Build an APISIX Plugin: file-logger Tutorial
On this page
- Introduction of file-logger plugin
- How to implement a plugin?
- Confirm the name and priority of the plugin
- Create a minimum executable plugin file
- Enable and test the plugin
- Write core function for the file-logger plugin
- Validate and add tests
- Validate the log records
- Add more tests for the plugin
- Summary
- References
This article documents the process of developing the
file-loggerplugin by a front-end engineer with no back-end experience.
Over the past few months, community users have added many plugins to Apache APISIX, enriching the Apache APISIX ecosystem. From the user’s point of view, the emergence of more diverse plugins is certainly a good thing, as they fulfill more of the user’s expectations for a gateway that is “one-stop” and “multi-functional” processor on top of perfecting the high performance and low latency of Apache APISIX.
None of the articles on the Apache APISIX blog seem to go into detail about the process of developing plugins. So let’s take a look at the process from the perspective of a plugin developer and see how a plugin is born!
This article documents the process of developing the file-logger plugin on API Gateway by a front-end engineer with no back-end experience. Before digging into the details of the implementation process, we will briefly introduce the functionality of file-logger.
Introduction of file-logger plugin
file-logger supports generating custom log formats using Apache APISIX plugin metadata. Users can append request and response data in JSON format to log files via the file-logger plugin, or push the log data stream to a specified location.
Imagine this: when monitoring the access log of a route, we not only care about the value of certain request and response data, but also want to write the log data to a specified file. This is where the file-logger plugin can be used to help achieve these goals.
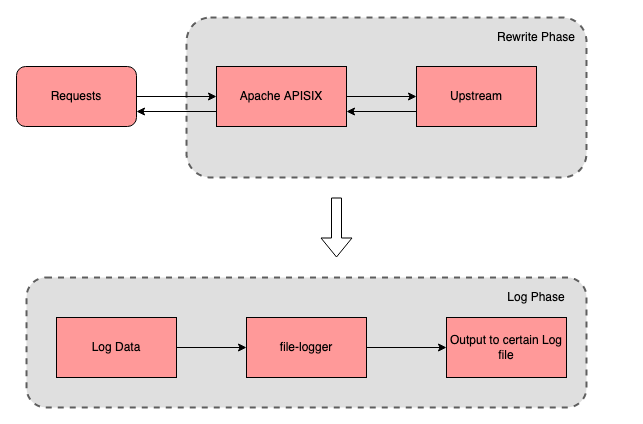
We can use file-logger to write log data to a specific log file to simplify the process of monitoring and debugging.
How to implement a plugin?
After introducing the features of file-logger, you will have a better understanding of this plugin. The following is a detailed explanation of how I, a front-end developer with no server-side experience, develop the plugin for Apache APISIX and add the corresponding tests for it.
Confirm the name and priority of the plugin
Open the Apache APISIX Plugin Development Guide and in order of priority you need to determine the following two things:
- Determine the plugin category.
- prioritize the plugins and update the
conf/config-default.yamlfile.
Since this development of file-logger is a logging type plugin, I refer to the name and ordering of the existing logging plugins for Apache APISIX and place file-logger here.
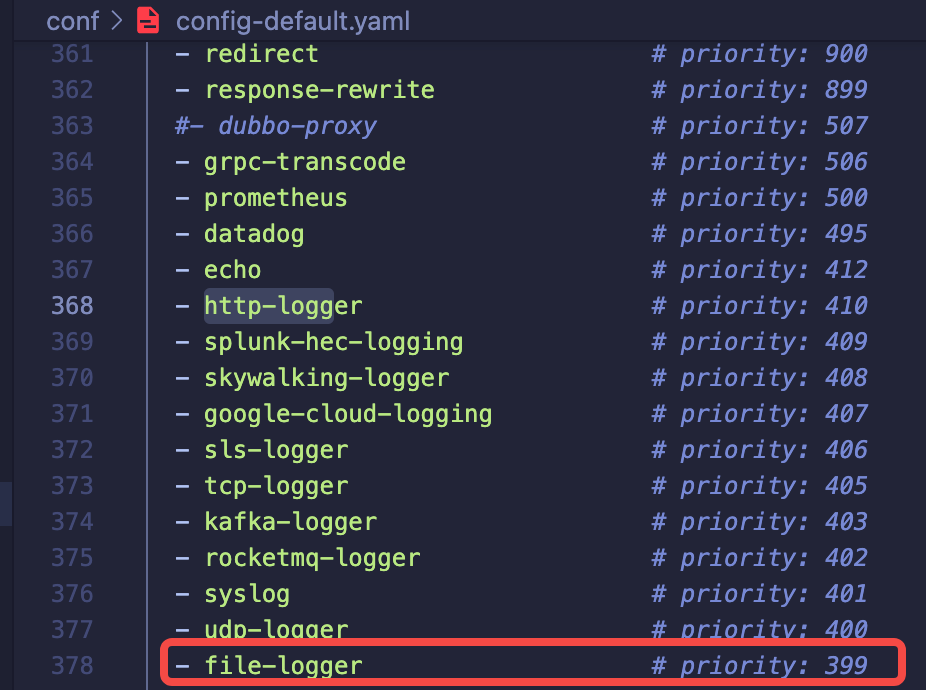
After consulting with other plugin authors and enthusiastic members of the community, the name file-logger and priority 399 of the plugin were finally confirmed.
Note that the priority of the plugin is related to the order of execution; the higher the value of the priority, the more forward the execution. And the ordering of plugin names is not related to the order of execution.
Create a minimum executable plugin file
After confirming the plugin name and priority, you can create our plugin code file in apisix/plugins/ directory . There are two points to note here:
- If the plugin code file is created directly in the
apisix/plugins/directory, there is no need to change theMakefilefile. - If your plugin has its own code directory, you need to update the
Makefilefile, please refer to the Apache APISIX Plugin Development Guide for detailed steps.
- Here we create the
file-logger.luafile in theapisix/plugins/ directory. - Then we will complete an initialized version based on the
example-plugin.
-- Introduce the module we need in the header
local log_util     =   require("apisix.utils.log-util")
local core         =   require("apisix.core")
local plugin       =   require("apisix.plugin")
local ngx          =   ngx

-- Declare the plugin's name
local plugin_name = "file-logger"

-- Define the plugin schema format
local schema = {
    type = "object",
    properties = {
        path = {
            type = "string"
        },
    },
    required = {"path"}
}

-- Plugin metadata schema
local metadata_schema = {
    type = "object",
    properties = {
        log_format = log_util.metadata_schema_log_format
    }
}


local _M = {
    version = 0.1,
    priority = 399,
    name = plugin_name,
    schema = schema,
    metadata_schema = metadata_schema
}

-- Check if the plugin configuration is correct
function _M.check_schema(conf, schema_type)
    if schema_type == core.schema.TYPE_METADATA then
        return core.schema.check(metadata_schema, conf)
    end
    return core.schema.check(schema, conf)
end

-- Log phase
function _M.log(conf, ctx)
    core.log.warn("conf: ", core.json.encode(conf))
    core.log.warn("ctx: ", core.json.encode(ctx, true))
end


return _M
Once the minimal available plugin file is ready, the plugin’s configuration data and request-related data can be output to the error.log file via core.log.warn(core.json.encode(conf)) and core.log.warn("ctx: ", core.json.encode(ctx, true)).
Enable and test the plugin
The following are a couple of steps for testing. In order to test whether the plugin can successfully print the plugin data and request-related data information we configured for it to the error log file, we need to enable the plugin and create a test route.
-
Prepare a test upstream locally (the test upstream used in this article is
127.0.0.1:3030/api/hello, which I created locally). -
Create a route via
curlcommand and enable our new plugin.curl http://127.0.0.1:9080/apisix/admin/routes/1 -H 'X-API-KEY: edd1c9f034335f136f87ad84b625c8f1' -X PUT -d ' { "plugins": { "file-logger": { "path": "logs/file.log" } }, "upstream": { "type": "roundrobin", "nodes": { "127.0.0.1:3030": 1 } }, "uri": "/api/hello" }'You will then see a status code
200, indicating that the route was successfully created. -
Run the
curlcommand to send a request to the route to test whether thefile-loggerplugin has been started.curl -i http://127.0.0.1:9080/api/hello HTTP/1.1 200 OK ... hello, world -
In the
logs/error.logfile there will be a record:
As you can see, the
path: logs/file.logthat we configured for the plugin in the conf parameter has been successfully saved. At this point we have successfully created a minimally usable plugin that prints theconfandctxparameters in the logging phase.After that, we can write the core functionality for the
file-logger.luaplugin directly in its code file. Here we can directly run theapisix reloadcommand to reload the latest plugin code without restarting Apache APISIX.
Write core function for the file-logger plugin
The main function of the file-logger plugin is to write log data. After asking other people from the community and checking the information, I learned about Lua’s IO library, and confirmed that the logic of the plugin’s function is roughly the following steps.
-
After each accepted request, output the log data to the
pathconfigured by the plugin.- First, get the value of
pathinfile-loggerthroughconfin the logging phase. - Then, the Lua IO library is used to create, open, write, refresh the cache, and close the file.
- First, get the value of
-
Handle errors such as open file failure, create file failure, etc.
local function write_file_data(conf, log_message) local msg, err = core.json.encode(log_message) if err then return core.log.error("message json serialization failed, error info : ", err) end local file, err = io_open(conf.path, 'a+') if not file then core.log.error("failed to open file: ", conf.path, ", error info: ", err) else local ok, err = file:write(msg, '\n') if not ok then core.log.error("failed to write file: ", conf.path, ", error info: ", err) else file:flush() end file:close() end end -
Referring to the source code of
http-loggerplugin, I finished the method of passing the log data to the write log data and some judgment and processing of the metadata.function _M.log(conf, ctx) local metadata = plugin.plugin_metadata(plugin_name) local entry if metadata and metadata.value.log_format and core.table.nkeys(metadata.value.log_format) > 0 then entry = log_util.get_custom_format_log(ctx, metadata.value.log_format) else entry = log_util.get_full_log(ngx, conf) end write_file_data(conf, entry) end
Validate and add tests
Validate the log records
Since the file-logger plugin was enabled when the test route was created and the path was configured as logs/file.log, we can simply send a request to the test route to verify the results of the log collection at this point.
curl -i http://127.0.0.1:9080/api/helloIn the corresponding logs/file.log we can see that each record is saved in JSON format. After formatting one of the data, it looks like this.
{
    "server":{
        "hostname":"....",
        "version":"2.11.0"
    },
    "client_ip":"127.0.0.1",
    "upstream":"127.0.0.1:3030",
    "route_id":"1",
    "start_time":1641285122961,
    "latency":13.999938964844,
    "response":{
        "status":200,
        "size":252,
        "headers":{
            "server":"APISIX\/2.11.0",
            "content-type":"application\/json; charset=utf-8",
            "date":"Tue, 04 Jan 2022 08:32:02 GMT",
            "vary":"Accept-Encoding",
            "content-length":"19",
            "connection":"close",
            "etag":"\"13-5j0ZZR0tI549fSRsYxl8c9vAU78\""
        }
    },
    "service_id":"",
    "request":{
        "querystring":{

        },
        "size":87,
        "method":"GET",
        "headers":{
            "host":"127.0.0.1:9080",
            "accept":"*\/*",
            "user-agent":"curl\/7.77.0"
        },
        "url":"http:\/\/127.0.0.1:9080\/api\/hello",
        "uri":"\/api\/hello"
    }
}
This concludes the verification of the collection of log records . The verification results indicate that the plugin was successfully launched and returned the appropriate data.
Add more tests for the plugin
For the add_block_preprocessor part of the code, I was confused when I first started writing it because I had no previous experience with Perl. After researching, I realized the correct way to use it: if we don’t write request assertions and no_error_log assertions in the data section, then the default assertion is as follows.
--- request
GET /t
--- no_error_log
[error]
After taking some other logging test files into account, I created the file file-logger.t in the t/plugin/ directory.
Each test file is divided by __DATA__ into a preamble section and a data section. Since there is no clear classification of test-related documents on the official website, you can refer to the related materials at the end of the article for more details. Here is one of the test cases that I have completed after referring to the relevant materials.
use t::APISIX 'no_plan';

no_long_string();
no_root_location();

add_block_preprocessor(sub {
    my ($block) = @_;

    if (! $block->request) {
        $block->set_value("request", "GET /t");
    }

    if (! $block->no_error_log && ! $block->error_log) {
        $block->set_value("no_error_log", "[error]");
    }
});


run_tests;

__DATA__

=== TEST 1: sanity
--- config
    location /t {
        content_by_lua_block {
            local configs = {
                -- full configuration
                {
                    path = "file.log"
                },
                -- property "path" is required
                {
                    path = nil
                }
            }

            local plugin = require("apisix.plugins.file-logger")

            for i = 1, #configs do
                ok, err = plugin.check_schema(configs[i])
                if err then
                    ngx.say(err)
                else
                    ngx.say("done")
                end
            end
        }
    }
--- response_body_like
done
property "path" is required
This concludes the plugin addition test session.
Summary
The above is the whole process of implementing an Apache APISIX plugin from 0 as a newbie in the backend. I did encounter a lot of pitfalls in the process of developing the plugin, but luckily there are many enthusiastic brothers in the Apache APISIX community to help me solve the problems, which made the development and testing of the file-logger plugin relatively smooth throughout. If you are interested in this plugin, or want to see the details of the plugin, you can refer to the official Apache APISIX documentation.
Apache APISIX is also currently working on other plugins to support more integration services, so if you’re interested, feel free to start a discussion in the GitHub Discussion, or via the mailing list.