Secure APISIX Dashboard Access with Keycloak
On this page
- Prerequisites
- Create a Certification Authority and Certificates
- Add the CA to Browsers
- Add the CA to the Operating System
- Install nginx-mainline
- Install Keycloak
- Prerequisites
- Keycloak Installation
- Automatic Keycloak Startup
- Create site and certificates for “https://k6k.h.net”
- Add Keycloak Reverse Proxy
- Apisix API Gateway
- Addresses for apisix-dashboard
- APISIX Deployment
- Accessing APISIX Dashboard
- Create Apisix resources for apisix-dashboard
- Create the certificate for “apisix.h.net”
- Apply certificates Nginx and enable HTTPS
- Create the load balancer definition
- Create “apisix-dashboard” route and upstream with apisix-dashboard
- Enable https in apisix
- Accessing the Protected APISIX Dashboard Route
- Recap
This article describes how to setup an external access to apisix-dashboard protecting the URL with authentication managed by a keycloak server.
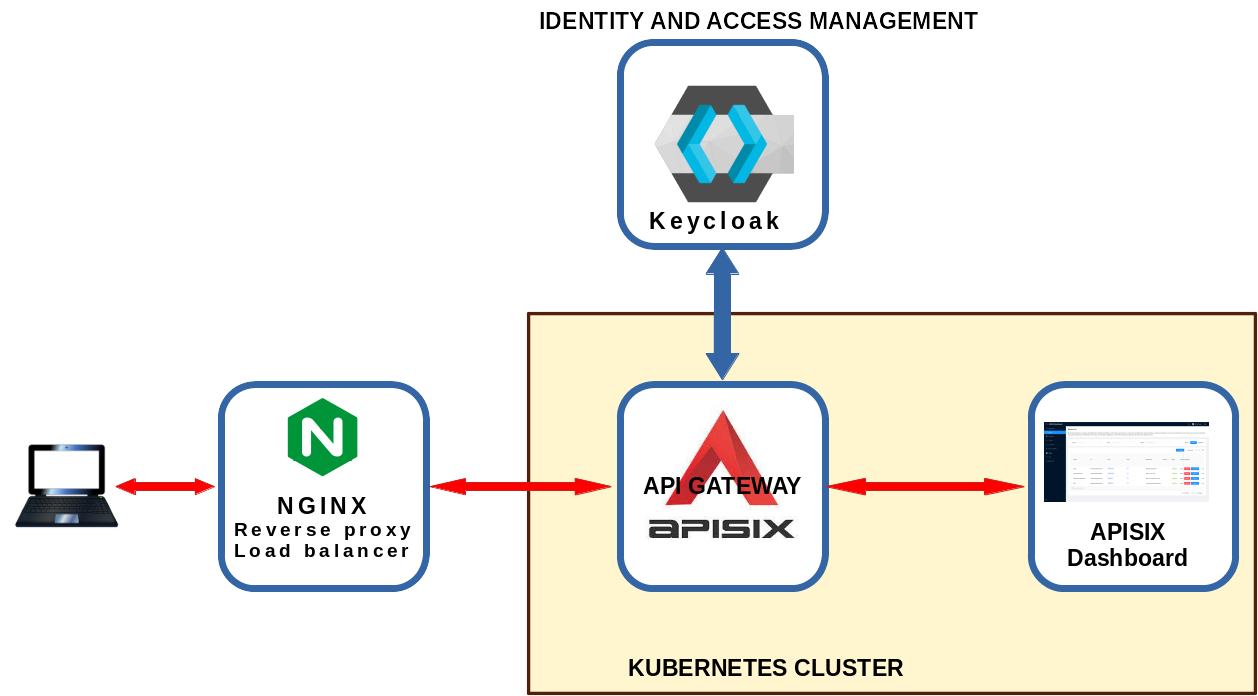
This article presents how to setup a framework where a user can access the Apisix-dashboard protected using an authentication system managed by a Keycloak server.
Prerequisites
Basic understanding of nginx reverse proxy, kubernetes, apisix and openid connect.
A lot of information on this matter can be found in “Use Keycloak with API Gateway to secure APIs” blog post
Here I’ll present instructions, examples, code and screenshots taken from my home lab.
The framework used in this article consists of some KVM virtual machines (from now VM):
| VM Name | Role | Services | Description |
|---|---|---|---|
| hdev | Development | kubectl, istioctl, helm | workstation from where manage the cluster |
| hserv | external services | DNS server, Nginx, Keycloak | services used by the cluster VM and external users |
| hkm | Kubernetes master | master node | control plane manager for K8S |
| hkw1 | K8S worker 1 | first worker node | node for hosting pods |
| hkw2 | K8S worker 2 | second worker node | node for hosting pods |
| hkw3 | K8S worker 3 | third worker node | node for hosting pods |
The hserv VM have two lan cards: one on an external lan to expose services and one an internal lan to communicate with the Kubernetes (from now K8S) cluster. All the other VM are only connected to the internal lan.
All the machines resolve the IP addresses using the DNS server installed on hserv
Hserv and hdev machines have a Graphical User Interface (from now GUI). All the other machines have only the character console.
The real framework is more complex. Here are reported only the relevant components
All machines use Ubuntu distribution but commands reported here should worh for other distributions with some modifications. The username used throughout this article will be “sysop” So the home directory will be indicated as “/home/sysop” or ”~/”.
Create a Certification Authority and Certificates
For all the VM the DNS server will resolve “apisix.h.net” to the external address of hserv. In all others machine that will access the the services exposed by hserv there will be a line in the “/etc/hosts” file resolving “apisix.h.net” to the external address of hserv.
Working on hserv
Create the directory for the entire project software
cd
mkdir H
Create the directory to hold the Certification authority (from now CA) certificates and the web sites certificates
cd ~/H
mkdir hservcerts
cd hservcerts
Create a private key for “hservca”
sudo openssl genrsa -out hservca.key 2048This generates a hservca.key key file. Using this fiile generate the CA certificate
sudo openssl req -x509 -new -nodes -key hservca.key -sha256 -days 3650 -out hservca.pemThis generates a hservca.pem” certificate file. These two files will be used to create the web sites certificates
Add the CA to Browsers
To be able to access the web sites with certidicates issued by this private CA, the CA certificate file have to be added to the web browser that will access these sites.
Working on hdev
Copy the “hservca.pem” file in any machine that will access these sites.
cd
cp ~/H/hservcerts/hservca.pem .
rcp hservca.pem mirto@_any_machine_name_://home/_your_username_/
For Firefox browser go to:
Preferences -> Privacy & Security -> Certificates -> View Certificates -> Authorities -> Importand import “hservca.pem” (remember to flag all options)
For Chromium or Chrome browsers go to:
Settings -> Advanced -> Privacy and security -> Manage certificates -> Authorities -> Import (flag all options)and import “hservca.pem” (remember to flag all options)
Add the CA to the Operating System
Working on hdev
Copy the “hservca.pem” file in the “/home/sysop” directory. Copy this file on any other machine that will use sertificates signed by this CA.
cd
cp ~/H/hservcerts/hservca.pem .
rcp hservca.pem mirto@_any_machine_name_://home/_your_username_/
Work on any machine
Then on any machine and hserv do the following:
cd
sudo mkdir -p /usr/share/ca-certificates/extra
sudo cp hservca.pem /usr/share/ca-certificates/extra/hservca.crt
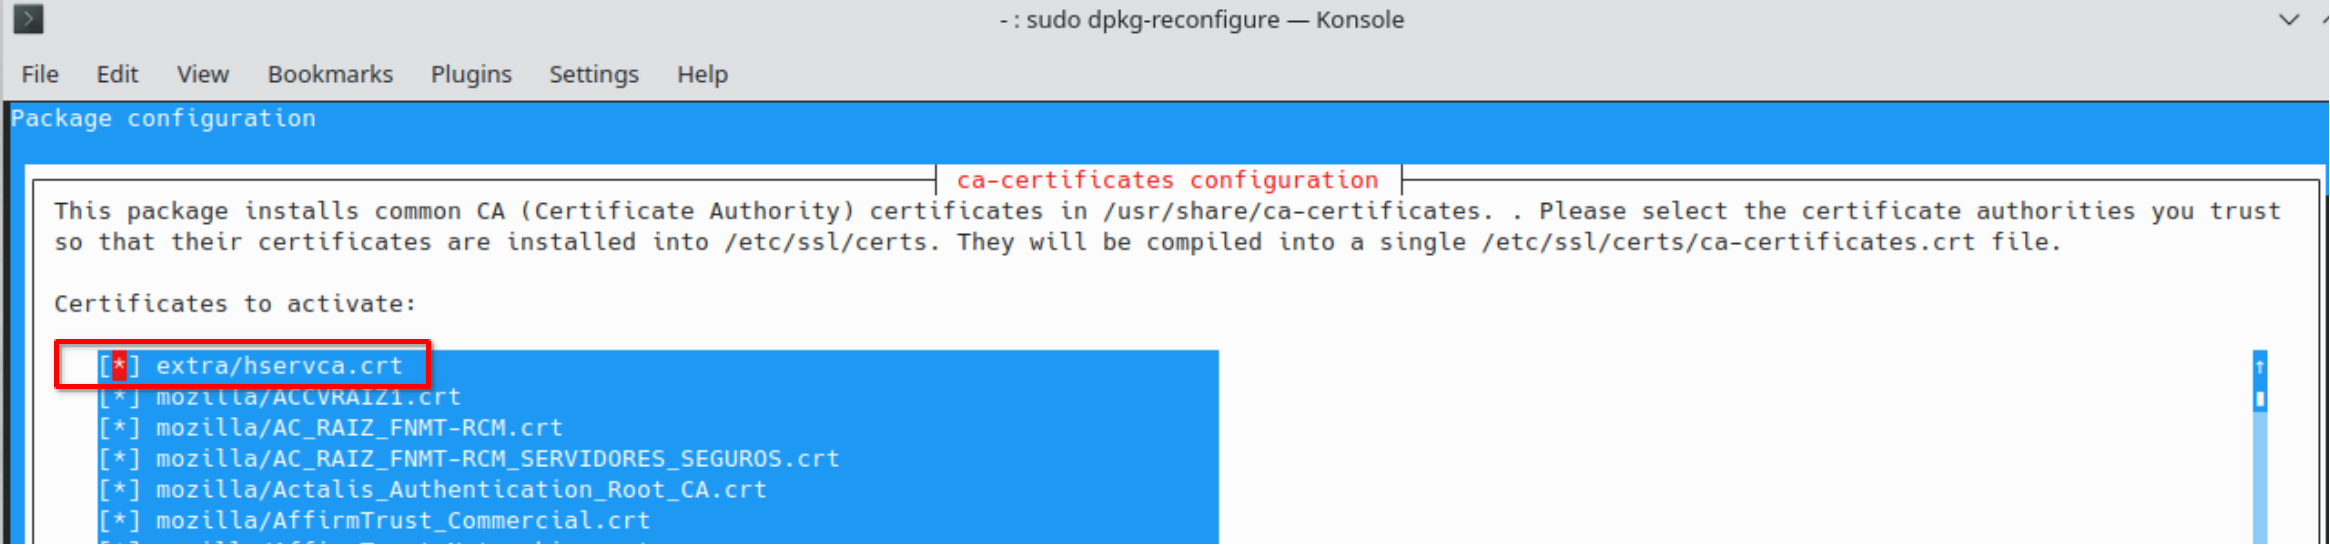
sudo dpkg-reconfigure ca-certificatesAttention:
• “dpkg-reconfigure ca-certificates” do not recognize the “.pem” extension. Copy the “hservca.pem” file to “hservca.crt”
• select the new certificate in “dpkg-reconfigure ca-certificates” (extra/hservca.crt is not selected)
Confirm that you want to proceed: select “yes” and click “Ok”. Select the new “hservca.crt” entry and click “Ok”
Install nginx-mainline
Verify the system is updated
sudo apt update
sudo apt full-upgrade
Install prerequisites
sudo apt install wget gnupg2 ca-certificates lsb-release ubuntu-keyring software-properties-common -yDownload the Nginx GPG key
wget -O- https://nginx.org/keys/nginx_signing.key | sudo gpg --dearmor | sudo tee /usr/share/keyrings/nginx-archive-keyring.gpgAdd the Nginx mainline apt repository
echo deb [arch=amd64,arm64 signed-by=/usr/share/keyrings/nginx-archive-keyring.gpg] http://nginx.org/packages/mainline/ubuntu `lsb_release -cs` nginx | sudo tee /etc/apt/sources.list.d/nginx-mainline.listPin the Nginx repository
echo -e "Package: *\nPin: origin nginx.org\nPin: release o=nginx\nPin-Priority: 900\n" | sudo tee /etc/apt/preferences.d/99nginxUpdate apt and install nginx
sudo apt update
sudo apt install nginx
Install Keycloak
Work on hserv
Prerequisites
Install jdk
sudo apt install default-jdkRemove anacron
sudo apt remove anacronReboot the hserv machine
Keycloak Installation
Go in base installation directory and get keycloak installation files (verify what is the last release)
cd ~/H/
wget https://github.com/keycloak/keycloak/releases/download/20.0.1/keycloak-20.0.1.zip
Extract the files
unzip keycloak-20.0.1.zipGo to the bin directory and start keycloak in standalone mode
cd ~/H/keycloak-20.0.1/bin/
./kc.sh start-dev
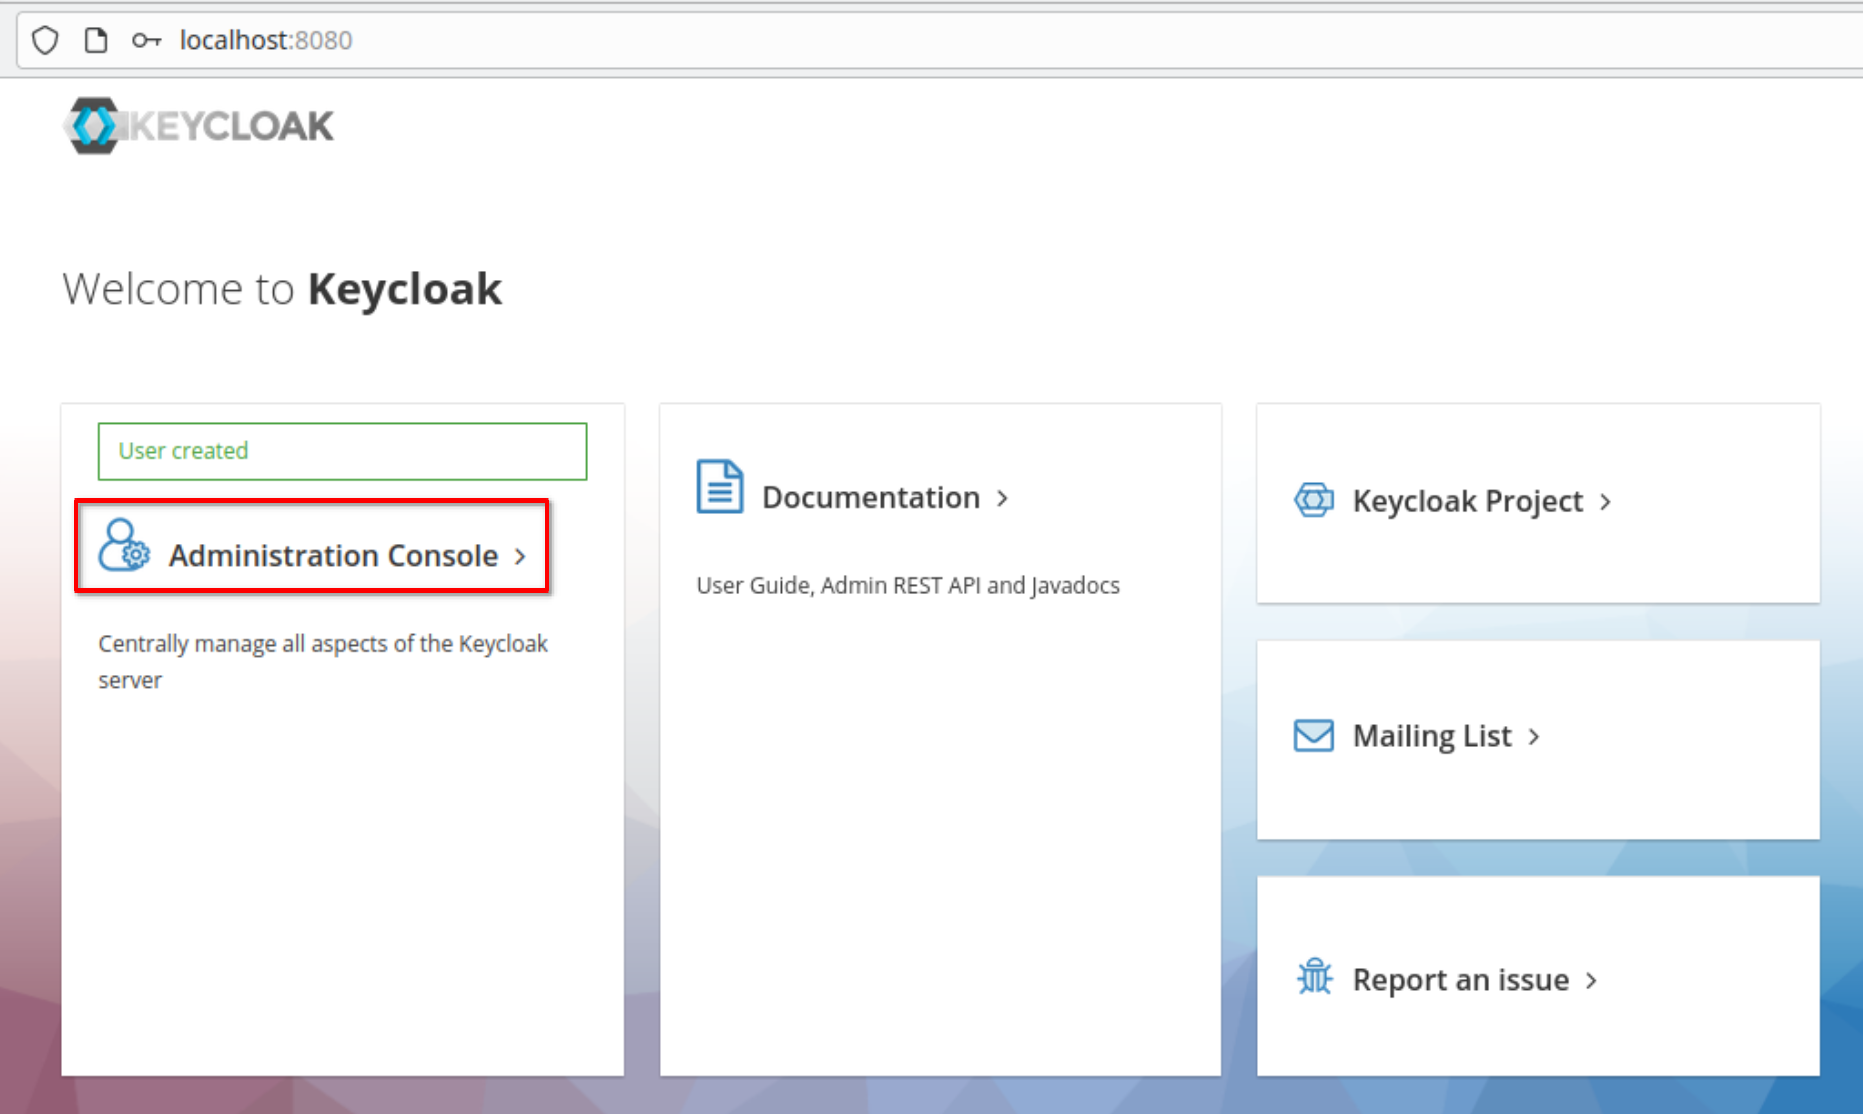
Verify that Keycloak is accessible from hserv at the URL “http://localhost:8080”
Create the admin user as name “admin” and password “1357Togo”
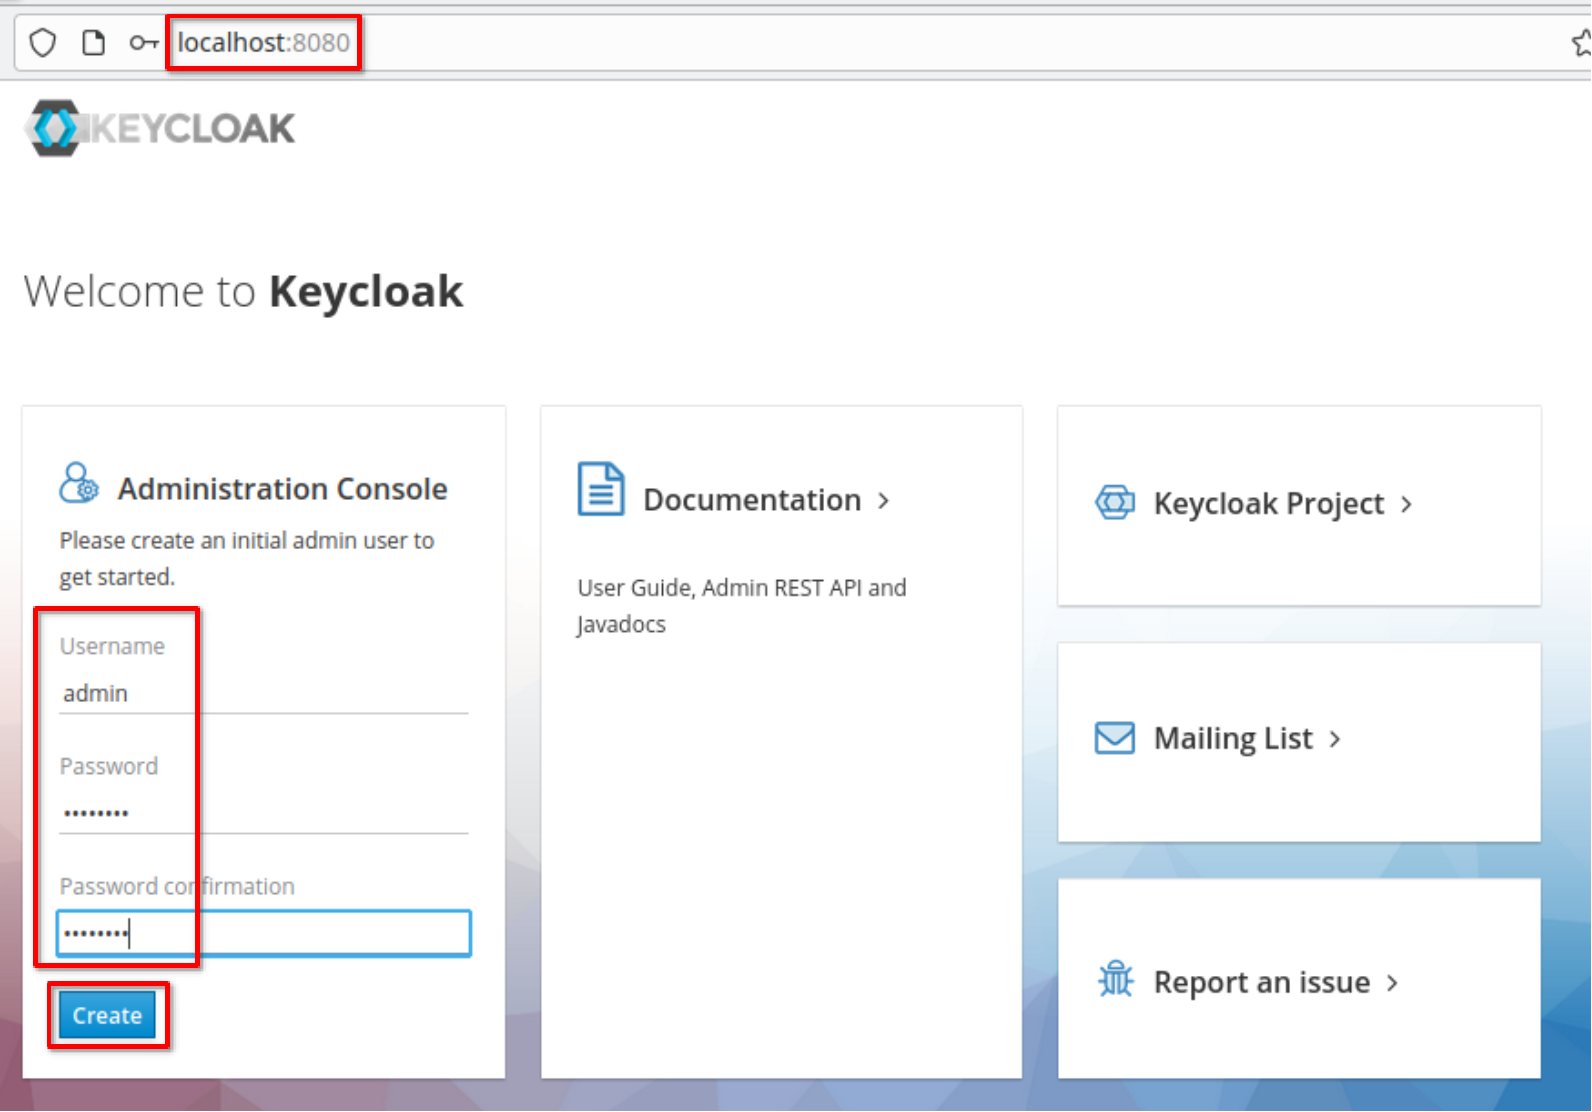
Go to the administration console
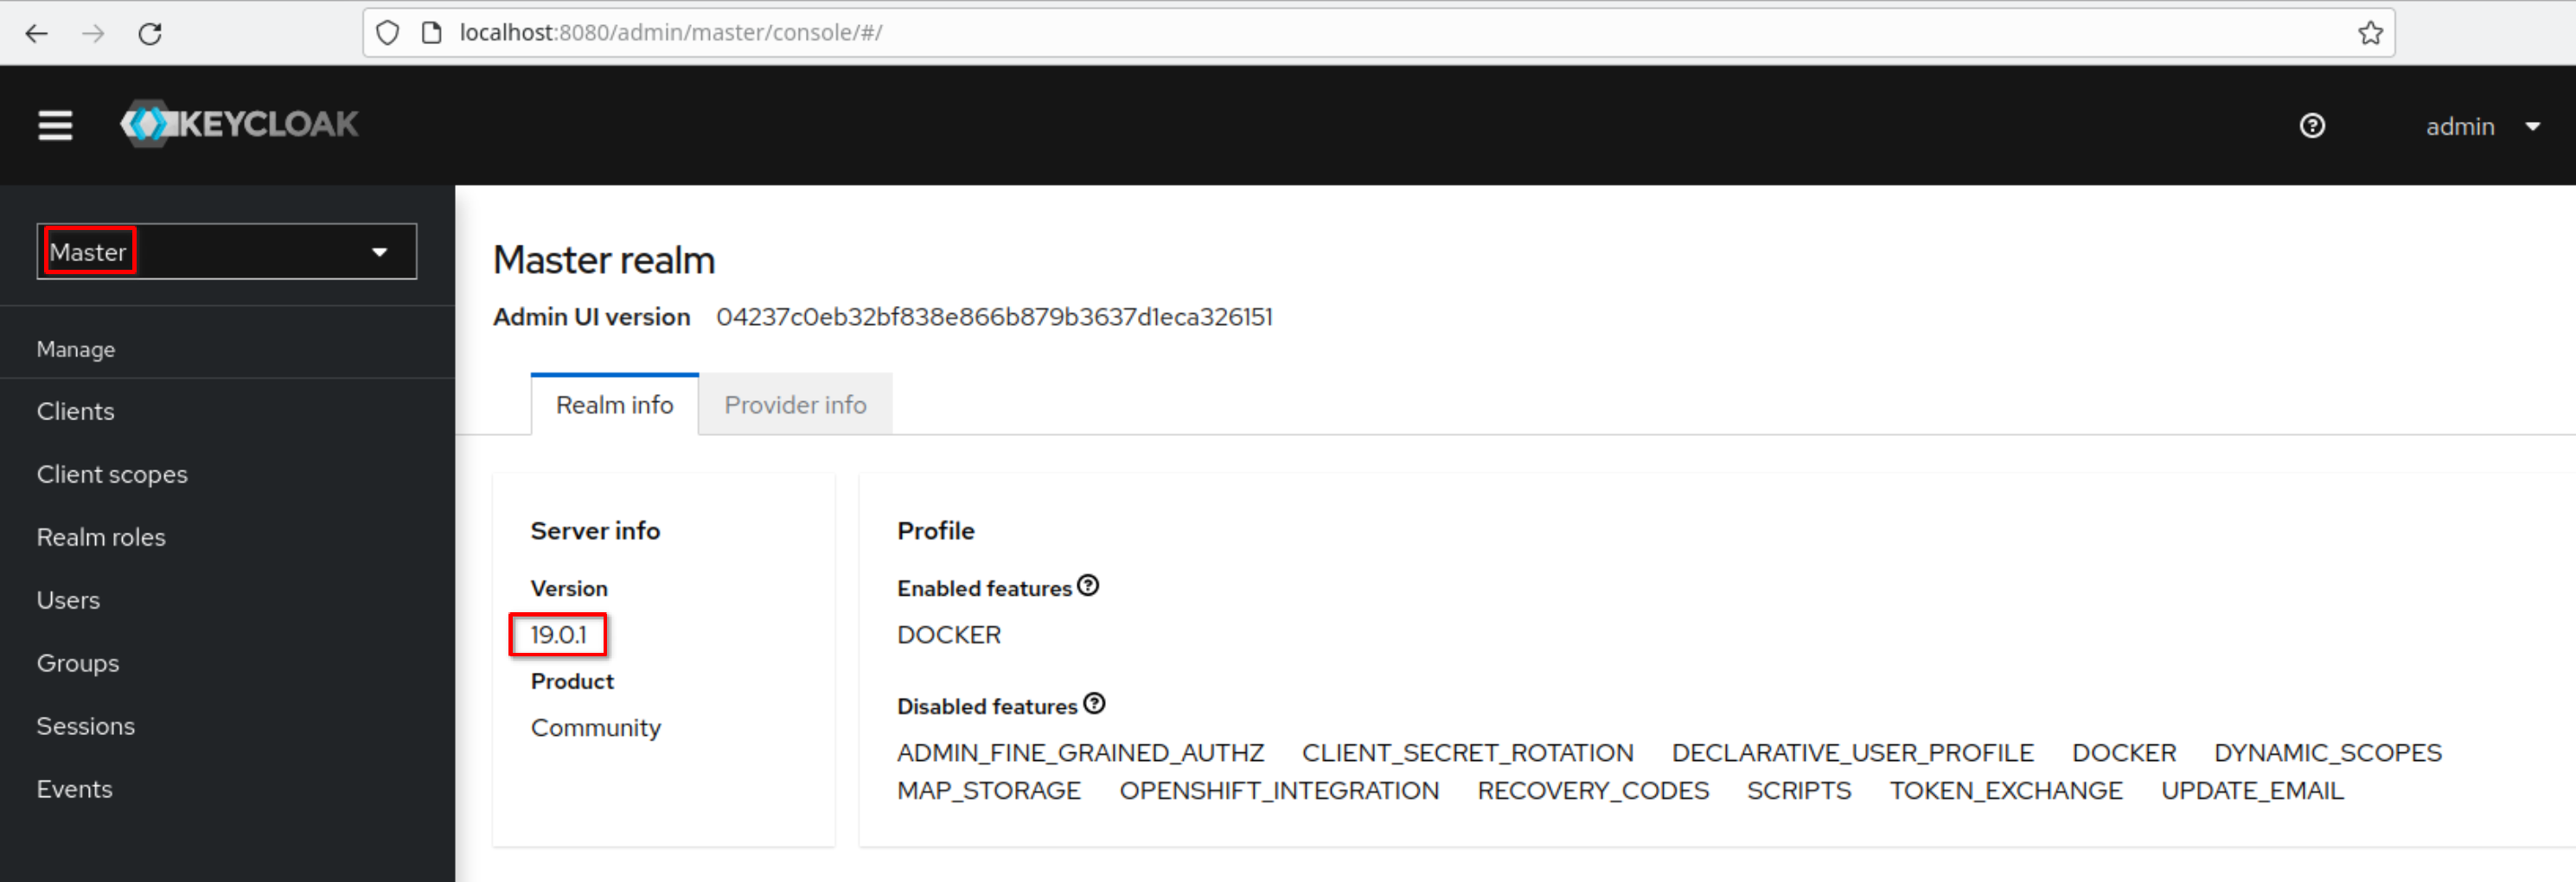
Login and the “Master” realm appears. Note the Keycloak version
Automatic Keycloak Startup
Work on hserv
Create in “/usr/lib/systemd/system” a file named “keycloak.service” containing
[Unit]
Description=keycloak service
After=network.service

[Service]
ExecStart=/home/sysop/H/keycloak-20.0.1/bin/kc.sh start-dev >/var/log/keycloak.log 2>&1
PIDFile=/var/run/keycloak.pid

[Install]
WantedBy=multi-user.target
Enable and activate the service
sudo systemctl enable keycloak
sudo systemctl start keycloak
Reboot hserv and verify Keycloak is accessible at startup
Create site and certificates for “https://k6k.h.net”
Work on hserv
Note that keycloak will be abbreviated in k6k
Verify that the keycloak address was added in “/etc/hosts” file on any machine that will access the service and is reported in the DNS server hosted on hserv.
The address used is the exsternal address o the hsrv machine
In the “/etc/hosts” fle add the line
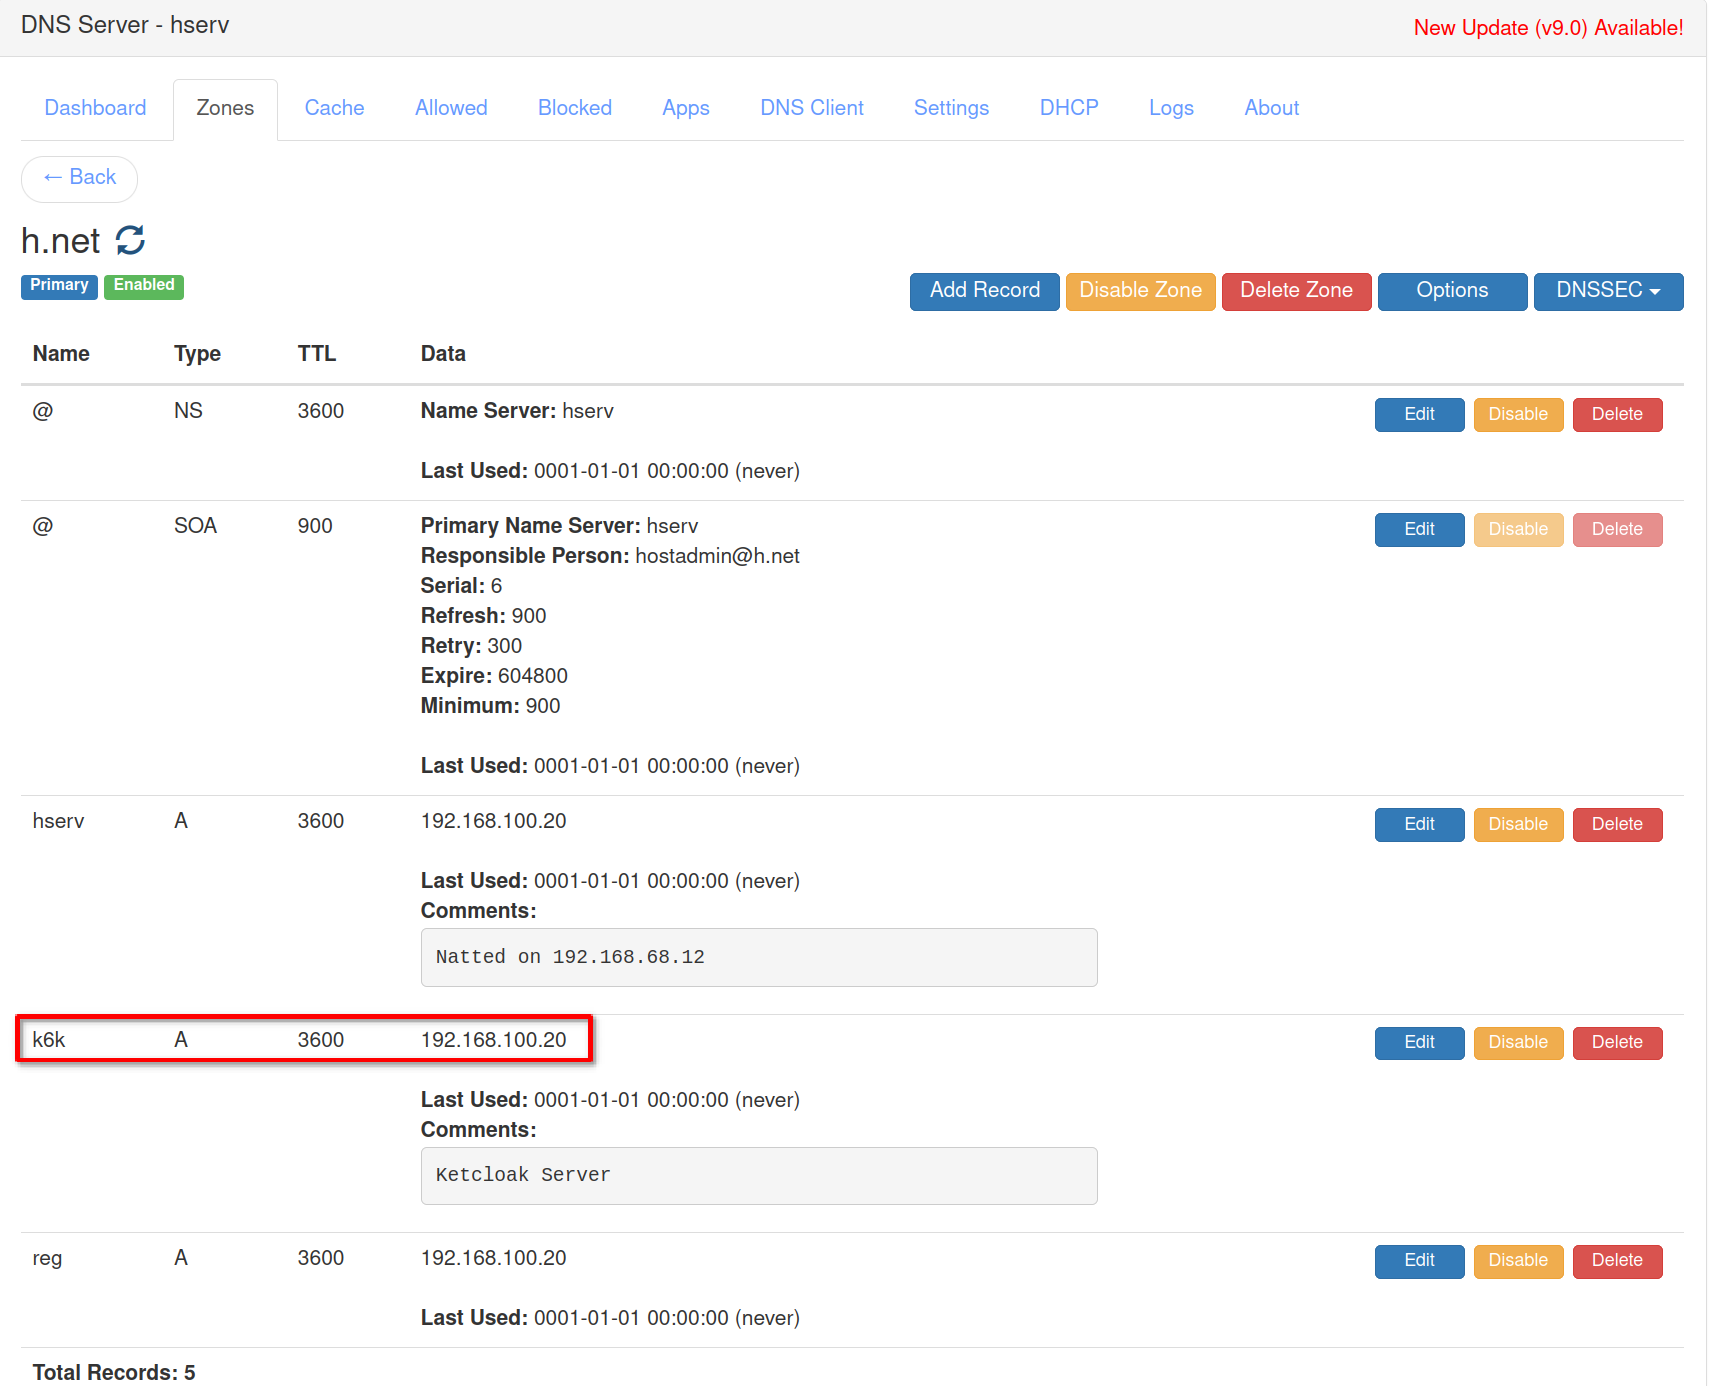
192.168.100.20 k6k k6k.h.netIn the DNS server on hserv add the k6k entry in the “h.net” DNS zone with address “192.168.100.20”
Create the certificate for “k6k.h.net”
In ”~/H/hservcerts” create a file called “k6kssl.cnf” containing
[req]
default_bits = 2048
distinguished_name = req_distinguished_name
prompt = no

[req_distinguished_name]
C = IT
ST = Italy
L = Rome
O = Busico Mirto
OU = Laboratory
CN = k6k.h.net

[v3_ca]
subjectAltName = @alt_names

[alt_names]
DNS.1 = k6k
# other names
DNS.2 = k6k.h.net
DNS.3 = k6k.ext.h.net
DNS.4 = k6k.int.h.net
Create the server private key and csr certificate request
cd ~/H/hservcerts
sudo openssl req -new -sha256 -nodes -newkey rsa:2048 -keyout k6k.key -out k6k.csr -config k6kssl.cnf
Create the certificate signed by the “hservca” certification authority
sudo openssl x509 -req -in k6k.csr -CA hservca.pem -CAkey hservca.key -CAcreateserial -out k6k.crt -sha256 -days 3650 -extfile k6kssl.cnf -extensions v3_caNow you have the key file k6k.key and the certificate file k6k.cert to be used in the nginx reverse proxy
Change the access rights for k6k.key file to permit nginx access
cd ~/H/hservcerts
sudo chmod a+r k6k.key
Create the root directory for k6k under nginx and create an index.html file in that directory
sudo mkdir /usr/share/nginx/k6k
sudo chmod 777 /usr/share/nginx/k6k
vi /usr/share/nginx/k6k/index.html
Put in index.html filke the “K6K” base document
<!DOCTYPE html>
<html>
<text>

<h1>K6K default page</h1>

</text>
</html>
In the directory “/etc/nginx/conf.d” create the file “k6k.conf”
cd /etc/nginx/conf.d
sudo vi k6k.conf
The file contains
server {

    listen 443 ssl http2;
    server_name k6k.h.net;
    root   /usr/share/nginx/k6k;

    access_log  /var/log/nginx/k6k.access.log;
    error_log  /var/log/nginx/k6k.error.log;

    ssl_certificate     /home/sysop/H/hservcerts/k6k.crt;
    ssl_certificate_key /home/sysop/H/hservcerts/k6k.key;

    location / {
        index  index.html index.htm;
    }

    error_page  404              /404.html;

    # redirect server error pages to the static page /50x.html
    #
    error_page   500 502 503 504  /50x.html;
    location = /50x.html {
        root   /usr/share/nginx/html;
    }

}
Restart Nginx
sudo systemctl restart nginxTry to access “https://k6k.h.net” from a browser: the k6k base document will be showed
Add Keycloak Reverse Proxy
In the directory “/etc/nginx/conf.d” change the file “k6k.conf” to proxy keycloak
cd /etc/nginx/conf.d
sudo vi k6k.conf
The file now contains
server {

    listen 443 ssl http2;
    server_name k6k.h.net;
    root   /usr/share/nginx/k6k;

    access_log  /var/log/nginx/k6k.access.log;
    error_log  /var/log/nginx/k6k.error.log;

    ssl_certificate     /home/sysop/H/hservcerts/k6k.crt;
    ssl_certificate_key /home/sysop/H/hservcerts/k6k.key;

    proxy_set_header Host $host;
    proxy_set_header X-Real-IP $remote_addr;
    proxy_set_header X-Forwarded-For $proxy_add_x_forwarded_for;
    proxy_set_header X-Forwarded-Host $host;
    proxy_set_header X-Forwarded-Proto $scheme;

    location / {
        proxy_pass http://127.0.0.1:8080;
    }

    error_page  404              /404.html;

    # redirect server error pages to the static page /50x.html
    #
    error_page   500 502 503 504  /50x.html;
    location = /50x.html {
        root   /usr/share/nginx/html;
    }

}
Restart Nginx
sudo systemctl restart nginxRebuild keycloak for production
cd ~/H/keycloak-20.0.1/bin/
./kc.sh --verbose build
Change in “/usr/lib/systemd/system” the file named “keycloak.service” with this content
[Unit]
Description=keycloak service
After=network.service

[Service]
ExecStart=/home/sysop/H/keycloak-20.0.1/bin/kc.sh start --proxy edge --hostname-strict=false >/var/log/keycloak.log 2>&1
PIDFile=/var/run/keycloak.pid

[Install]
WantedBy=multi-user.target
Enable and activate the service
sudo systemctl daemon-reload
sudo systemctl restart keycloak
Apisix API Gateway
Addresses for apisix-dashboard
The address used is the exsternal address o the hsrv machine
In the “/etc/hosts” file of any machine accessing the cluster through the nginx reverse proxy add the line
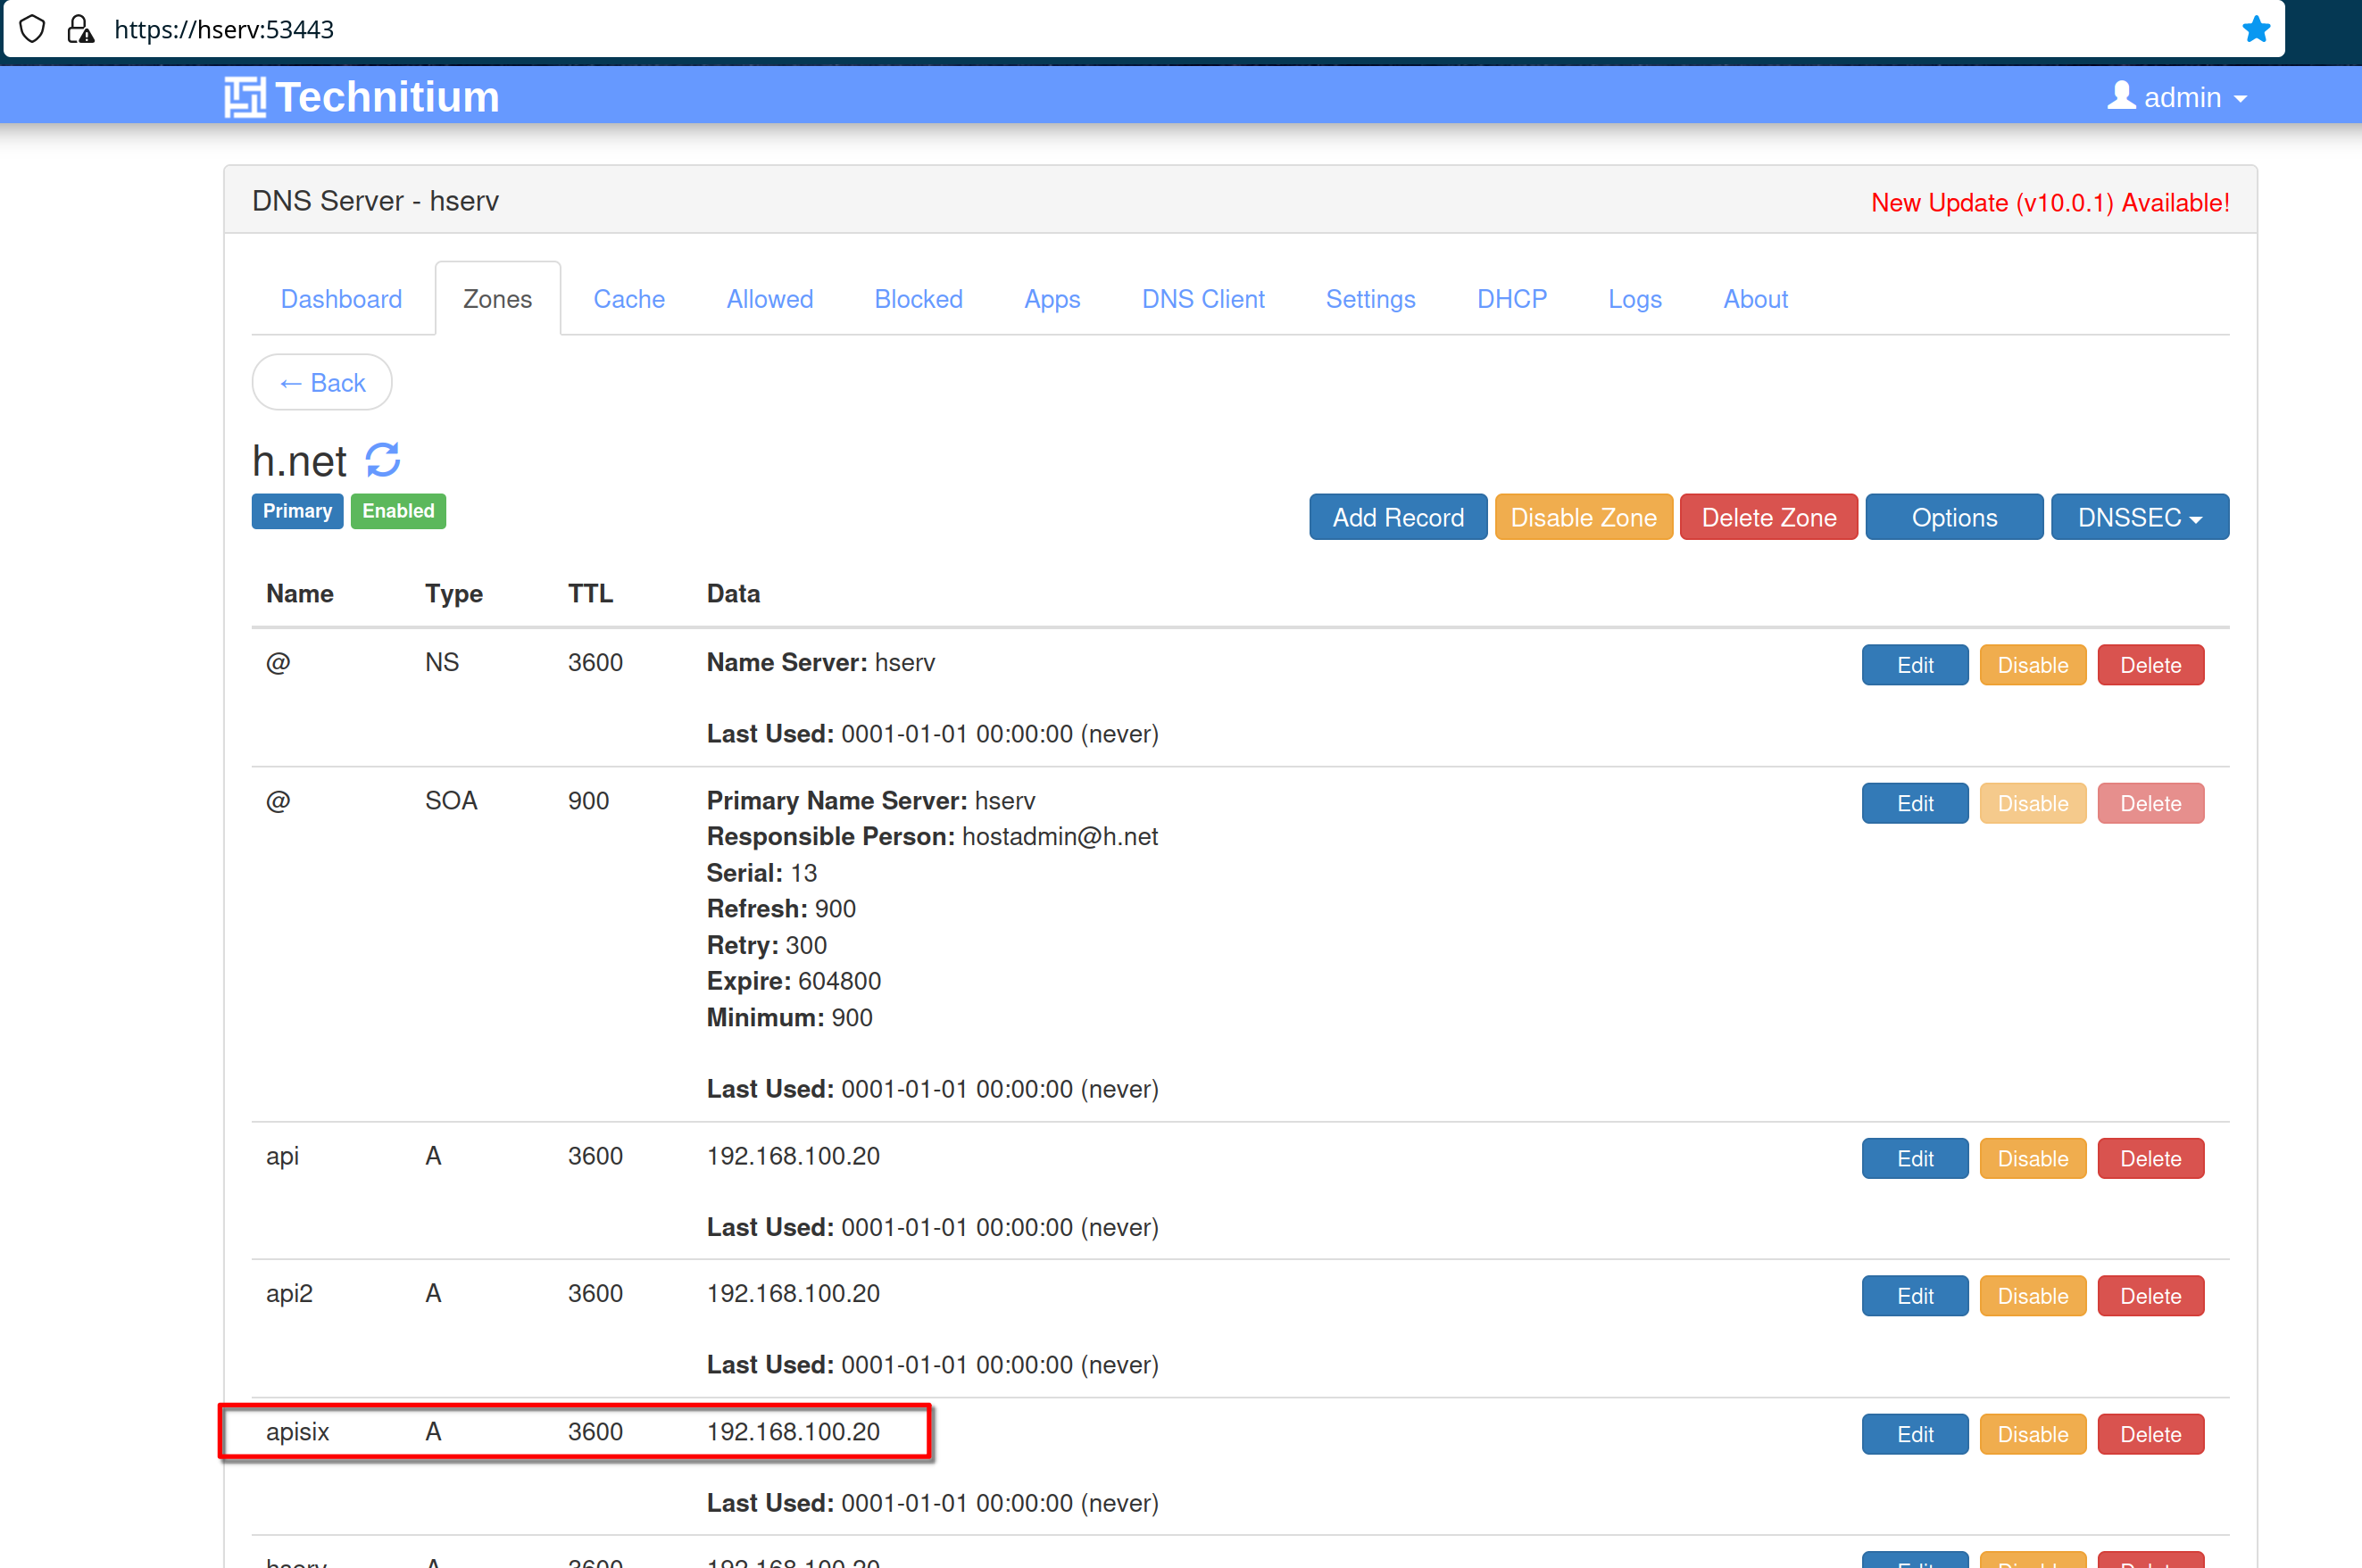
192.168.100.20 apisix apisix.h.netIn the DNS server on hserv add the apisix entry in the “h.net” DNS zone with address “192.168.100.20”
APISIX Deployment
Work on hdev
create a namespace for apisix
kubectl create ns apisixAdd apisix helm repo
mkdir ~/H/software/apisisx
cd ~/H/software/apisisx
helm repo add apisix https://charts.apiseven.com
helm repo update
helm repo list
work on hserv
On “hserv” create the CA kubernetes secret (make readable hservca.key)
cd ~/H/hservcerts
ls -lh hservca.*
kubectl -n apisix create secret generic hservcacert --from-file=cert=./hservca.pem
kubectl describe secret hservcacert -n apisix
work on hdev
Get the core_dns service address and port (in this example 10.43.0.10
)sysop@hdev:~/H/software/apisisx$ kubectl get svc -n kube-system
NAME TYPE CLUSTER-IP EXTERNAL-IP PORT(S) AGE
kube-dns ClusterIP 10.43.0.10 <none> 53/UDP,53/TCP,9153/TCP 97d
metrics-server ClusterIP 10.43.64.71 <none> 443/TCP 97d
docker-registry LoadBalancer 10.43.183.18 192.168.101.21,192.168.101.22,192.168.101.23,192.168.101.24 5000:31397/TCP 92d
sysop@hdev:~/H/software/apisisx$Get the apisic helm chart the default values and put the output in a file named apisix-values.yaml then edit this file
cd ~/H/software/apisisx
helm show values apisix/apisix > apisix-values.yaml
vi apisix-values.yaml
You have to change:
- the gateway type to LoadBalancer (my home lab is powered off every day and with the default gateway type of NodePort the Apisix gateway starts every day on a different node changing IP address)
- set the tls section to use the kubernetes secret with the private CA reference
- set the discovery section to use the kube-dns address found before (doing this enables apisix upstream definition to use the service name instead of the IP address)
- set a session secret in the httpSrv section as a workaround cited in the #8068 feature request
- enable (set to true) apisix dashboard and ingress-controller
The relevant tiles changed are:
gateway:
  type: LoadBalancer
...
  tls:
    enabled: true
    servicePort: 443
    containerPort: 9443
    existingCASecret: "hservcacert"
    certCAFilename: "cert"
...
discovery:
  enabled: true
  registry:
    dns:
        servers:
            - "10.43.0.10:53"
...
   httpSrv: |
    set $session_secret 0123456789a5bac9bb3c868ec8b202e93;
...

dashboard:
  enabled: true

ingress-controller:
  enabled: true
Install apisix using the new values.yaml file
helm install apisix apisix/apisix -f apisix-values.yaml \
--set ingress-controller.config.apisix.serviceNamespace=apisix \
--set ingress-controller.config.apisix.serviceName=apisix-admin \
--set ingress-controller.config.kubernetes.apisixRouteVersion=apisix.apache.org/v2beta3 \
--namespace apisix
Wait for the pods to start (it can take some time)
kubectl -n apisix wait --for=condition=Ready pods --all
kubectl get pods -n apisix
When all the Apisix pods will be in Running state the installation is completed
Accessing APISIX Dashboard
Work on hdev
Port forward apisix-dashboard
kubectl -n apisix port-forward service/apisix-dashboard 9090:80The command output should be something like
sysop@hdev:~$ kubectl -n apisix port-forward service/apisix-dashboard 9090:80
Forwarding from 127.0.0.1:8080 -> 9000
Forwarding from [::1]:8080 -> 9000
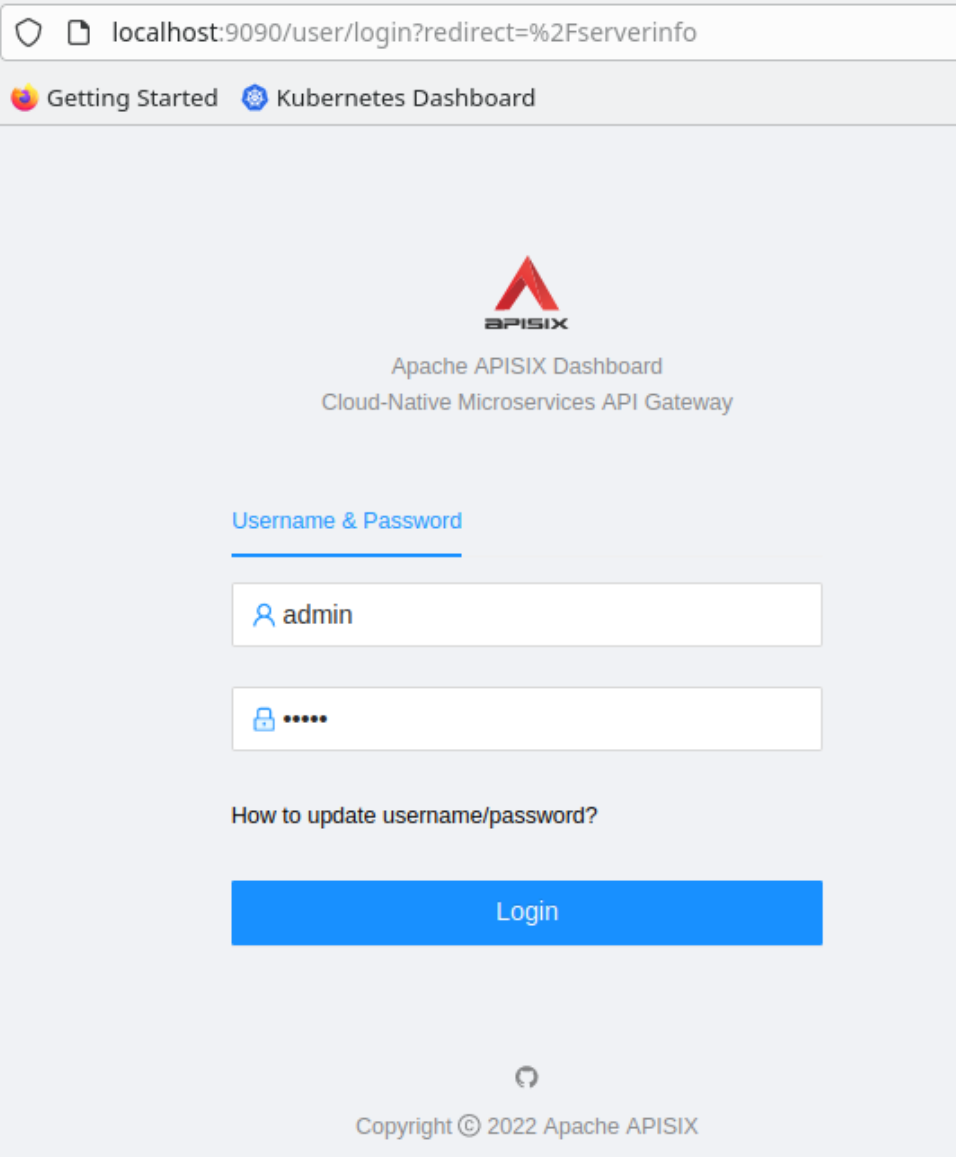
Then access the dashboard on “hdev” pointing the web browser to the url “http://localhost:9090” Login with “admin / admin”
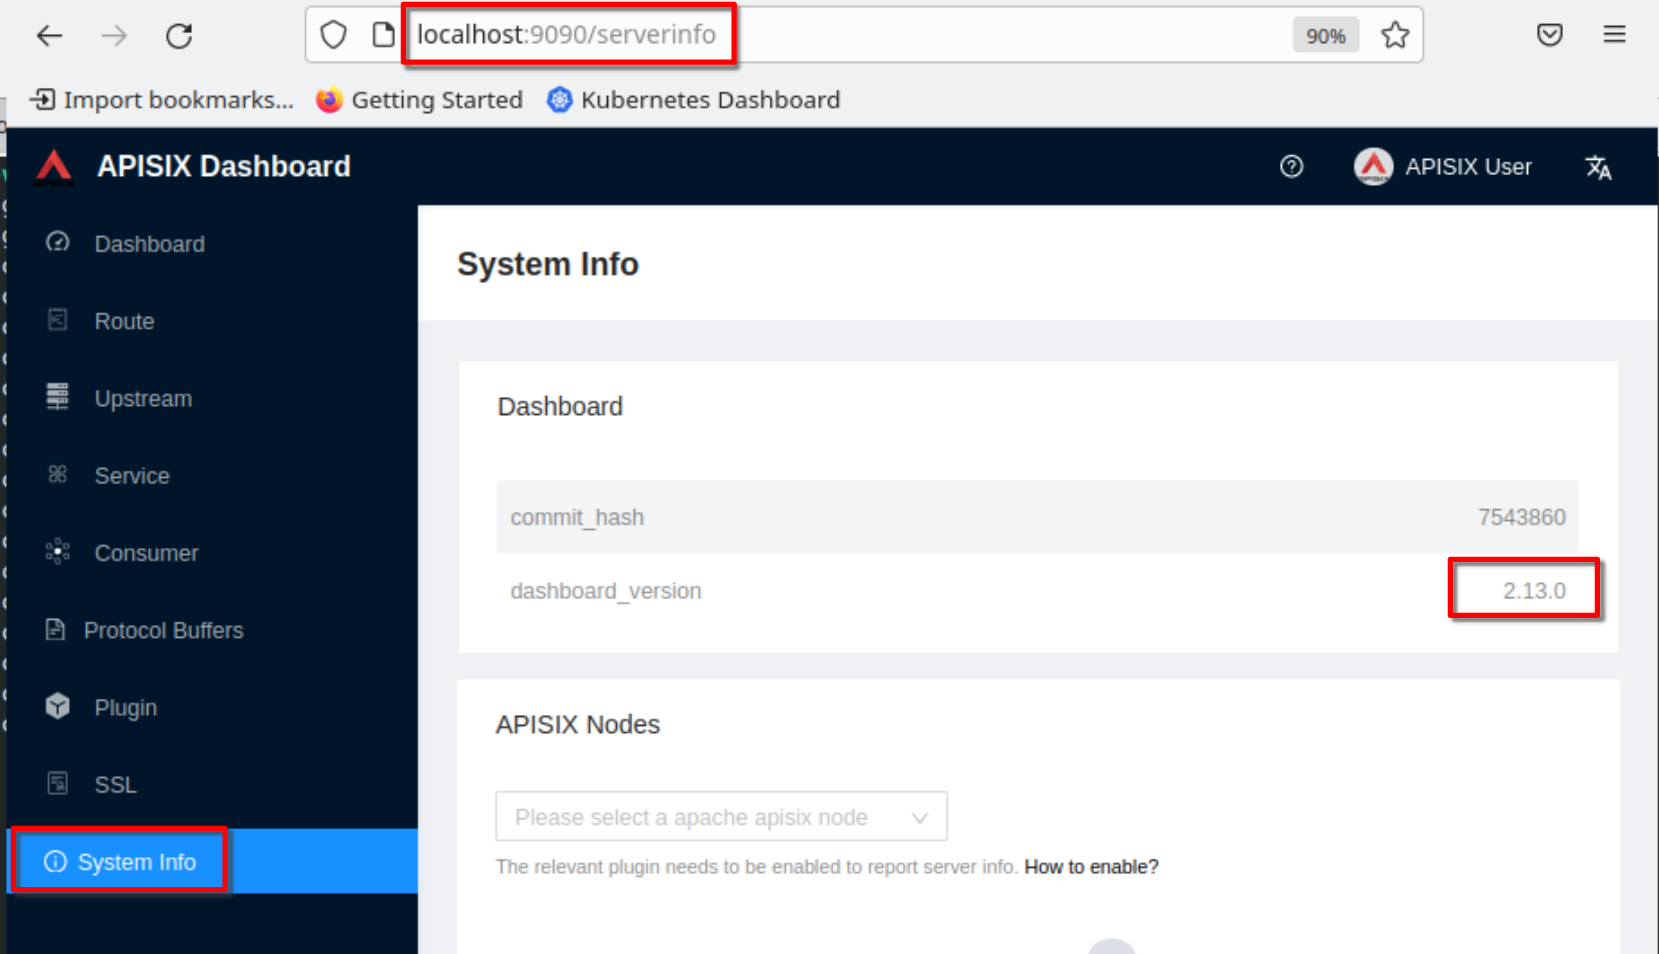
Verify the dashboard version
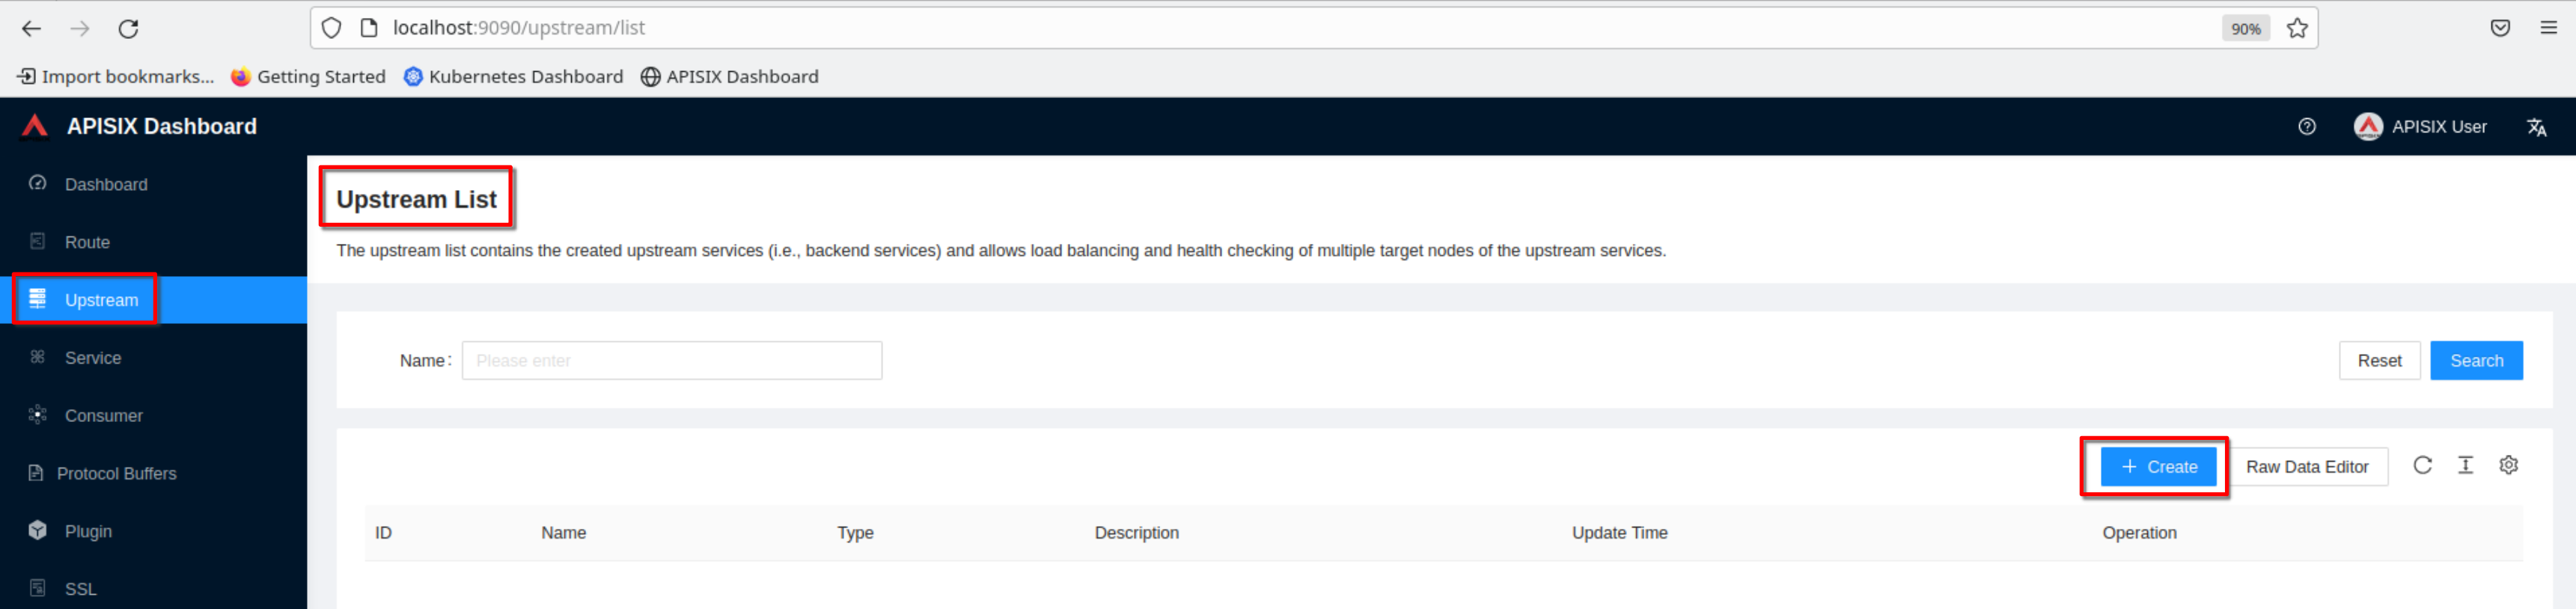
Create Apisix resources for apisix-dashboard
Create the certificate for “apisix.h.net”
Work on hserv
In the “~/H/hservcerts/” folder create the key and certificate for apisix.h.net
Create a file called “apisixssl.cnf” containing
[req]
default_bits = 2048
distinguished_name = req_distinguished_name
prompt = no

[req_distinguished_name]
C = IT
ST = Italy
L = Rome
O = Busico Mirto
OU = Laboratory
CN = apisix.h.net

[v3_ca]
subjectAltName = @alt_names

[alt_names]
DNS.1 = apisix
# other names
DNS.2 = apisix.h.net
DNS.3 = apisix.ext.h.net
DNS.4 = apisix.int.h.net
Create the server private key and csr
sudo openssl req -new -sha256 -nodes -newkey rsa:2048 -keyout apisix.key -out apisix.csr -config apisixssl.cnfCreate the certificate file.
sudo openssl x509 -req -in apisix.csr -CA hservca.pem -CAkey hservca.key -CAcreateserial -out apisix.crt -sha256 -days 3650 -extfile apisixssl.cnf -extensions v3_caChange the access rights for apisix key to permit nginx access
sudo chmod a+r apisix.keyApply certificates Nginx and enable HTTPS
Work on hserv
Create the root directory for apisix under nginx and create an index.html file in that directory
sudo mkdir /usr/share/nginx/apisix
sudo chmod 777 /usr/share/nginx/apisix
vi /usr/share/nginx/apisix/index.html
Create a index.html file containing
<!DOCTYPE html>
<html>
<text>

<h1>apisix https default page</h1>

</text>
</html>
In the directory “/etc/nginx/conf.d” create the file named “apisix.conf”
cd /etc/nginx/conf.d
sudo vi apisix.conf
Put in the “apisix.conf” file this content
server {

    listen 443 ssl http2;
    server_name apisix.h.net;
    root   /usr/share/nginx/apisix;

    access_log  /var/log/nginx/apisix.access.log;
    error_log  /var/log/nginx/apisix.error.log;

    ssl_certificate     /home/sysop/H/hservcerts/apisix.crt;
    ssl_certificate_key /home/sysop/H/hservcerts/apisix.key;

    location / {
        index  index.html index.htm;
    }

    error_page  404              /404.html;

    # redirect server error pages to the static page /50x.html
    #
    error_page   500 502 503 504  /50x.html;
    location = /50x.html {
        root   /usr/share/nginx/html;
    }

}
Restart Nginx
sudo systemctl restart nginxAdd the apisix line in “/etc/hosts” on any machine that will access apisix-dashboard
192.168.100.20 apisix.h.netAdd the apisix A record in the DNS in “h.net” zone

Access “https://apisix.h.net” from a browser and the apisix default page should be presented
Create the load balancer definition
Work on hserv
In the directory “/etc/nginx/conf.d” modify the file “apisix.conf”
cd /etc/nginx/conf.d
sudo vi apisix.conf
Put in the file this content
upstream hcluster {
    ip_hash;
    server 192.168.101.22:443;
    server 192.168.101.23:443;
    server 192.168.101.24:443;
}

server {

    listen 443 ssl http2;
    server_name apisix.h.net;
    root   /usr/share/nginx/apisix;

    access_log  /var/log/nginx/apisix.access.log;
    error_log  /var/log/nginx/apisix.error.log;

    ssl_certificate     /home/sysop/H/hservcerts/apisix.crt;
    ssl_certificate_key /home/sysop/H/hservcerts/apisix.key;

    proxy_busy_buffers_size   512k;
    proxy_buffers   4 512k;
    proxy_buffer_size   256k;

    proxy_set_header Host $host;
    proxy_ssl_server_name on;
    proxy_ssl_name apisix.h.net;
    proxy_set_header X-Real-IP $remote_addr;
    proxy_set_header X-Forwarded-For $proxy_add_x_forwarded_for;
    proxy_set_header X-Forwarded-Host $host;
    proxy_set_header X-Forwarded-Proto $scheme;

    location / {
        proxy_pass https://hcluster;
    }

    error_page  404              /404.html;

    # redirect server error pages to the static page /50x.html
    #
    error_page   500 502 503 504  /50x.html;
    location = /50x.html {
        root   /usr/share/nginx/html;
    }

}
Note:
the lines
upstream hcluster {
    ip_hash;
    server 192.168.101.22:443;
    server 192.168.101.23:443;
    server 192.168.101.24:443;
}
use the internal address of the three kubernetes worker nodes and it is necessary to specify the 443 port to enable https traffic
The lines
    proxy_busy_buffers_size   512k;
    proxy_buffers   4 512k;
    proxy_buffer_size   256k;
are required because, after the Keycloak authentication, the apisix server replyes with the state in the URL.
With the default values nginx replies with a “response too big” error
Restart Nginx
sudo systemctl restart nginxAccess “https://apisix.h.net” from a browser. You should receive page not found error because there is no route in Apisix
Create “apisix-dashboard” route and upstream with apisix-dashboard
Work on hdev
port forward apisix-dashboard and access it at “http://localhost:9090” and login with “admin” / “admin“
kubectl -n apisix port-forward service/apisix-dashboard 9090:80Find the apisix-dashboard service name and port
sysop@hdev:~/H/hservcerts$ kubectl get svc -n apisix
NAME                        TYPE           CLUSTER-IP      EXTERNAL-IP                                                   PORT(S)                      AGE
apisix-etcd-headless        ClusterIP      None            <none>                                                        2379/TCP,2380/TCP            12h
apisix-etcd                 ClusterIP      10.43.75.4      <none>                                                        2379/TCP,2380/TCP            12h
apisix-ingress-controller   ClusterIP      10.43.170.105   <none>                                                        80/TCP                       12h
apisix-dashboard            ClusterIP      10.43.48.202    <none>                                                        80/TCP                       12h
apisix-admin                ClusterIP      10.43.169.123   <none>                                                        9180/TCP                     12h
apisix-gateway              LoadBalancer   10.43.161.47    192.168.101.21,192.168.101.22,192.168.101.23,192.168.101.24   80:30508/TCP,443:32653/TCP   12h
sysop@hdev:~/H/hservcerts$
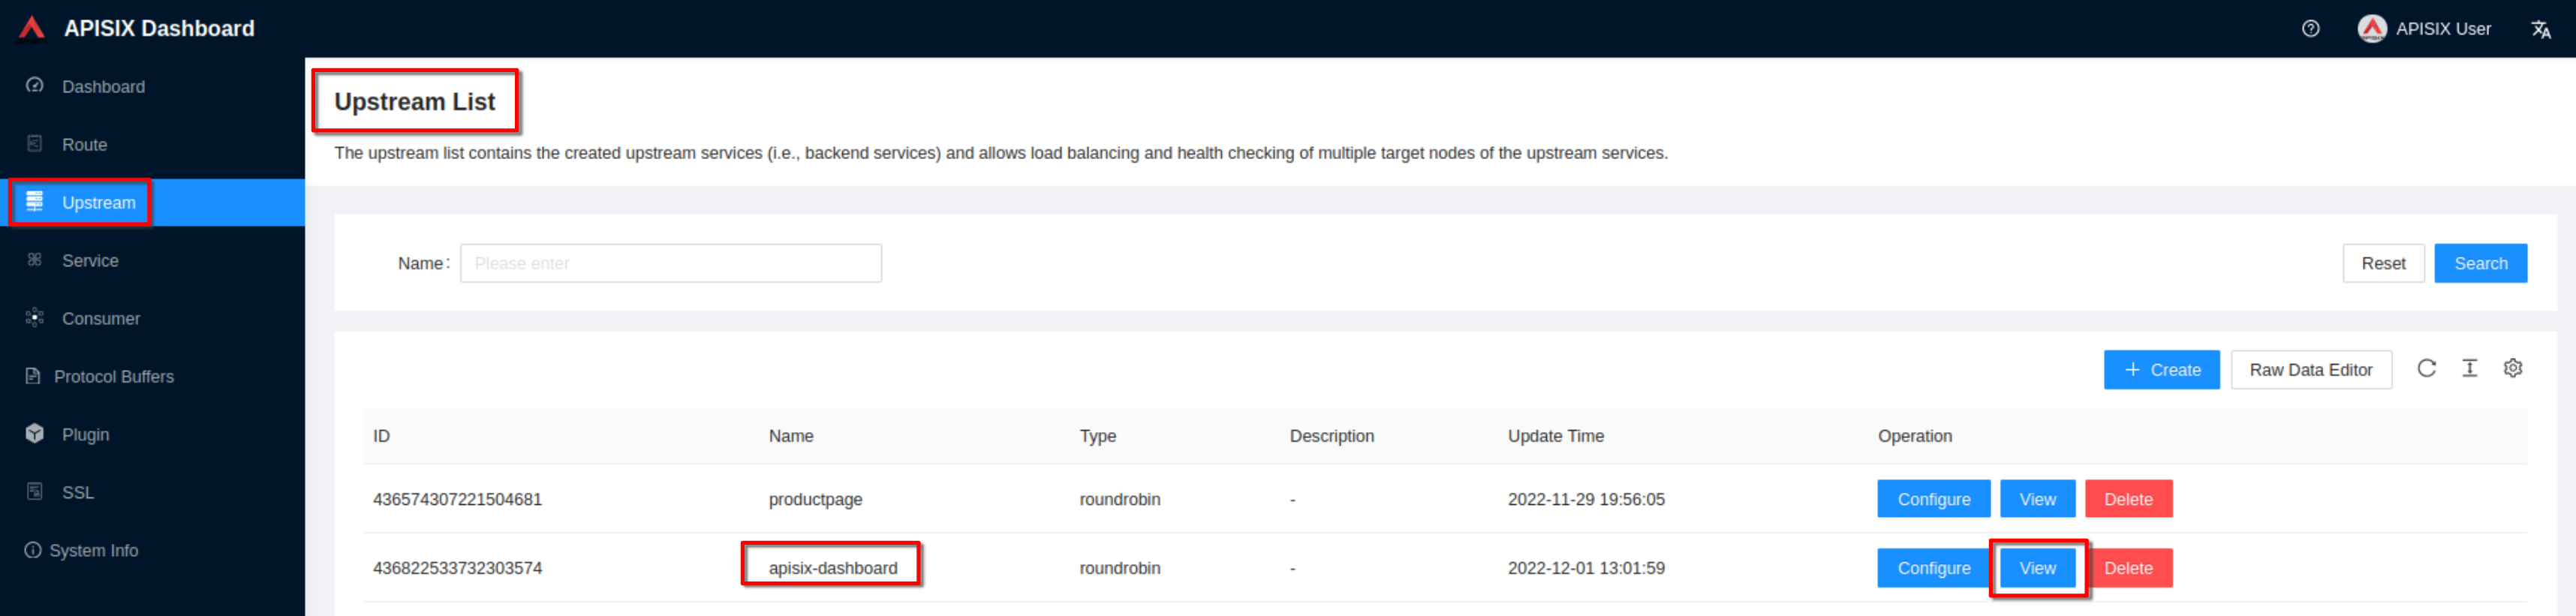
Create an upstream
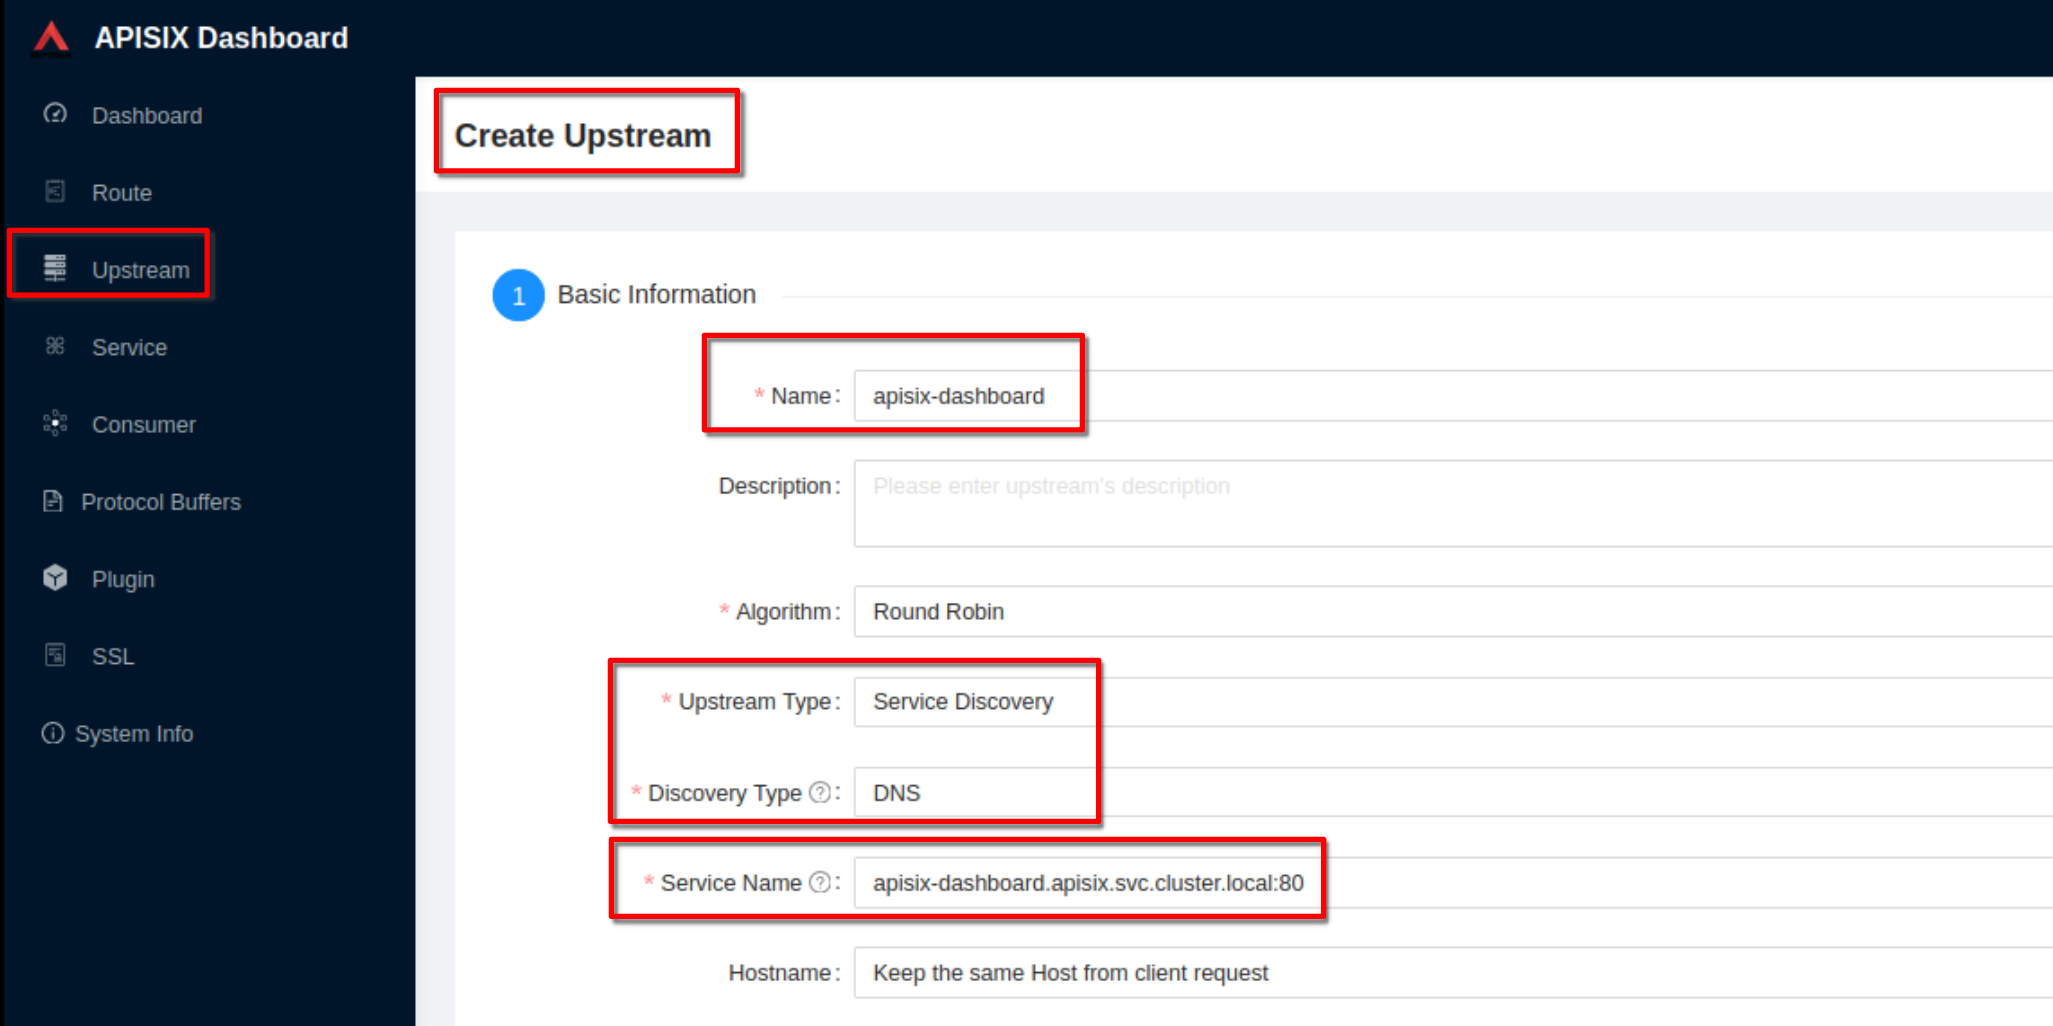
Set the name to “apisix-dashboard”, upstream type to “service discovery”, discovery type to “dns” and servicename to “apisix-dashboard.apisix.svc.cluster.local
”.
Then click “Next” and after click “Submit”
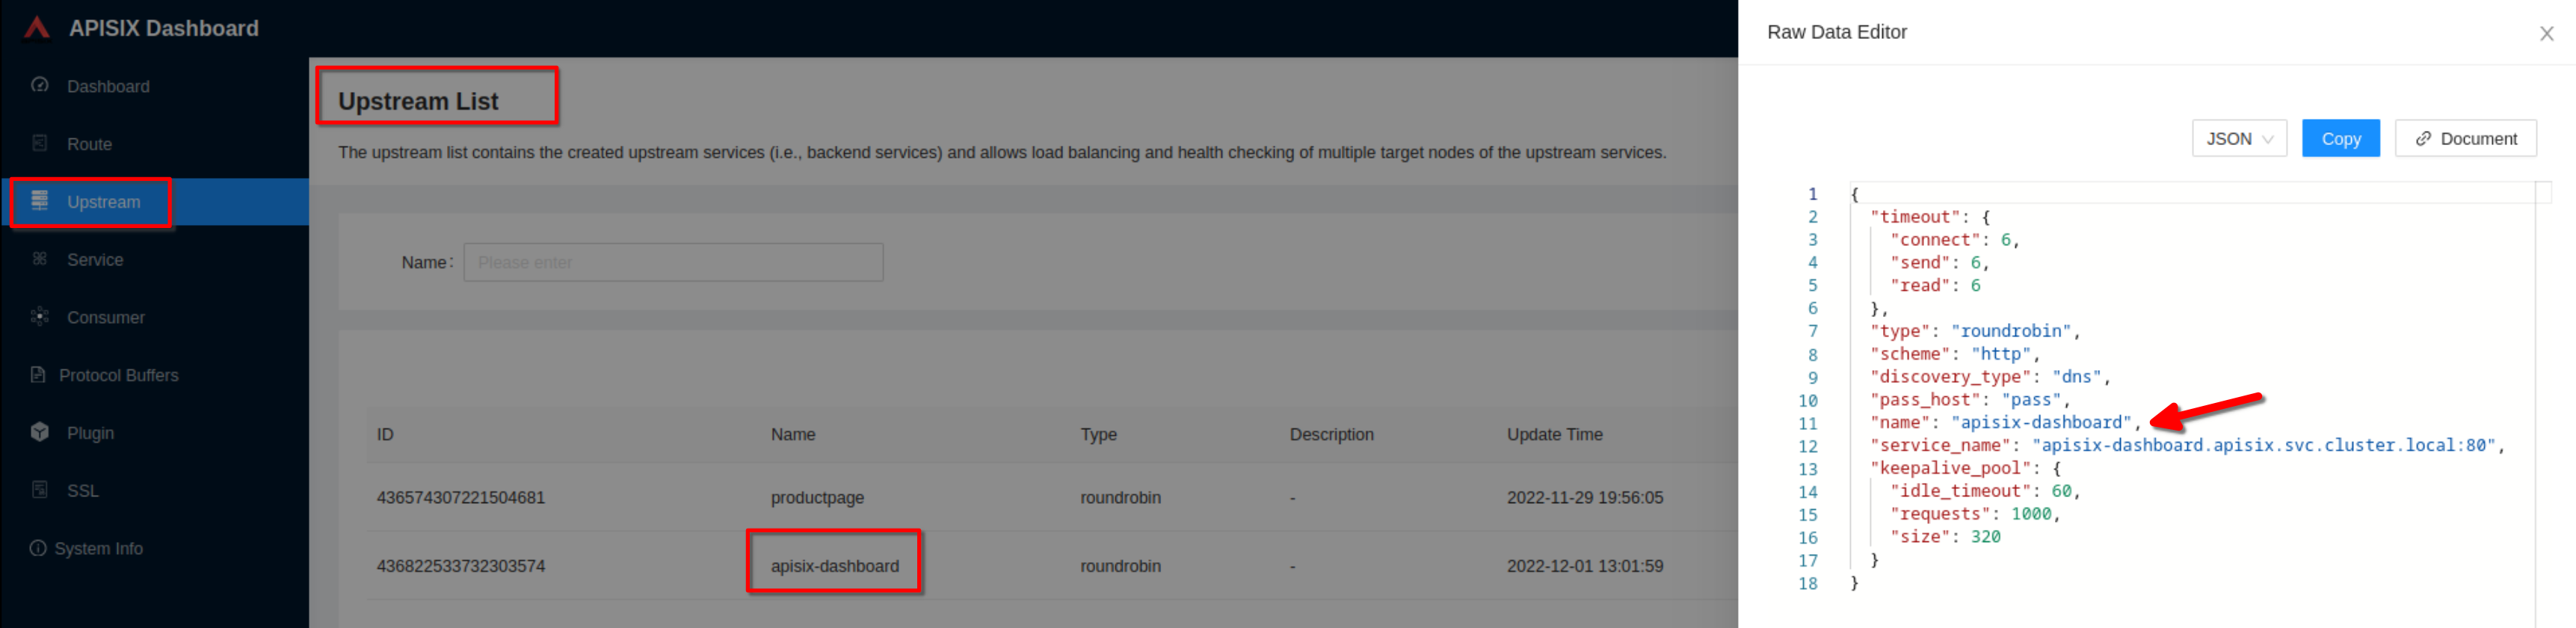
Click “View” to see the json upstream definition
Note the upstream name to be used in the next route definition
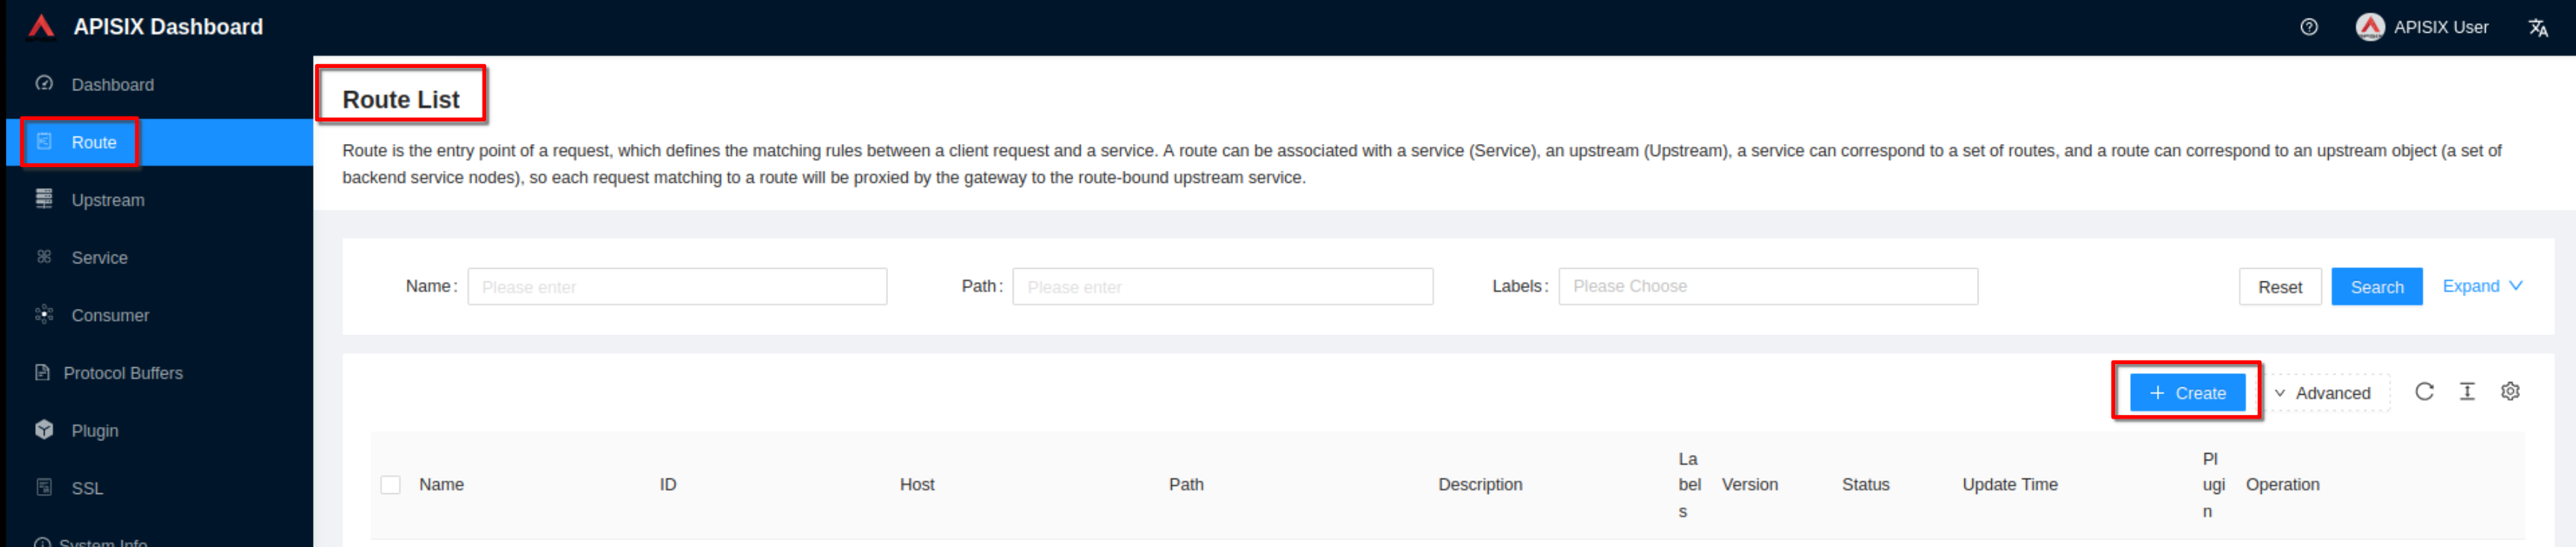
Now click “Create” on the “Route” page
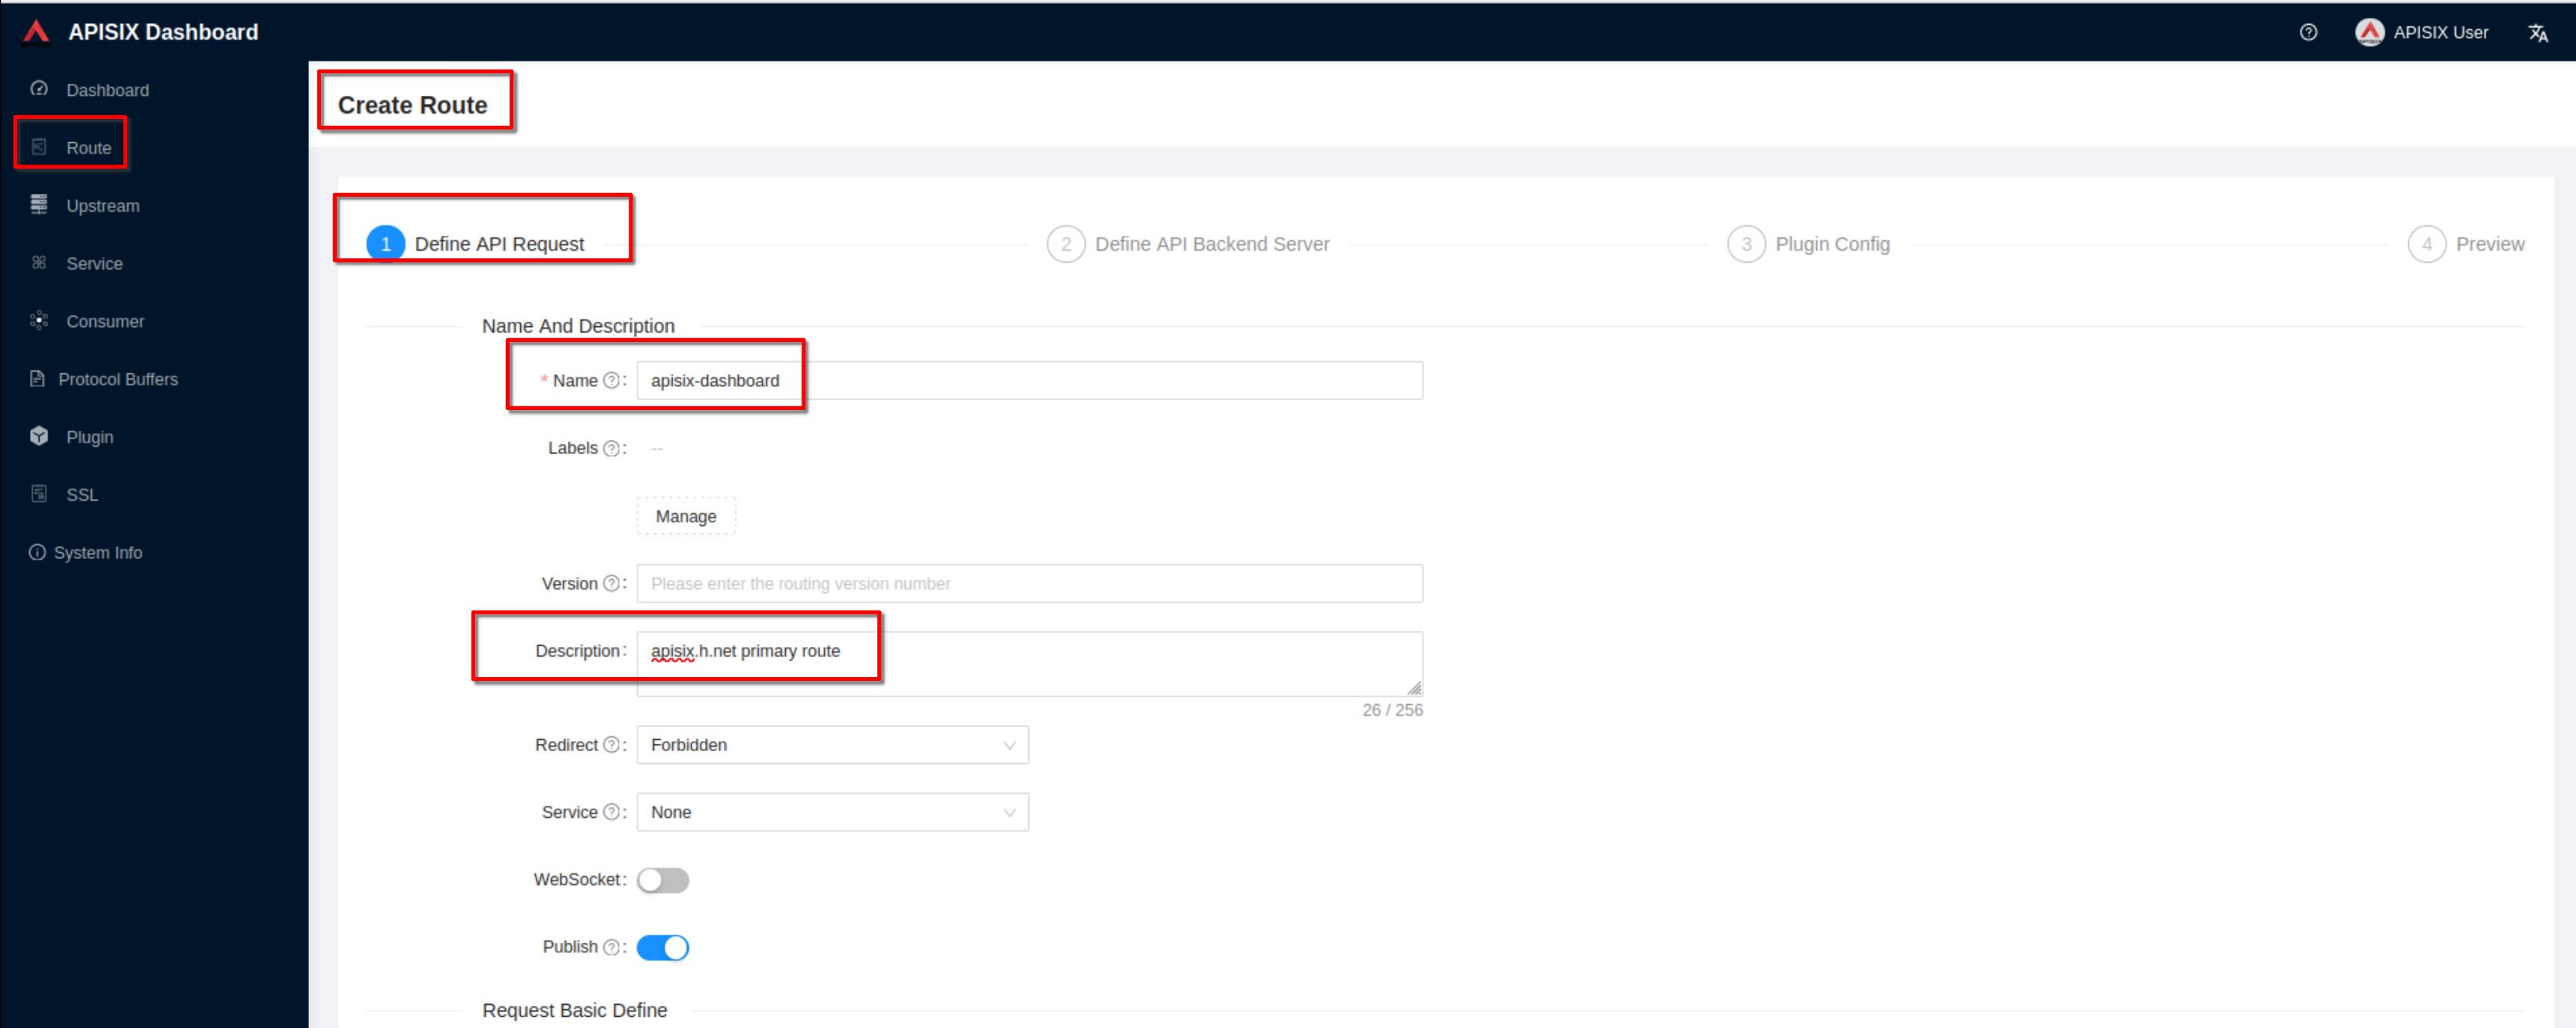
Create a route (“Define api request” - on top): set name to “apisix-dashboard” and add a description
Create a route (“Define api request” - below): set host to “apisix.h.net” and path to “/*”. Then click “Next”
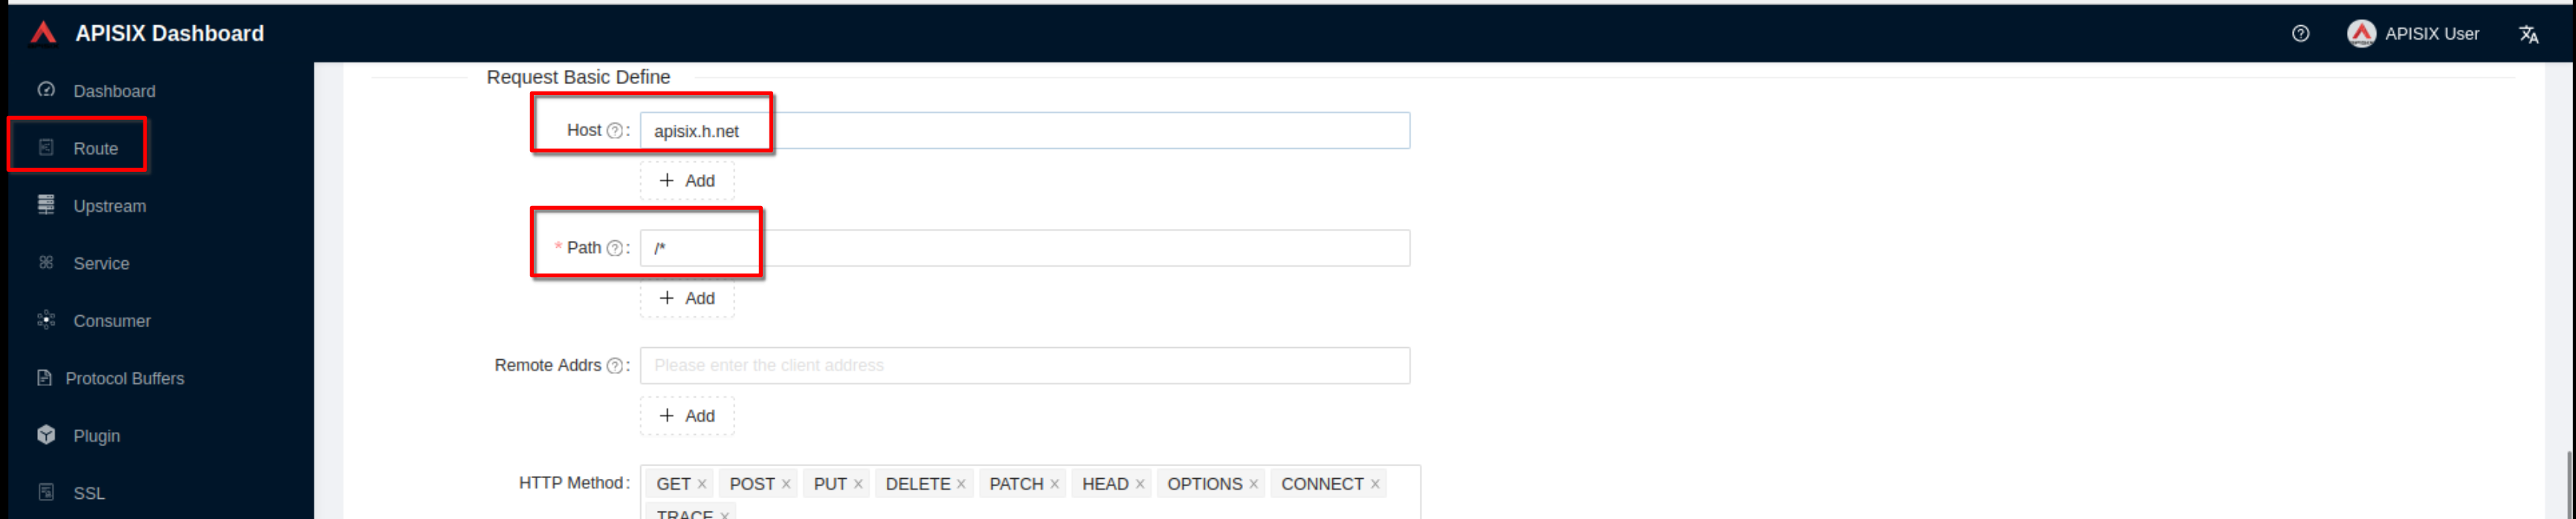
Select the previous defined “apisix” upstream from the dropdown list. Then click “Next”

For now don’t use plugins and click “Next”. Then click “Submit”
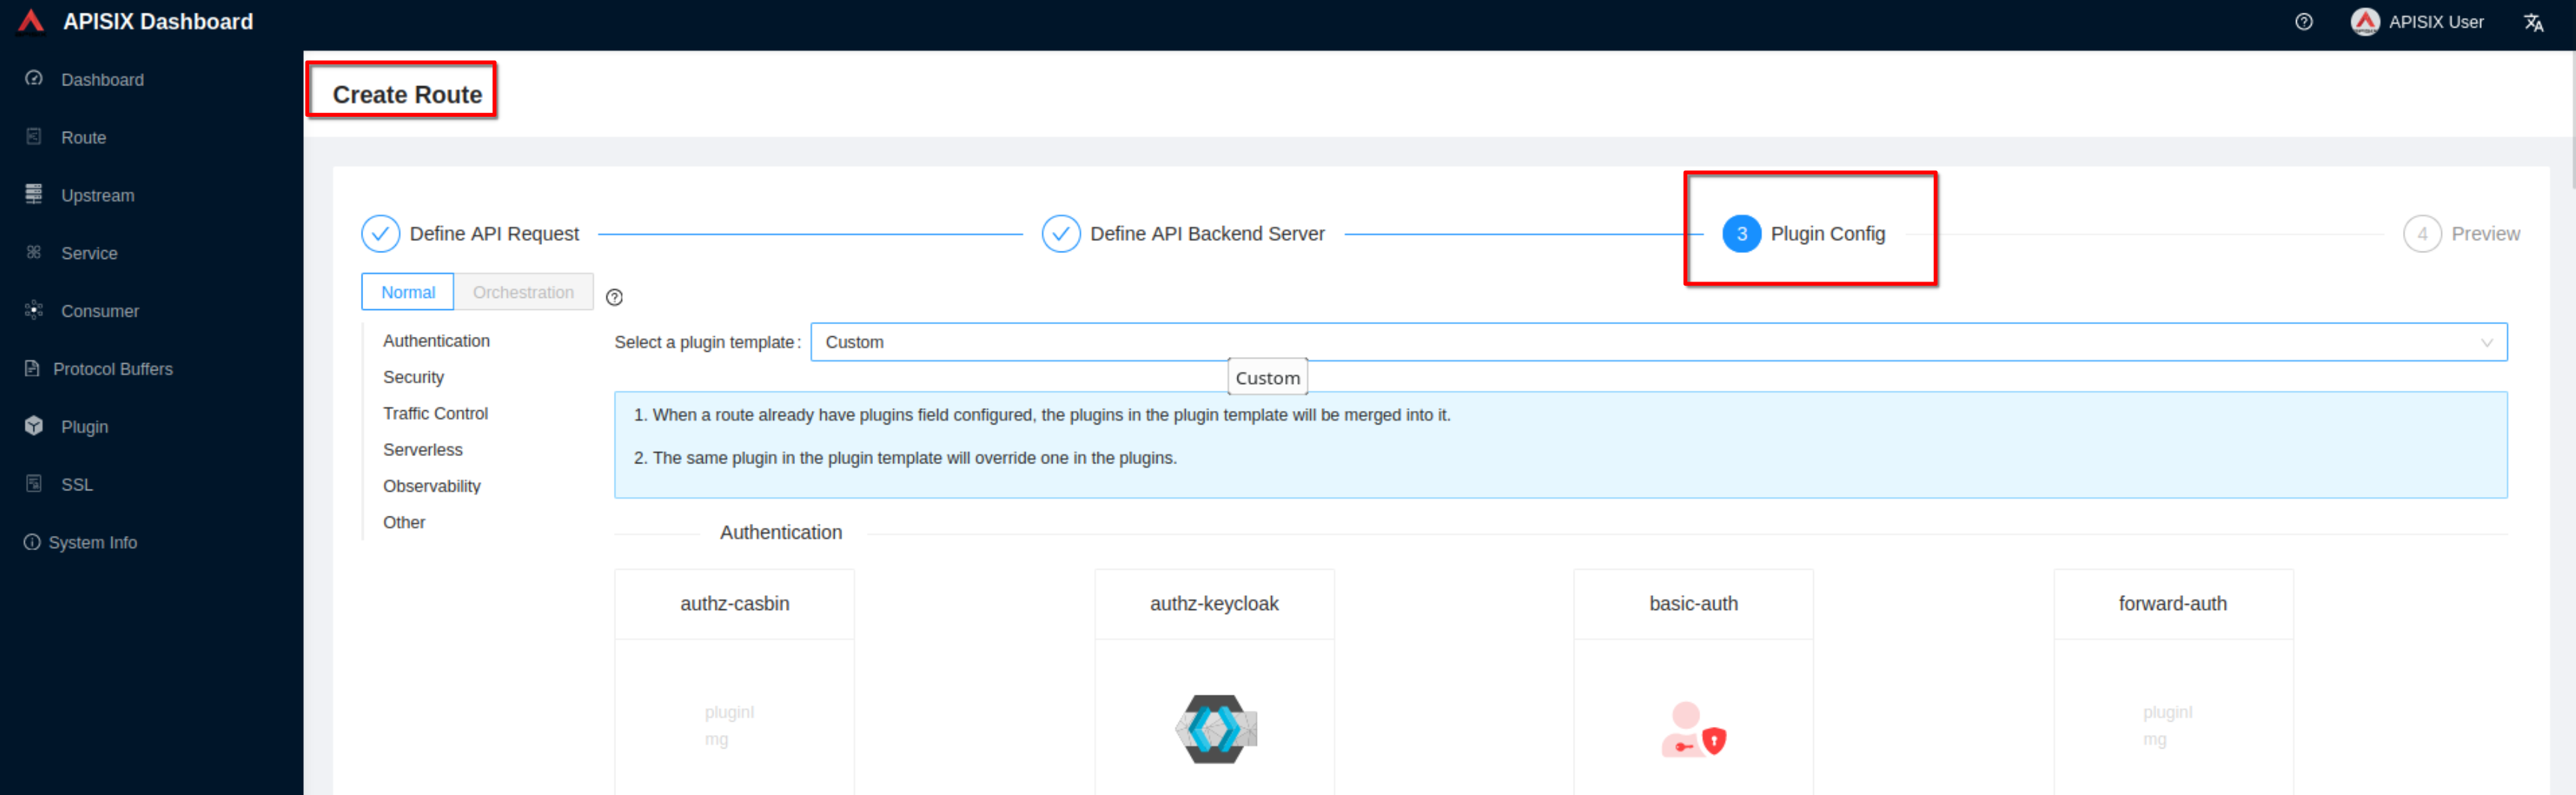
Enable https in apisix
Work on hserv
Copy the certificates from hserv to hdev. From hserv:
sysop@hserv:~$ cd ~/H
sysop@hserv:~/H$ rsync -vau --stats ./hservcerts/* hdev.int.h.net://home/sysop/H/hservcerts/
Work on hdev
Port forward apisix-dashboard and access it ah “http://localhost:9090” and login with “admin” / “admin“
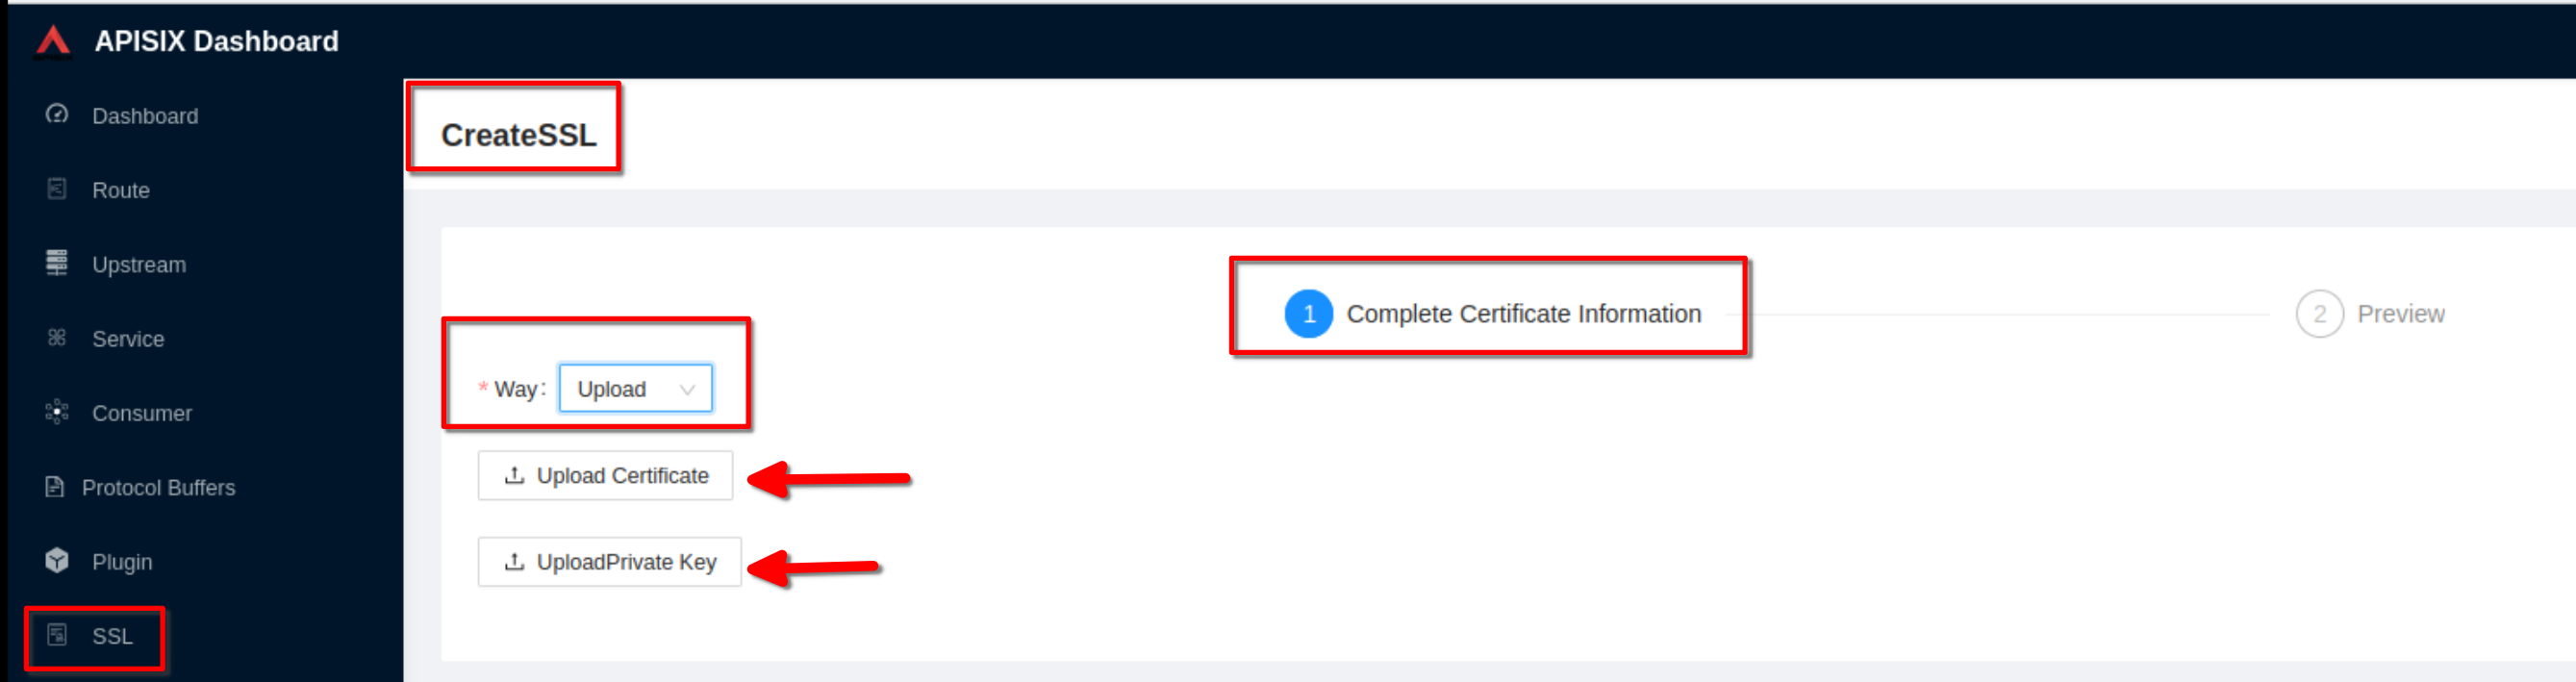
kubectl -n apisix port-forward service/apisix-dashboard 9090:80Select the “SSL” page and click Create

Select “Way: Upload”, then click “upload certificate” and “upload key”. Clik “Next” (Take certificate and key files from ~/H/hservcerts)
Preview the SSL resource and click “Submit”
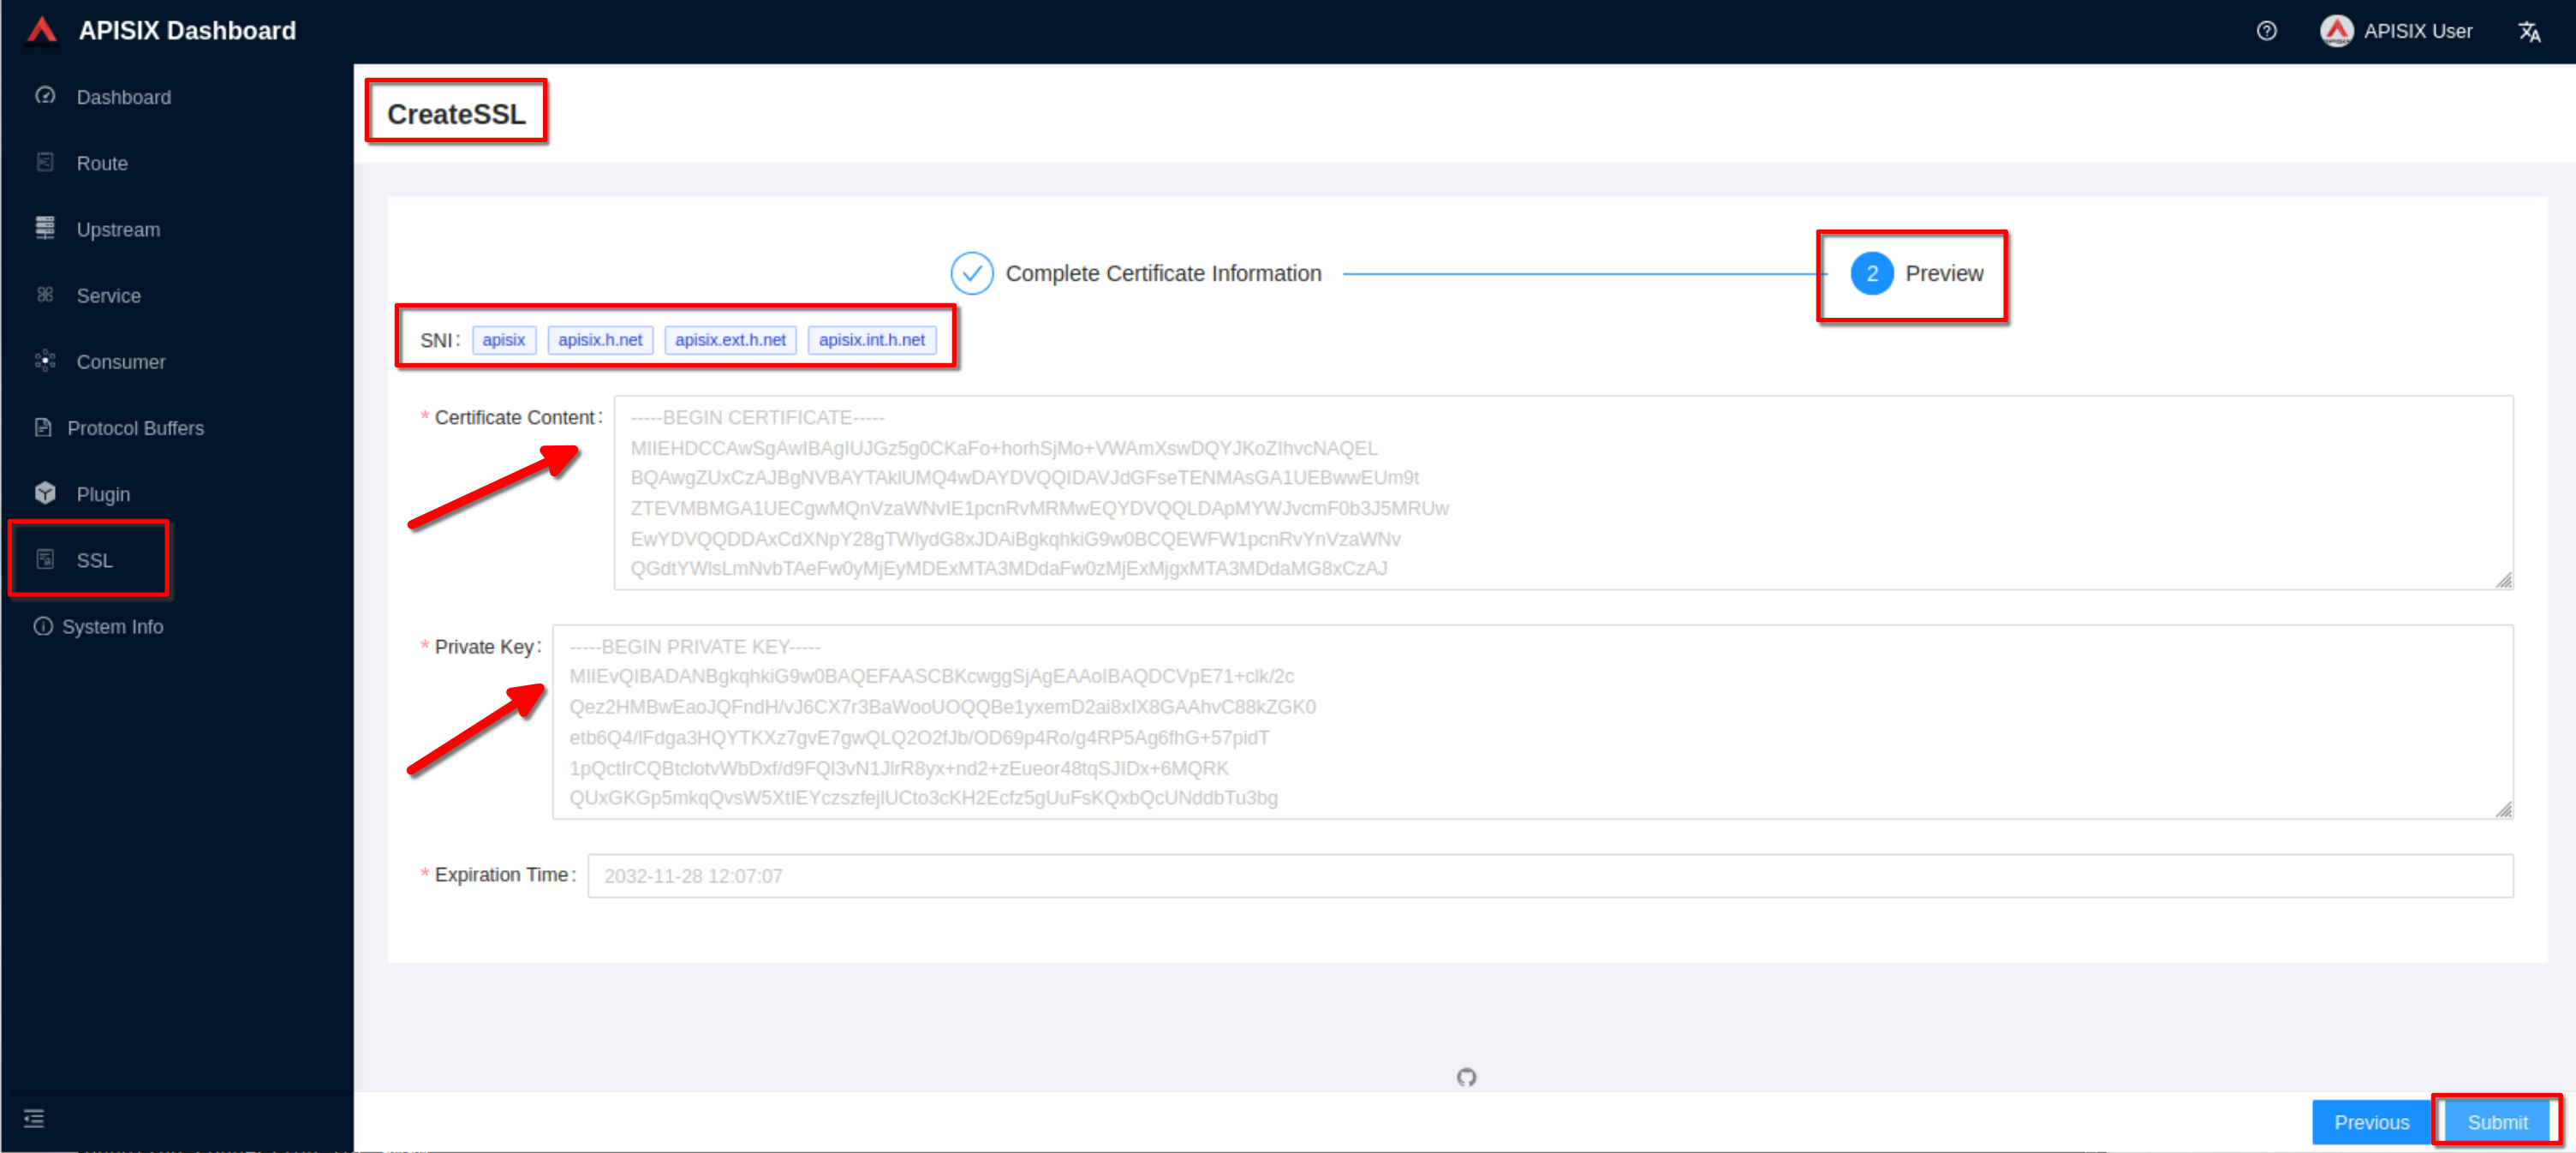
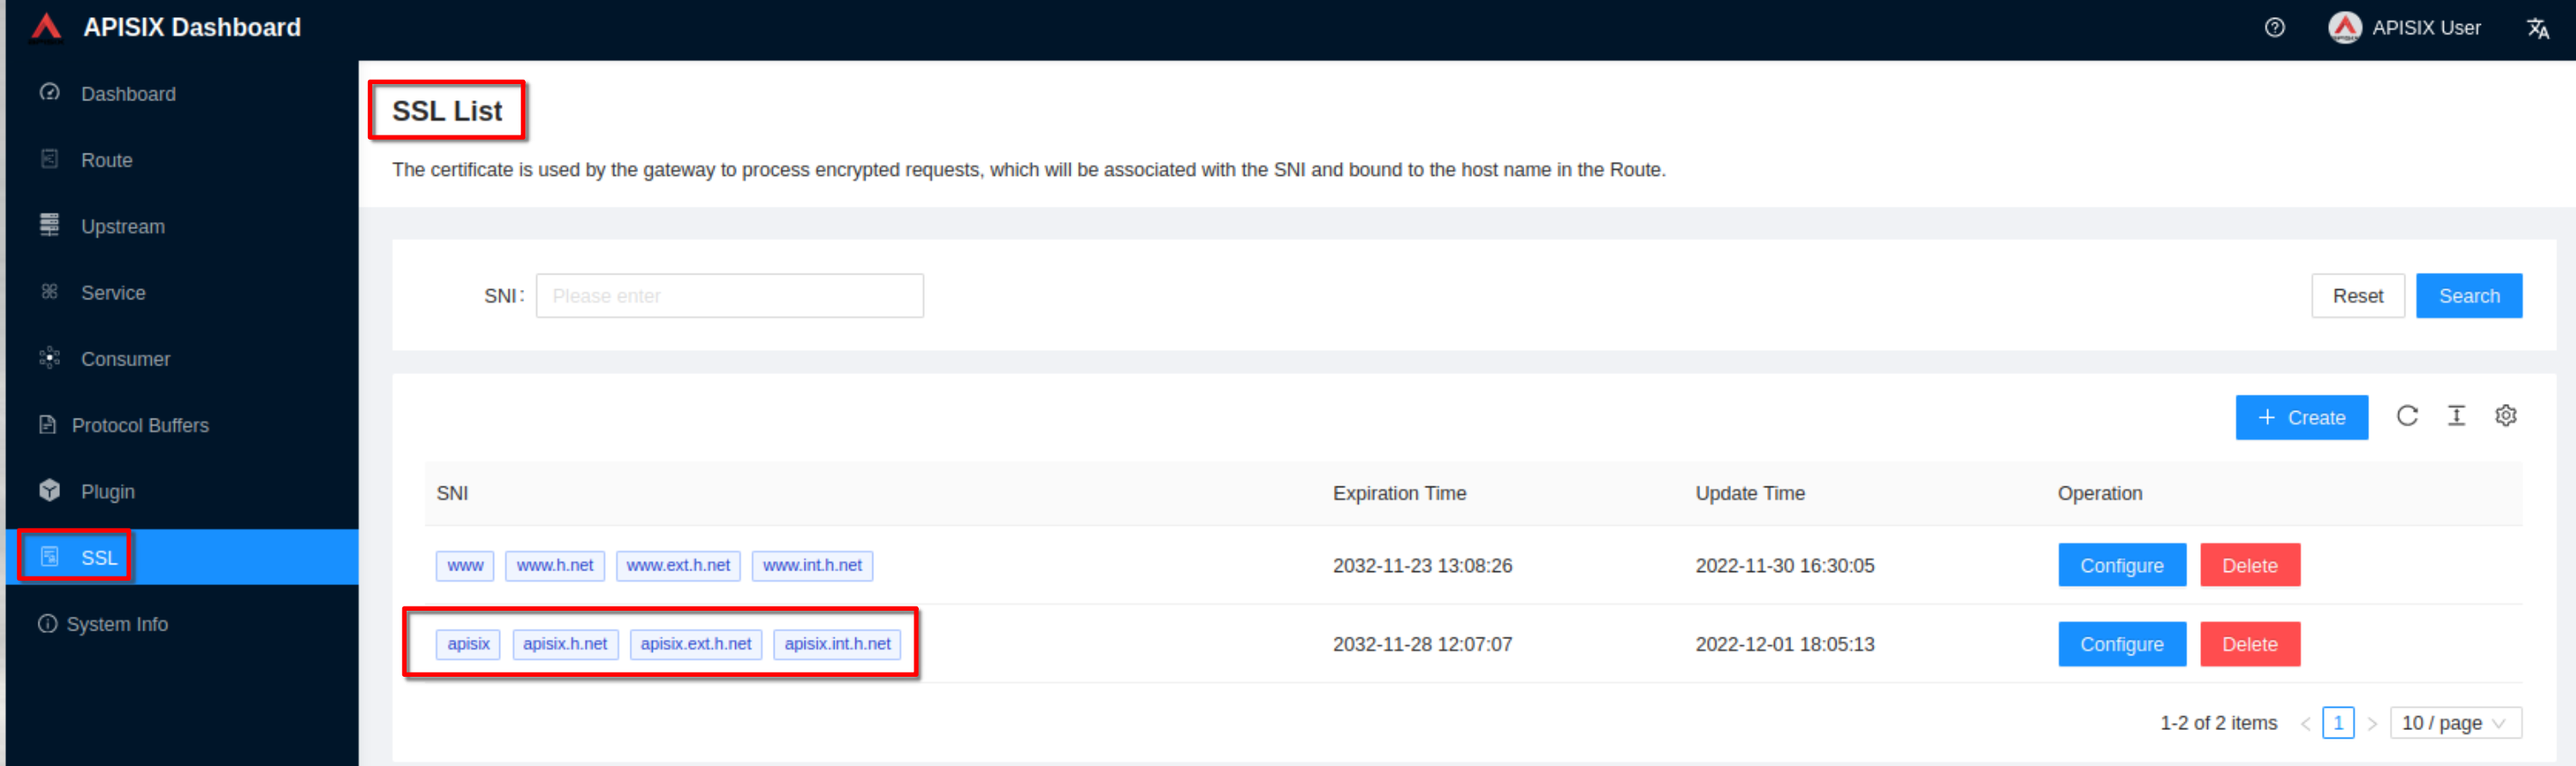
The ssl resource appear in the list (note the SNI values)
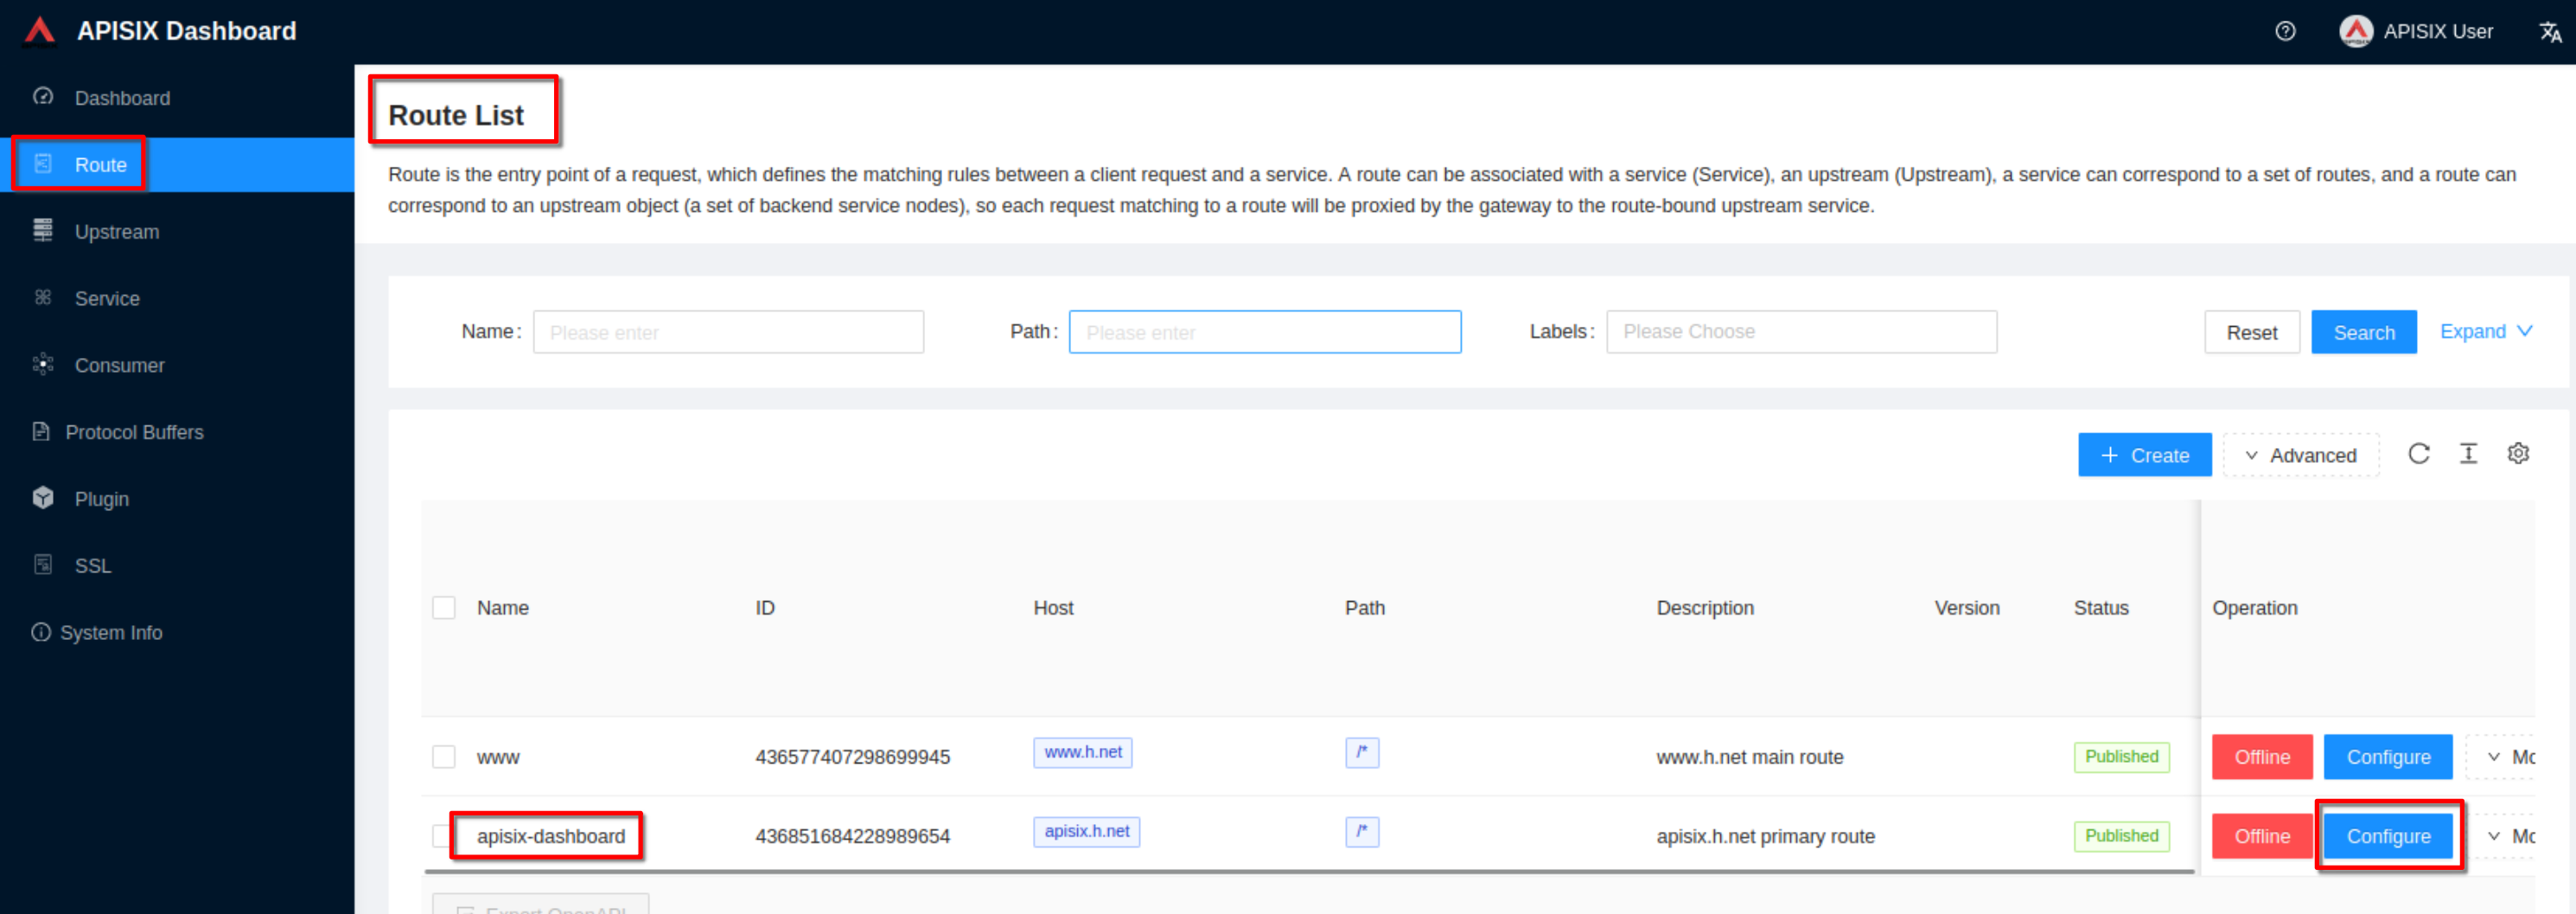
Configure the “apisix-dashboard” route to enable http to https redirection
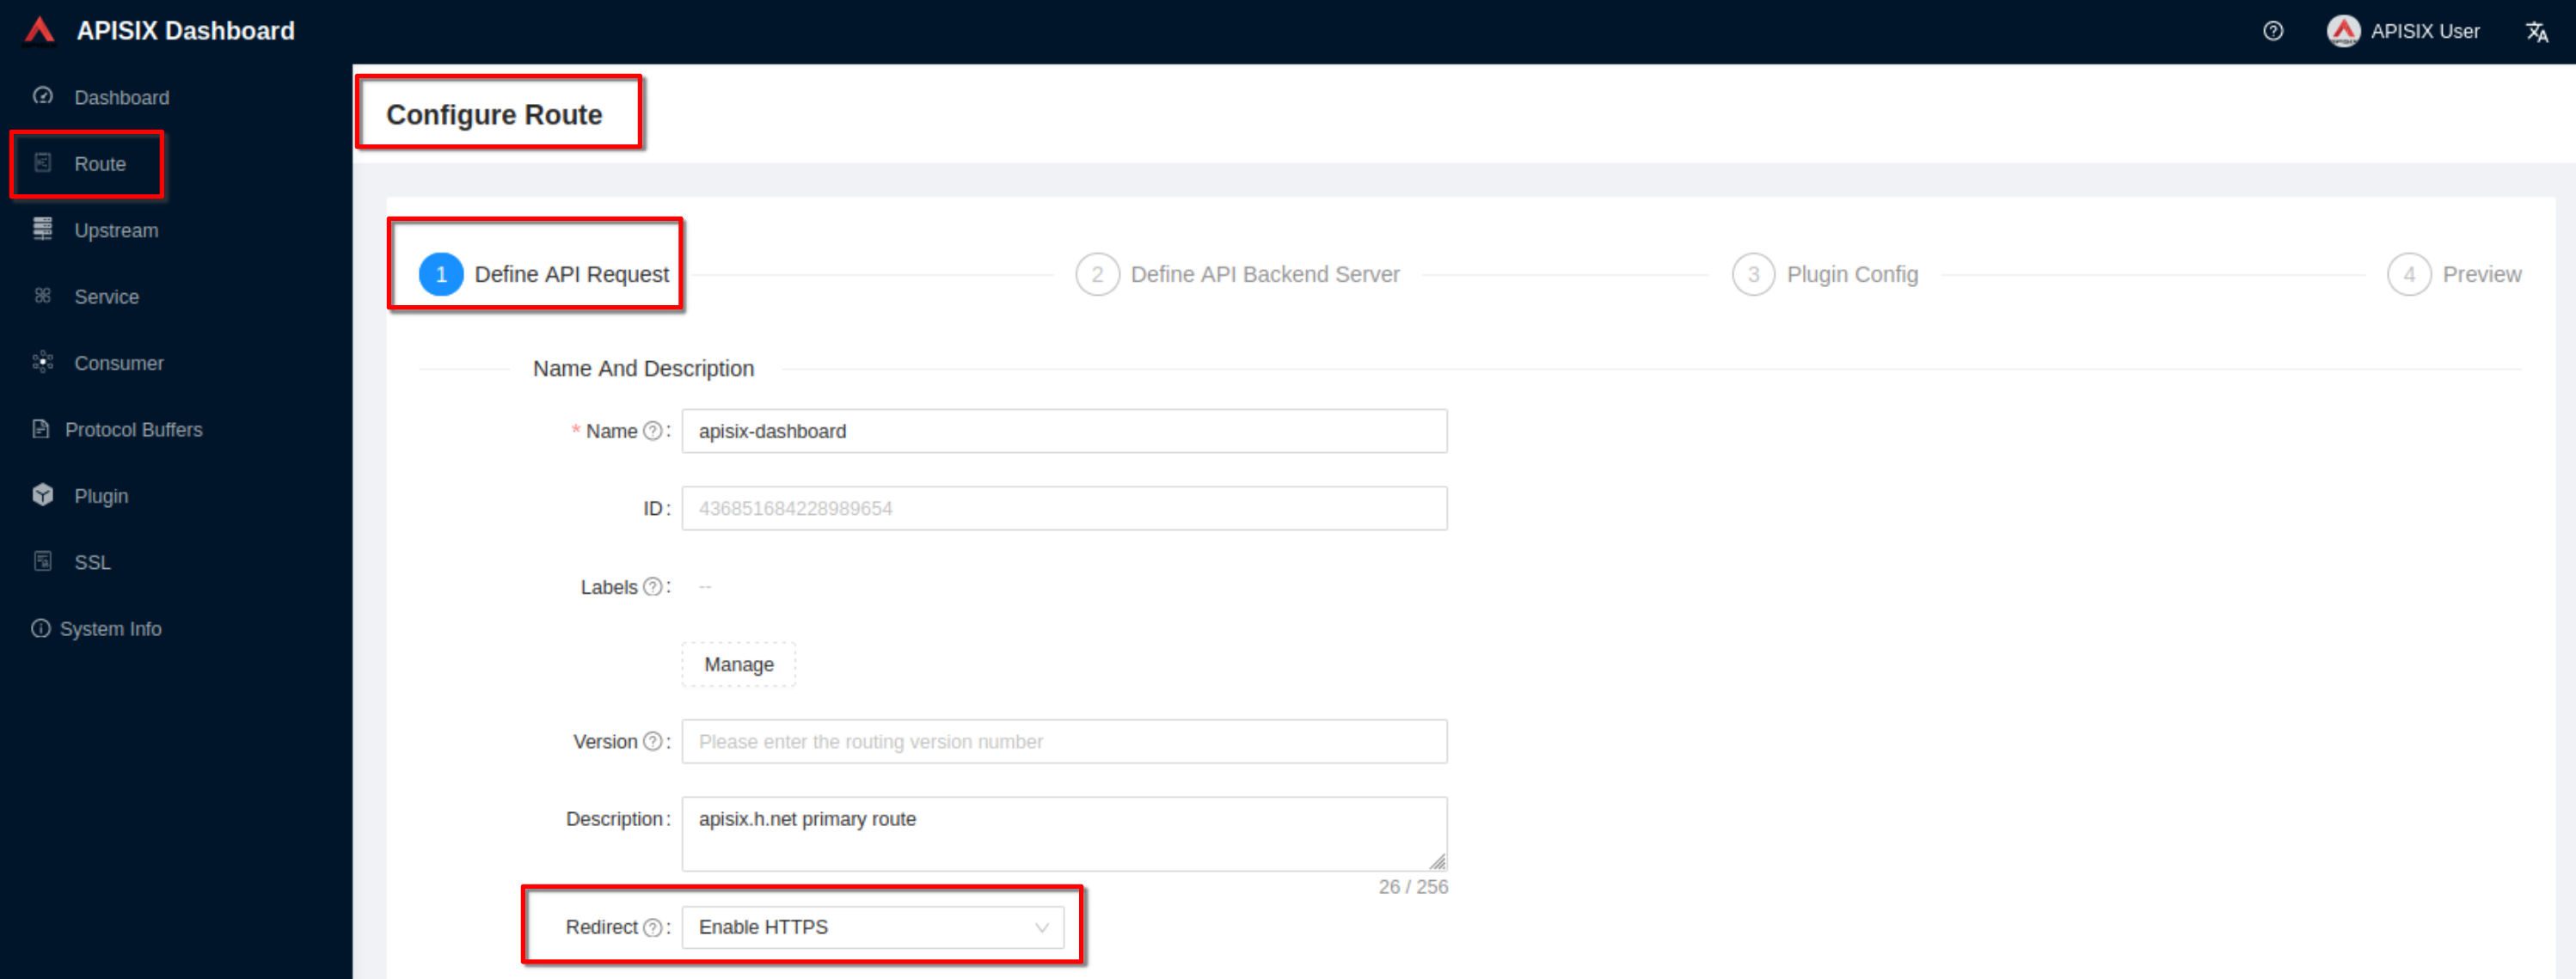
Set the “Redirect” field to “Enable HTTPS”. Then click “Next” until you see “Submit”. Click “Submit”
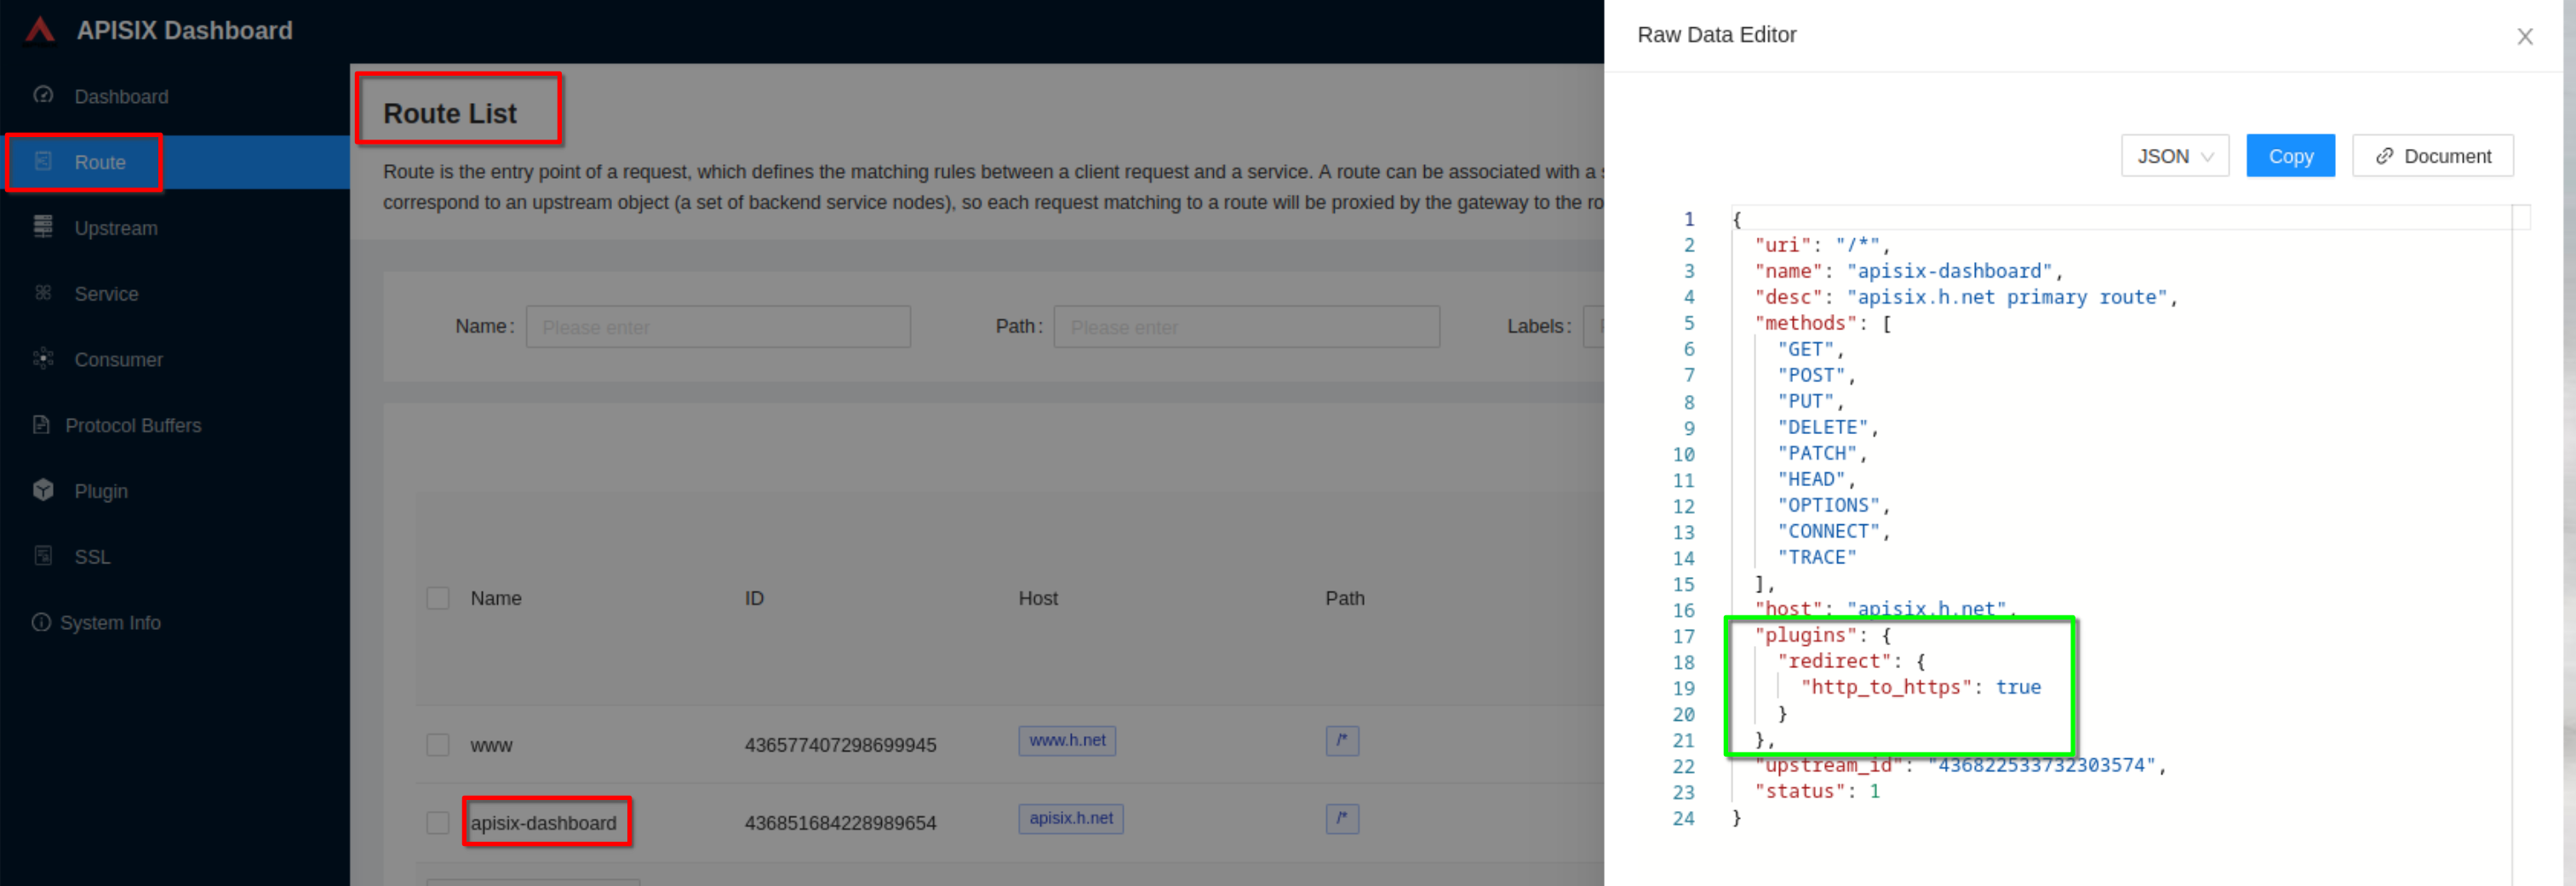
View the route configuration and verify that the redirect plugin is enabled
Now from any machine you can access the apisix-dashboard at the url “https://apisix.h.net” and verify that the apisix-dashboard login page is showed
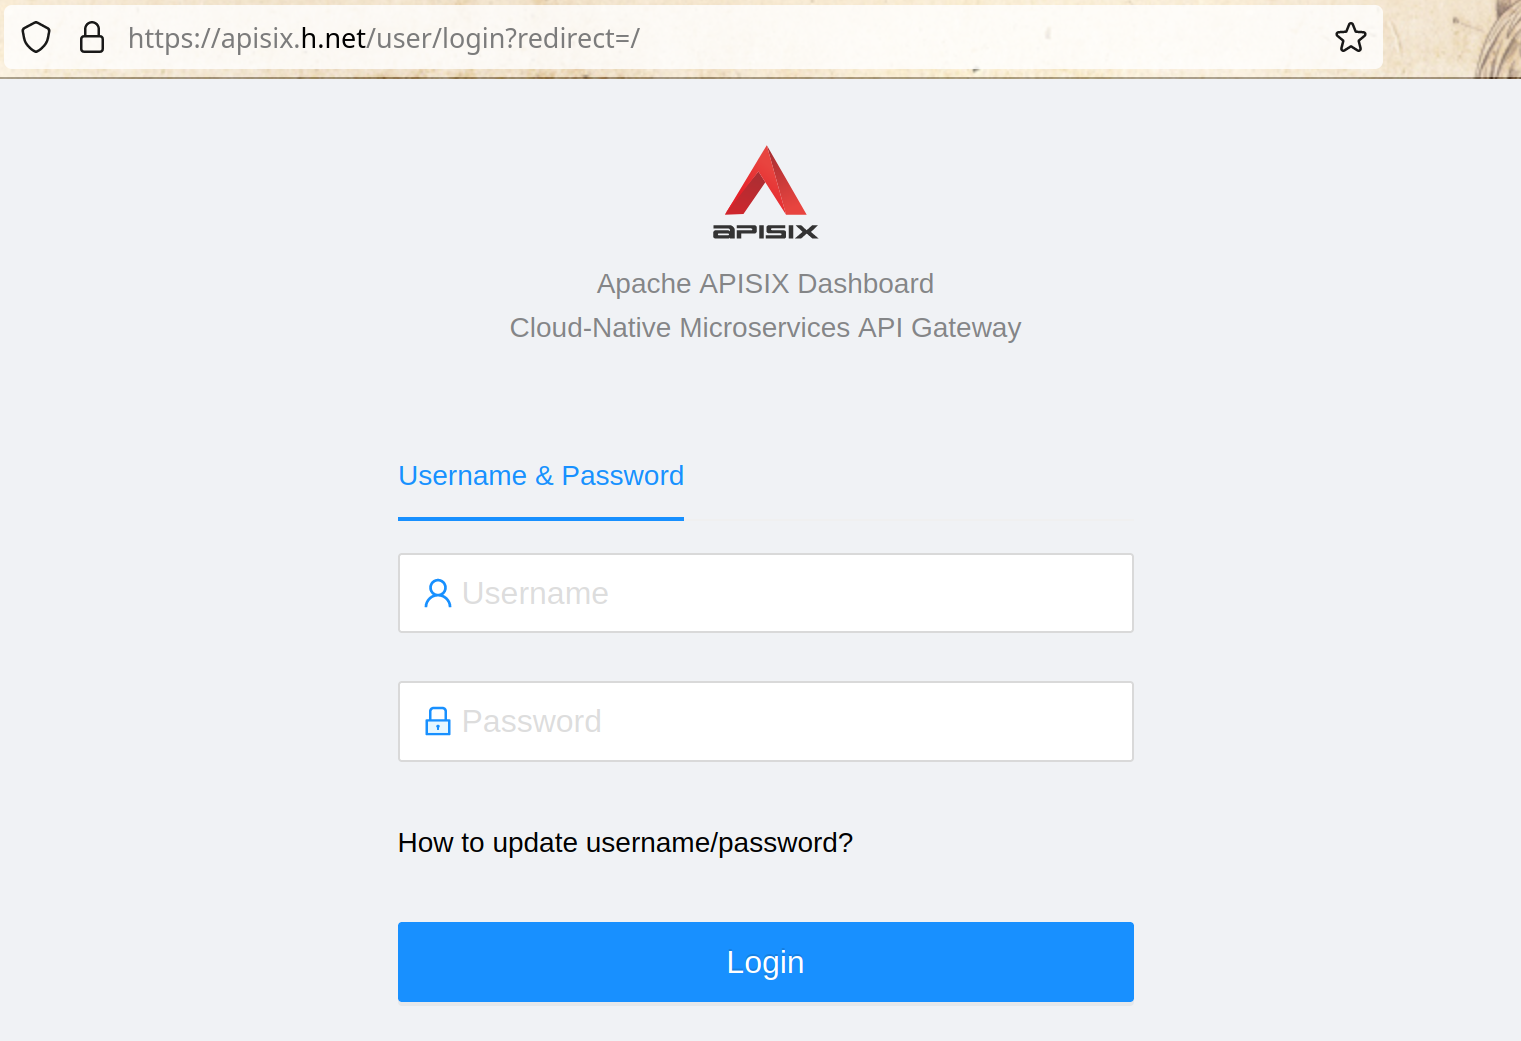
Login with “admin” / “admin”
Create Keycloak Definitions for OpenID-Connect
Work on any machine
Working on any machine, access the keycloak console at “https://k6k.h.net” and login with “admin” / “1357Togo“
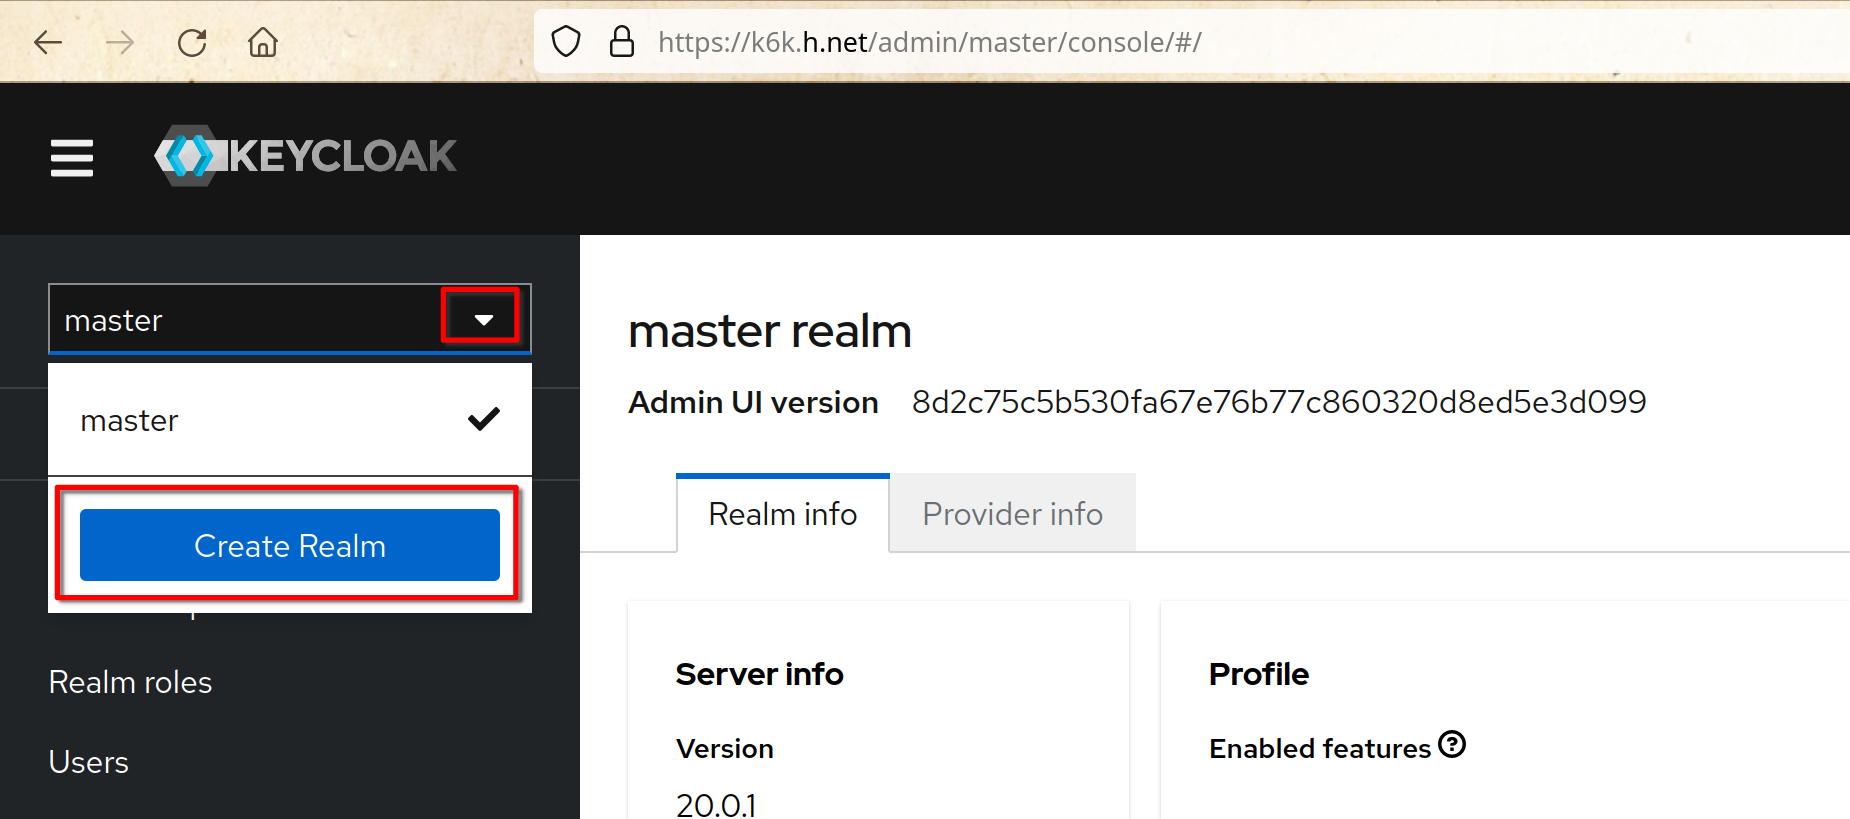
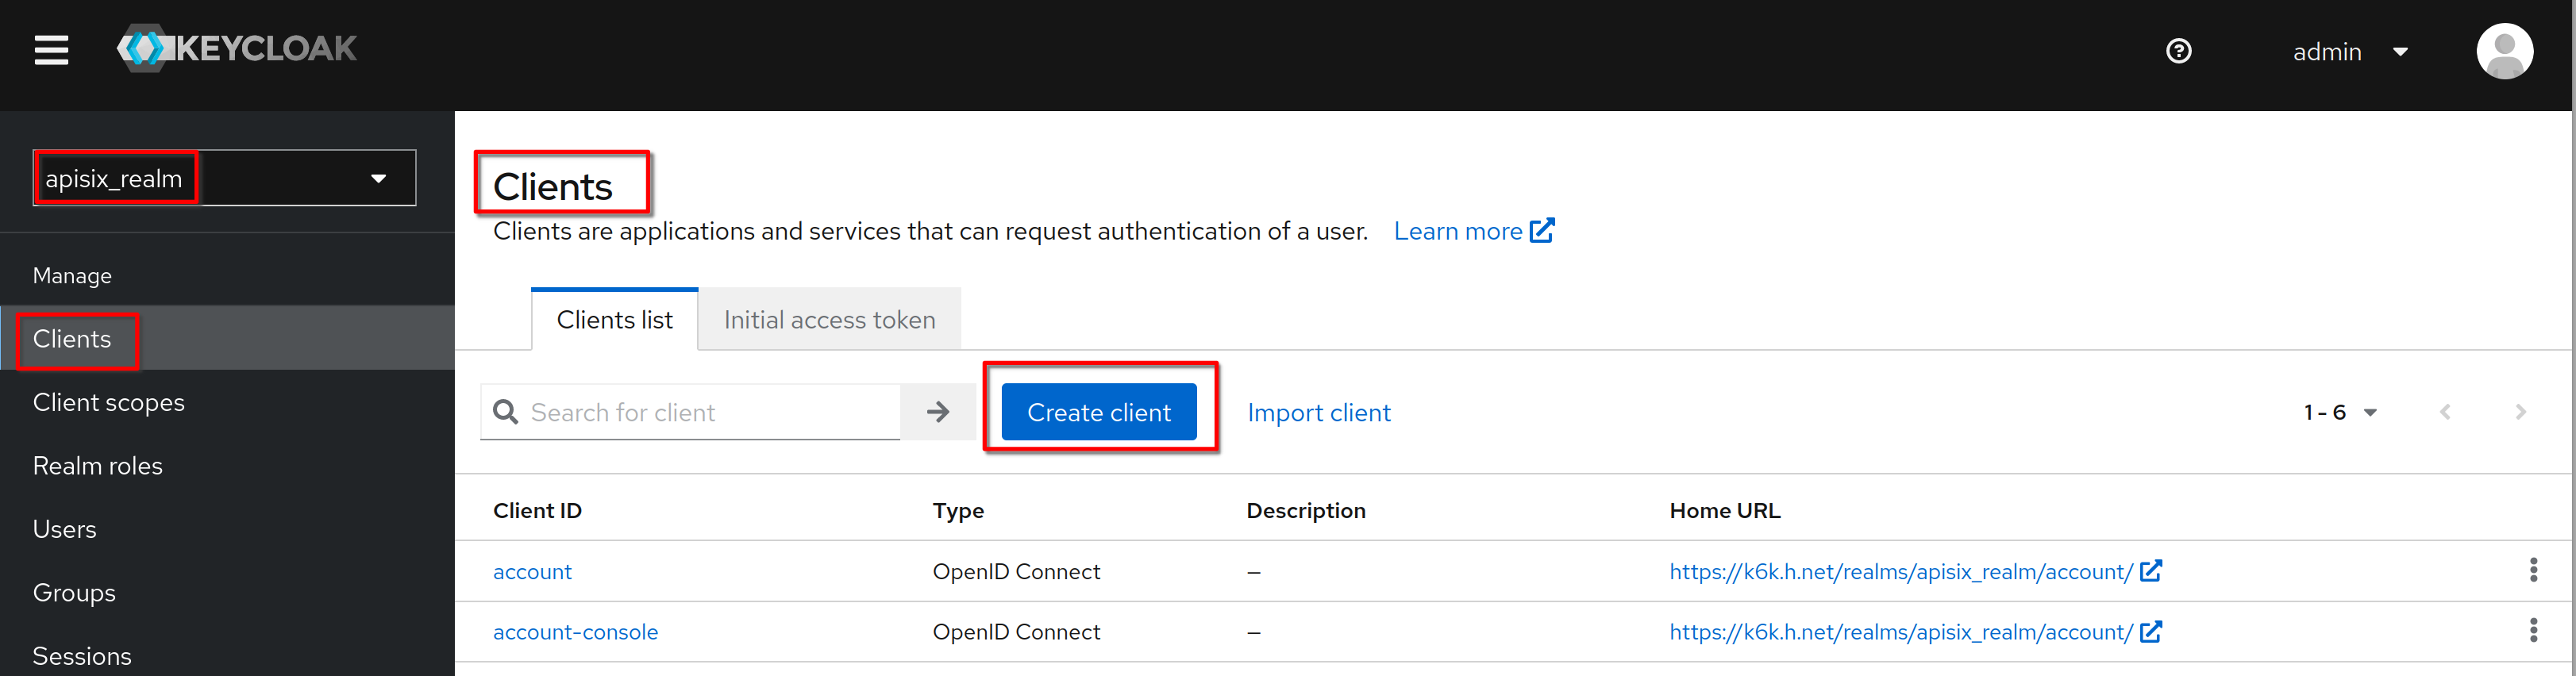
Click “Create Realm”
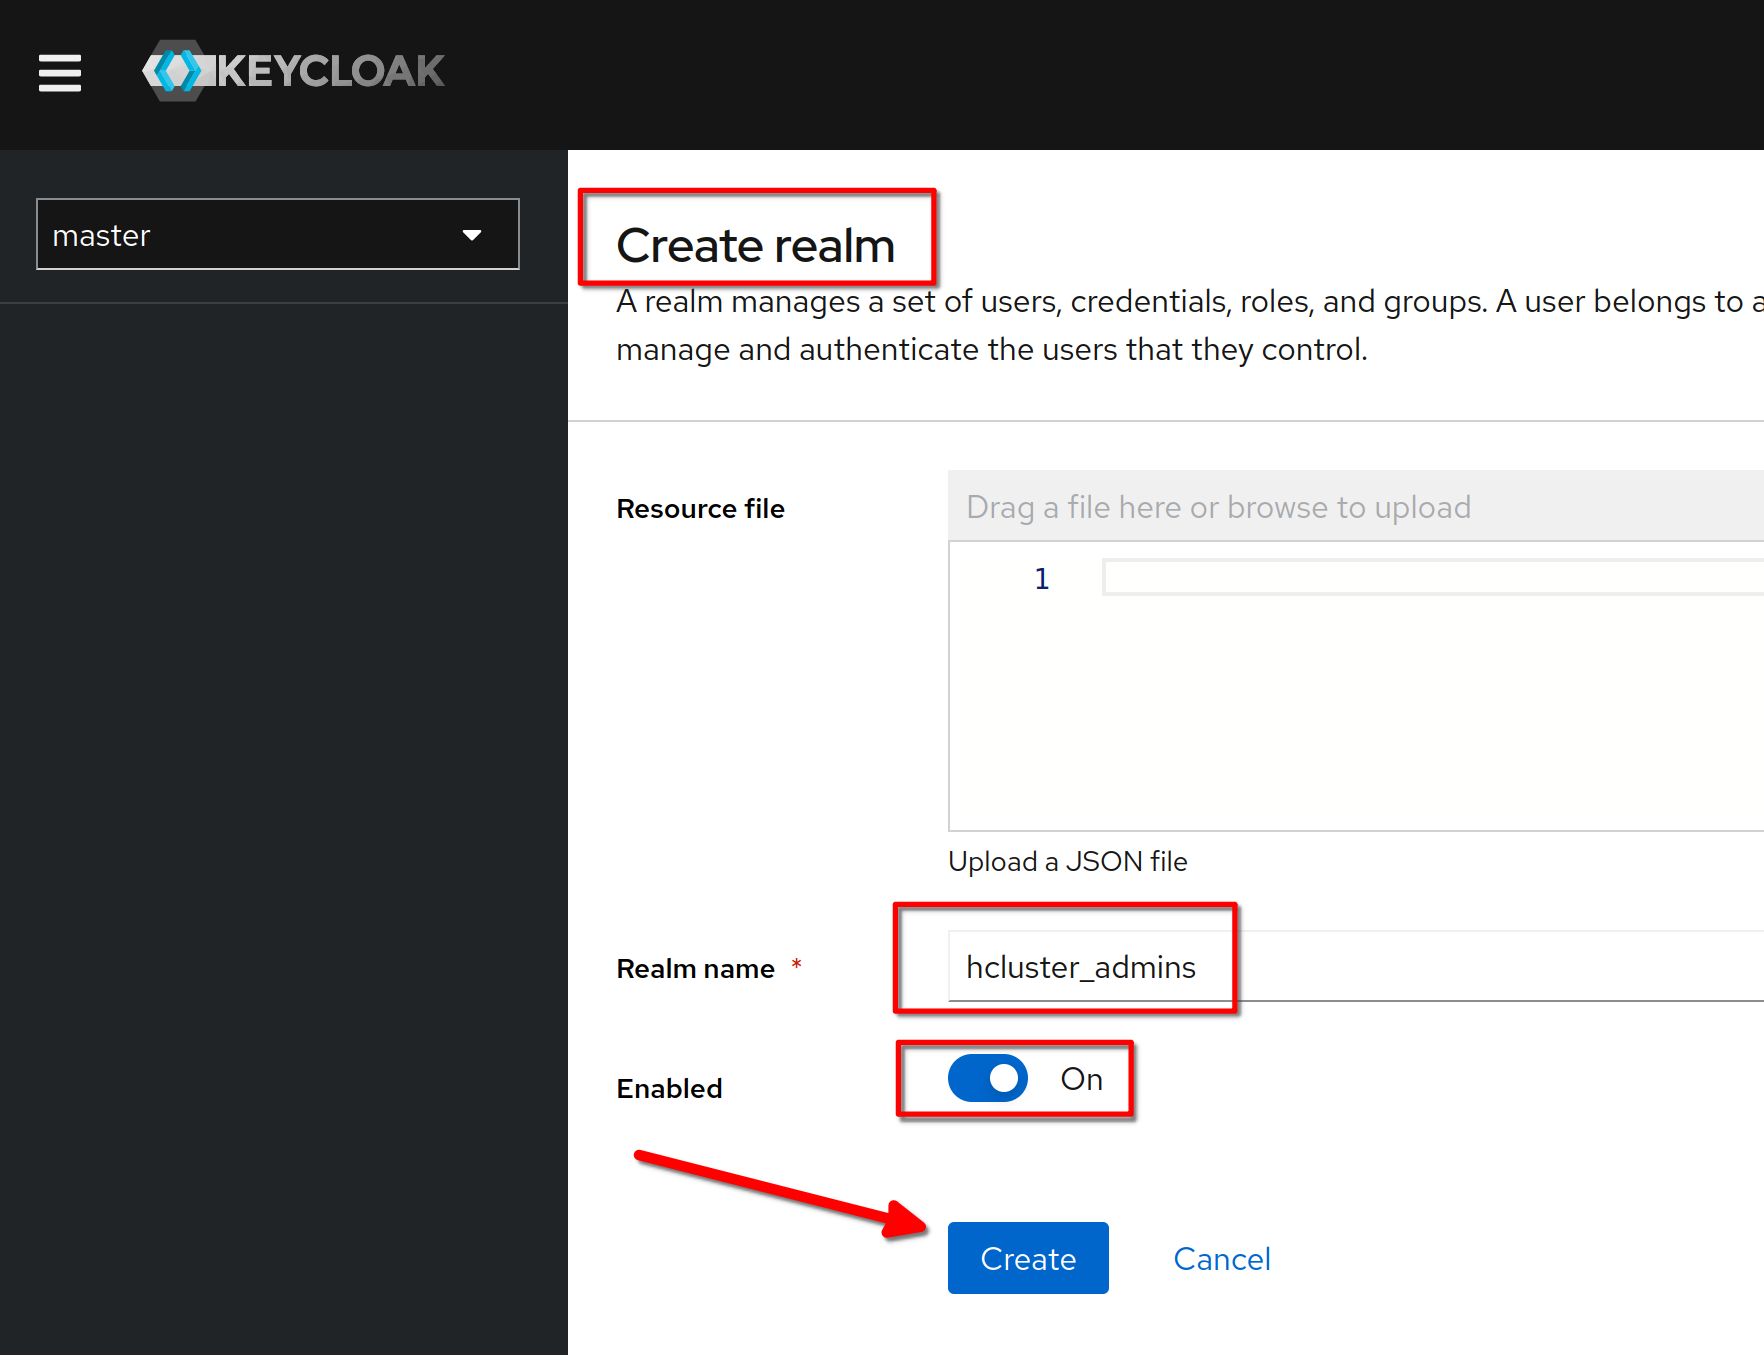
Create a realm named “hcluster_admins”
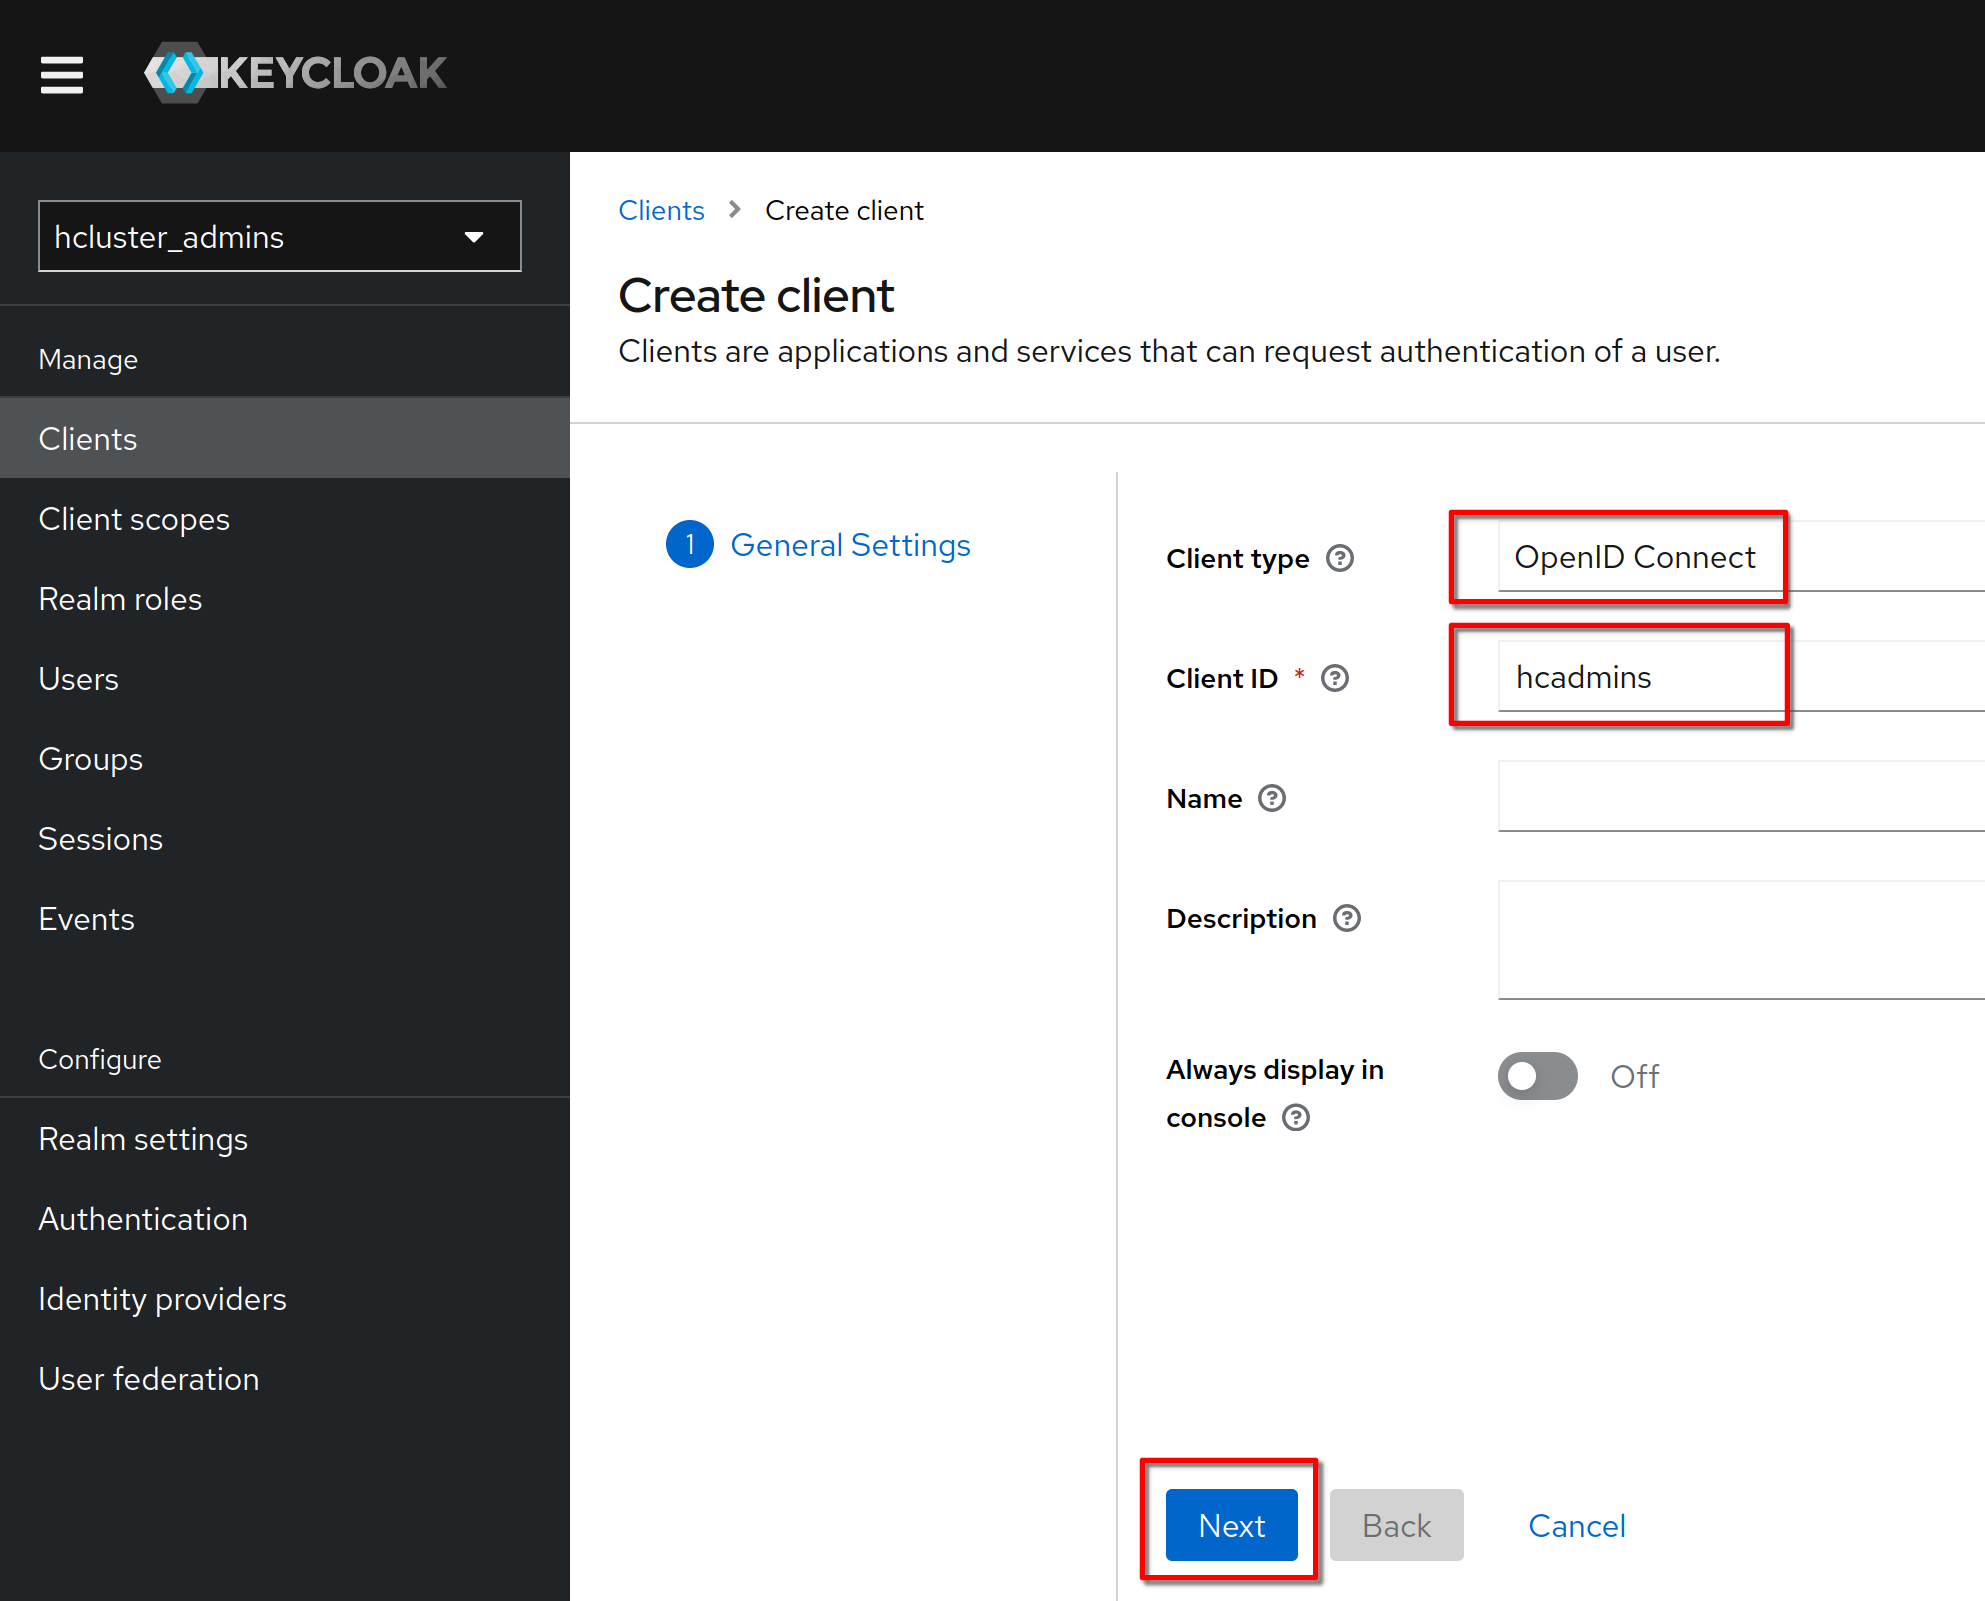
Create a client named “hcadmins”
Verify that the client protocol is “openid-connect” and click “Next”
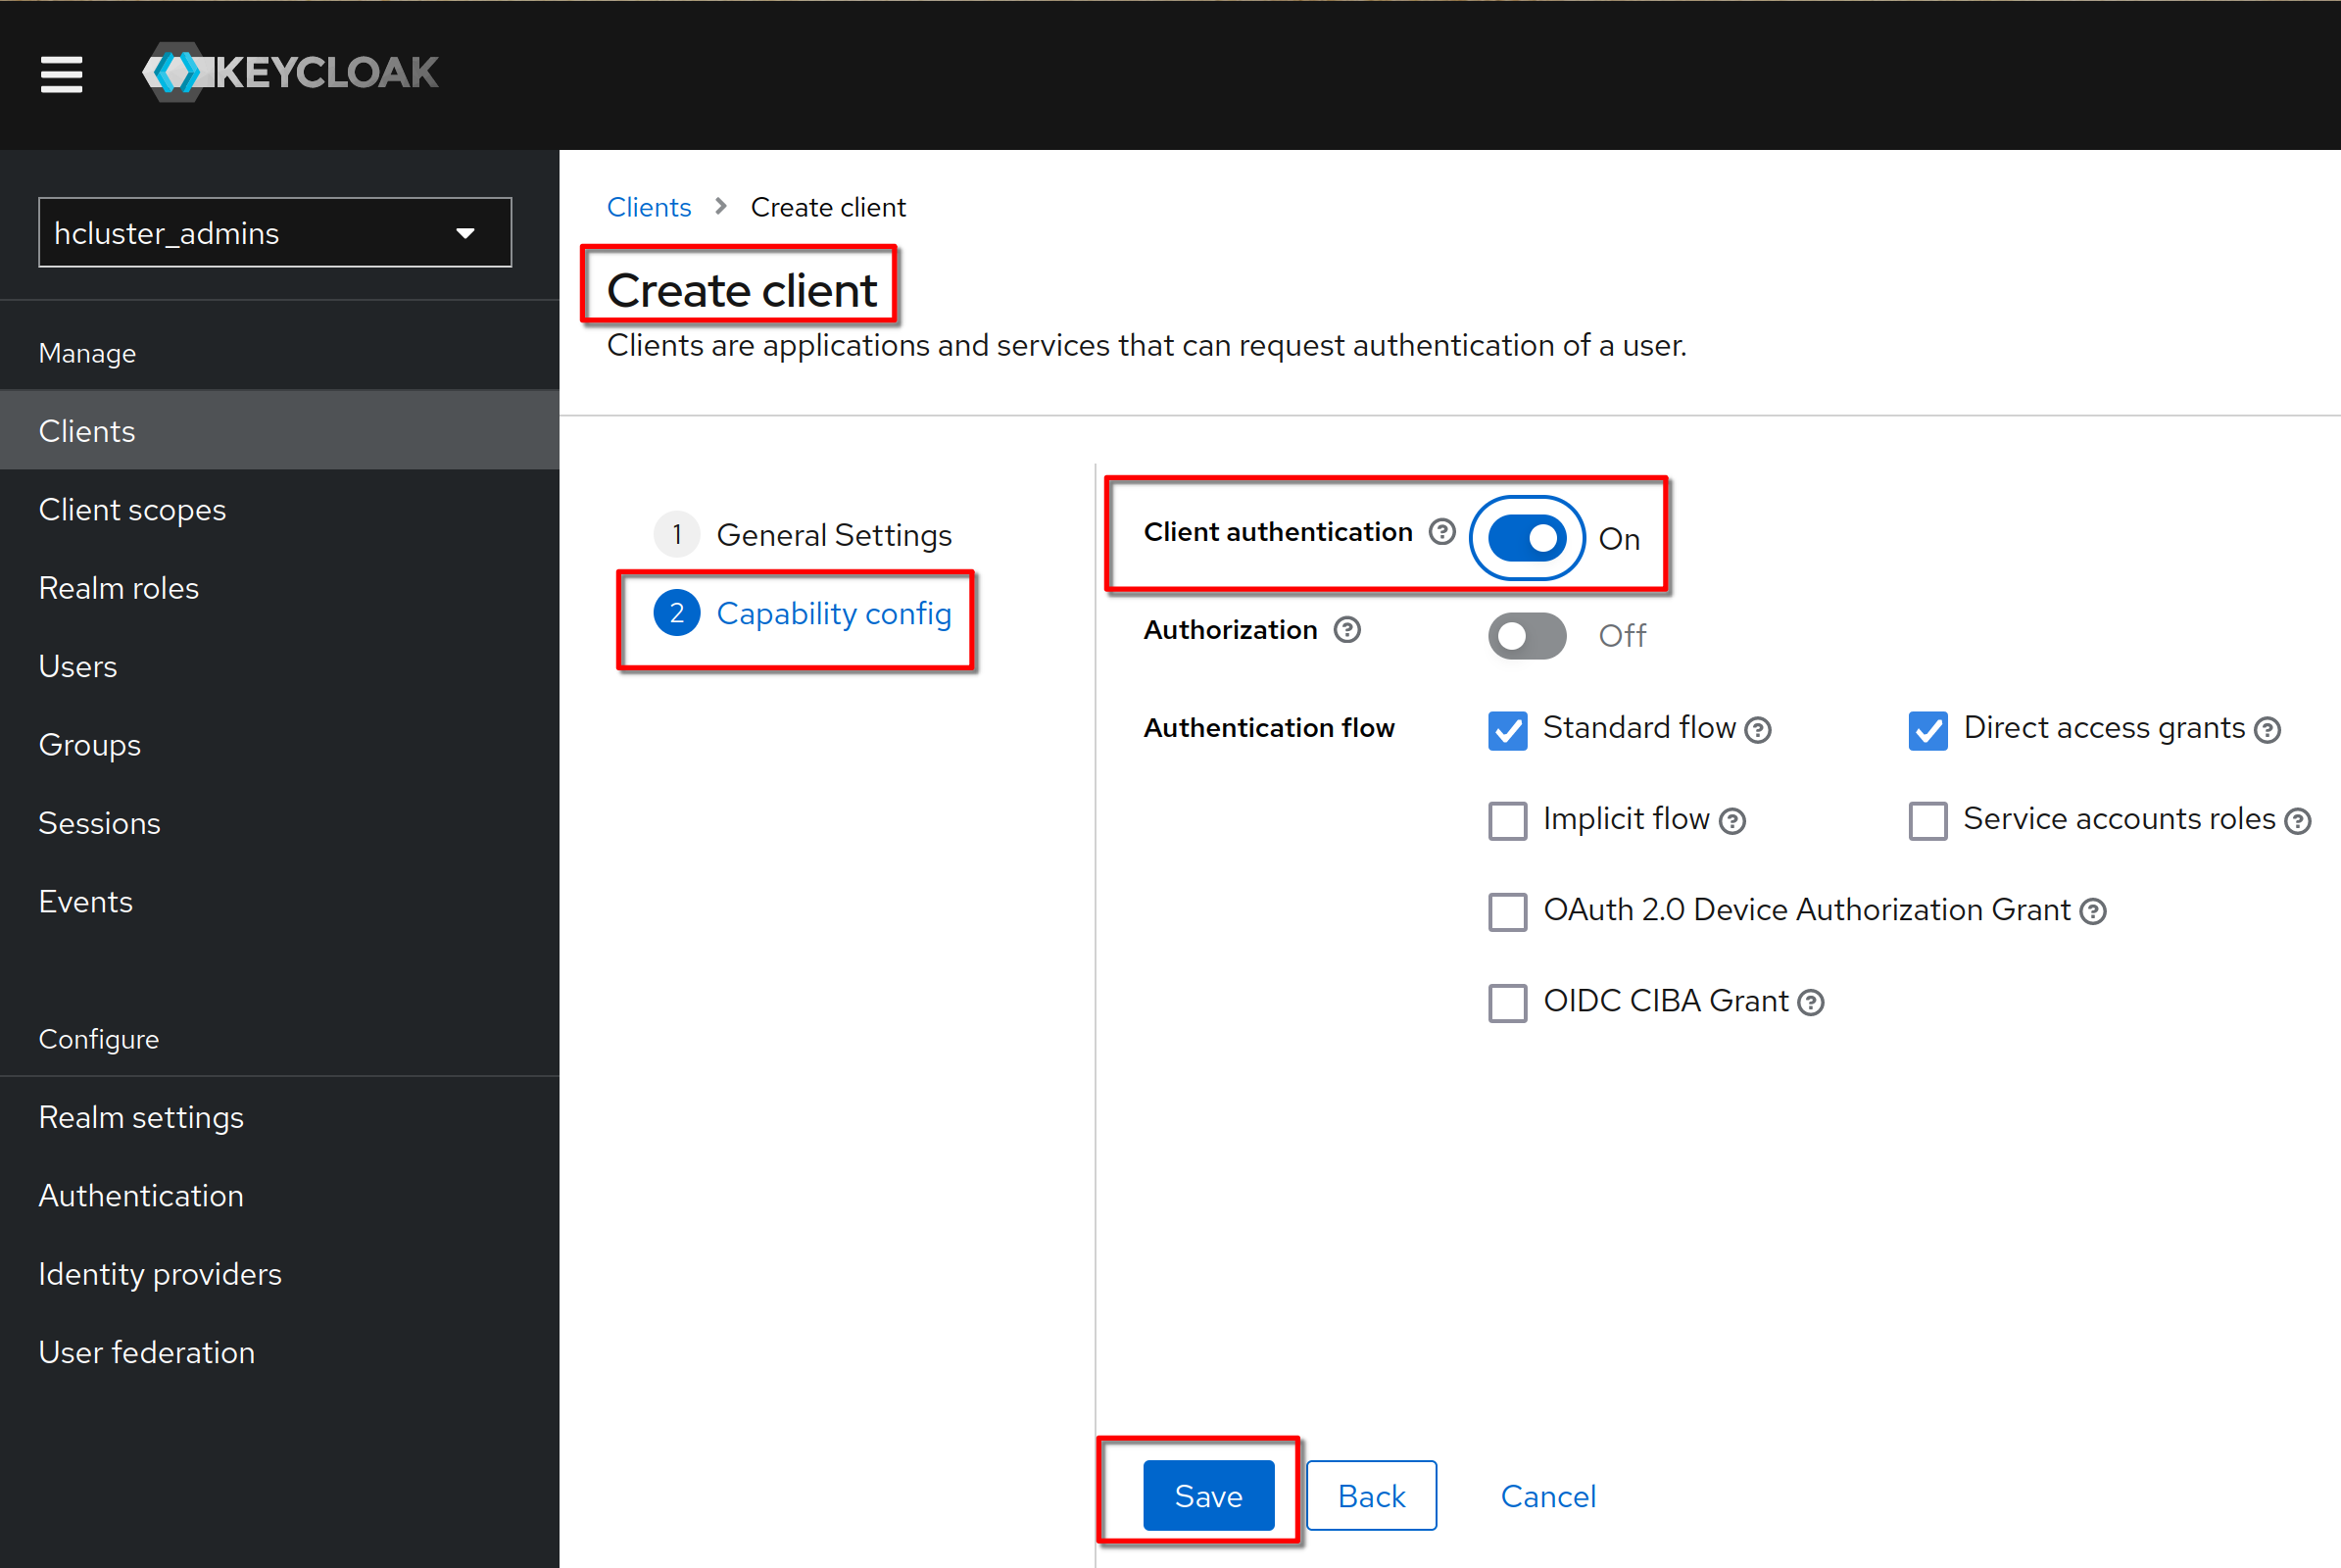
Set “Client authentication” to “on” (means OIDC type confidential). Click “Save”
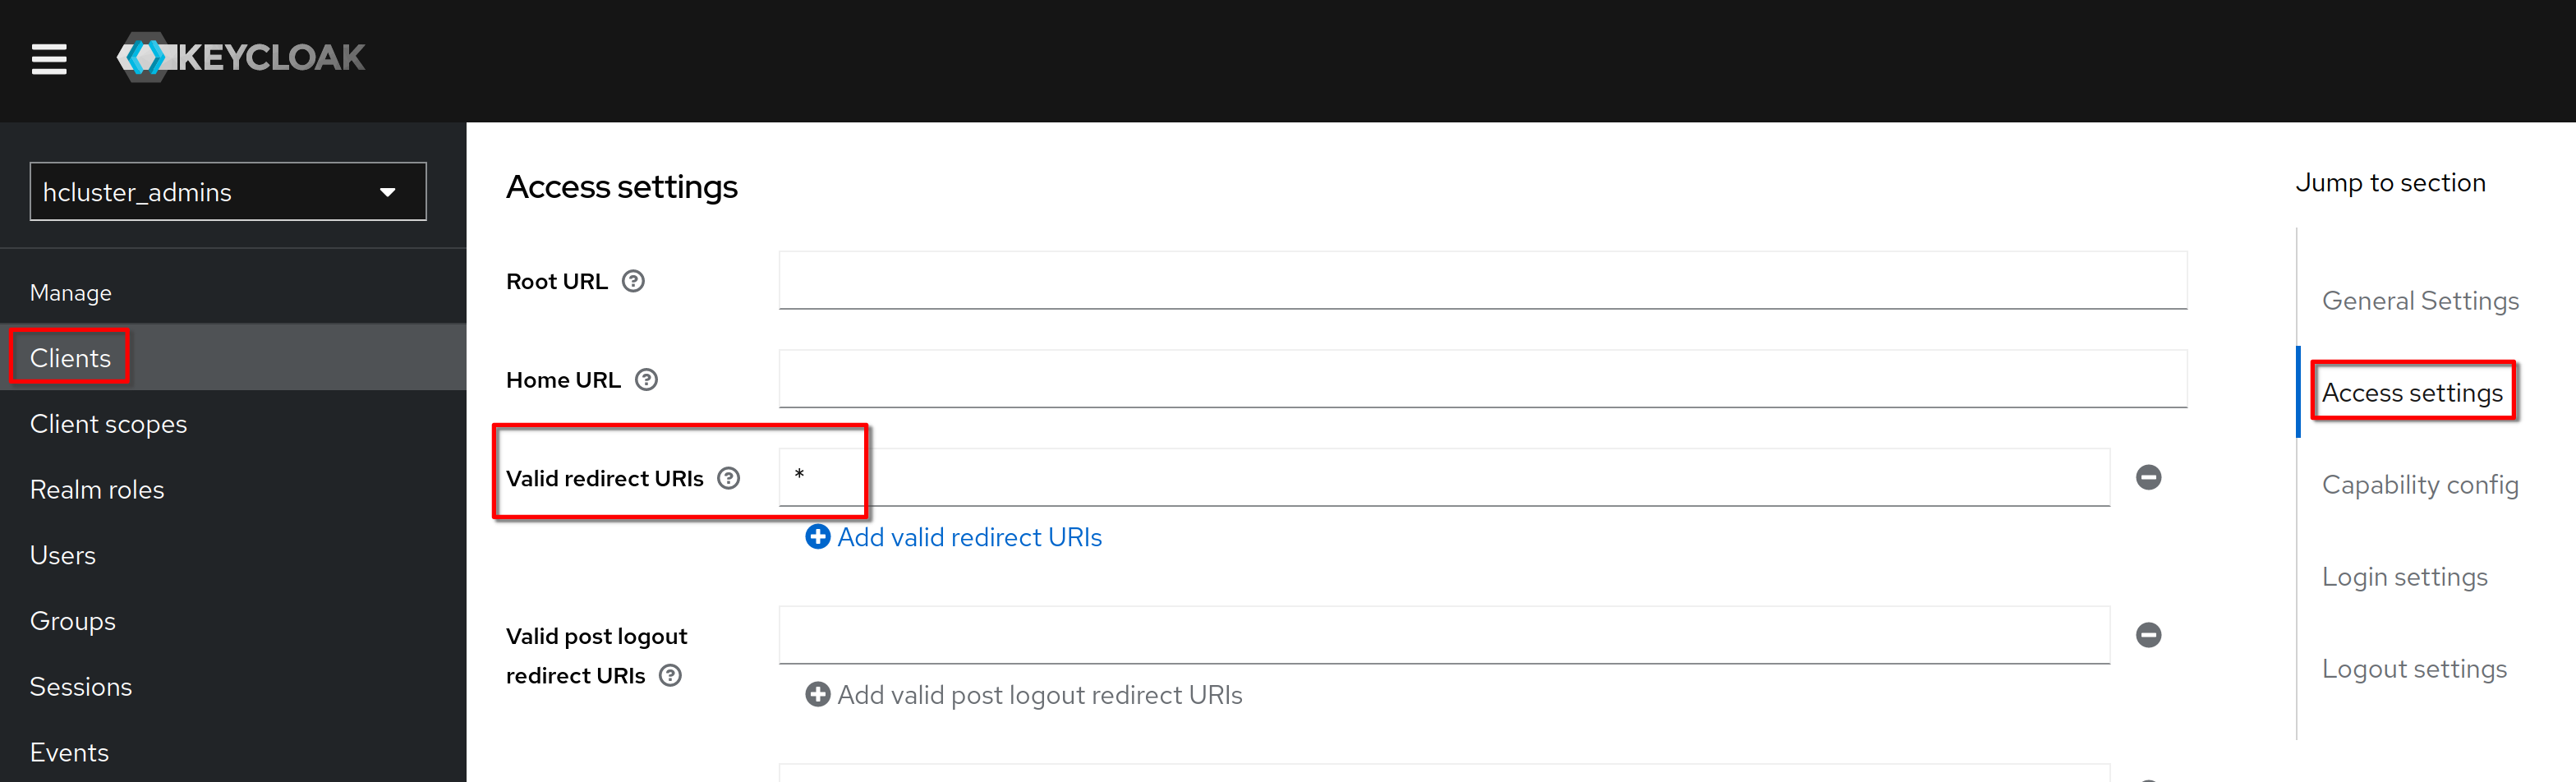
In “Cient details”, “Settings” tab, “access settings” section, set “Valid redirect URI” to “*”. Click “Save”
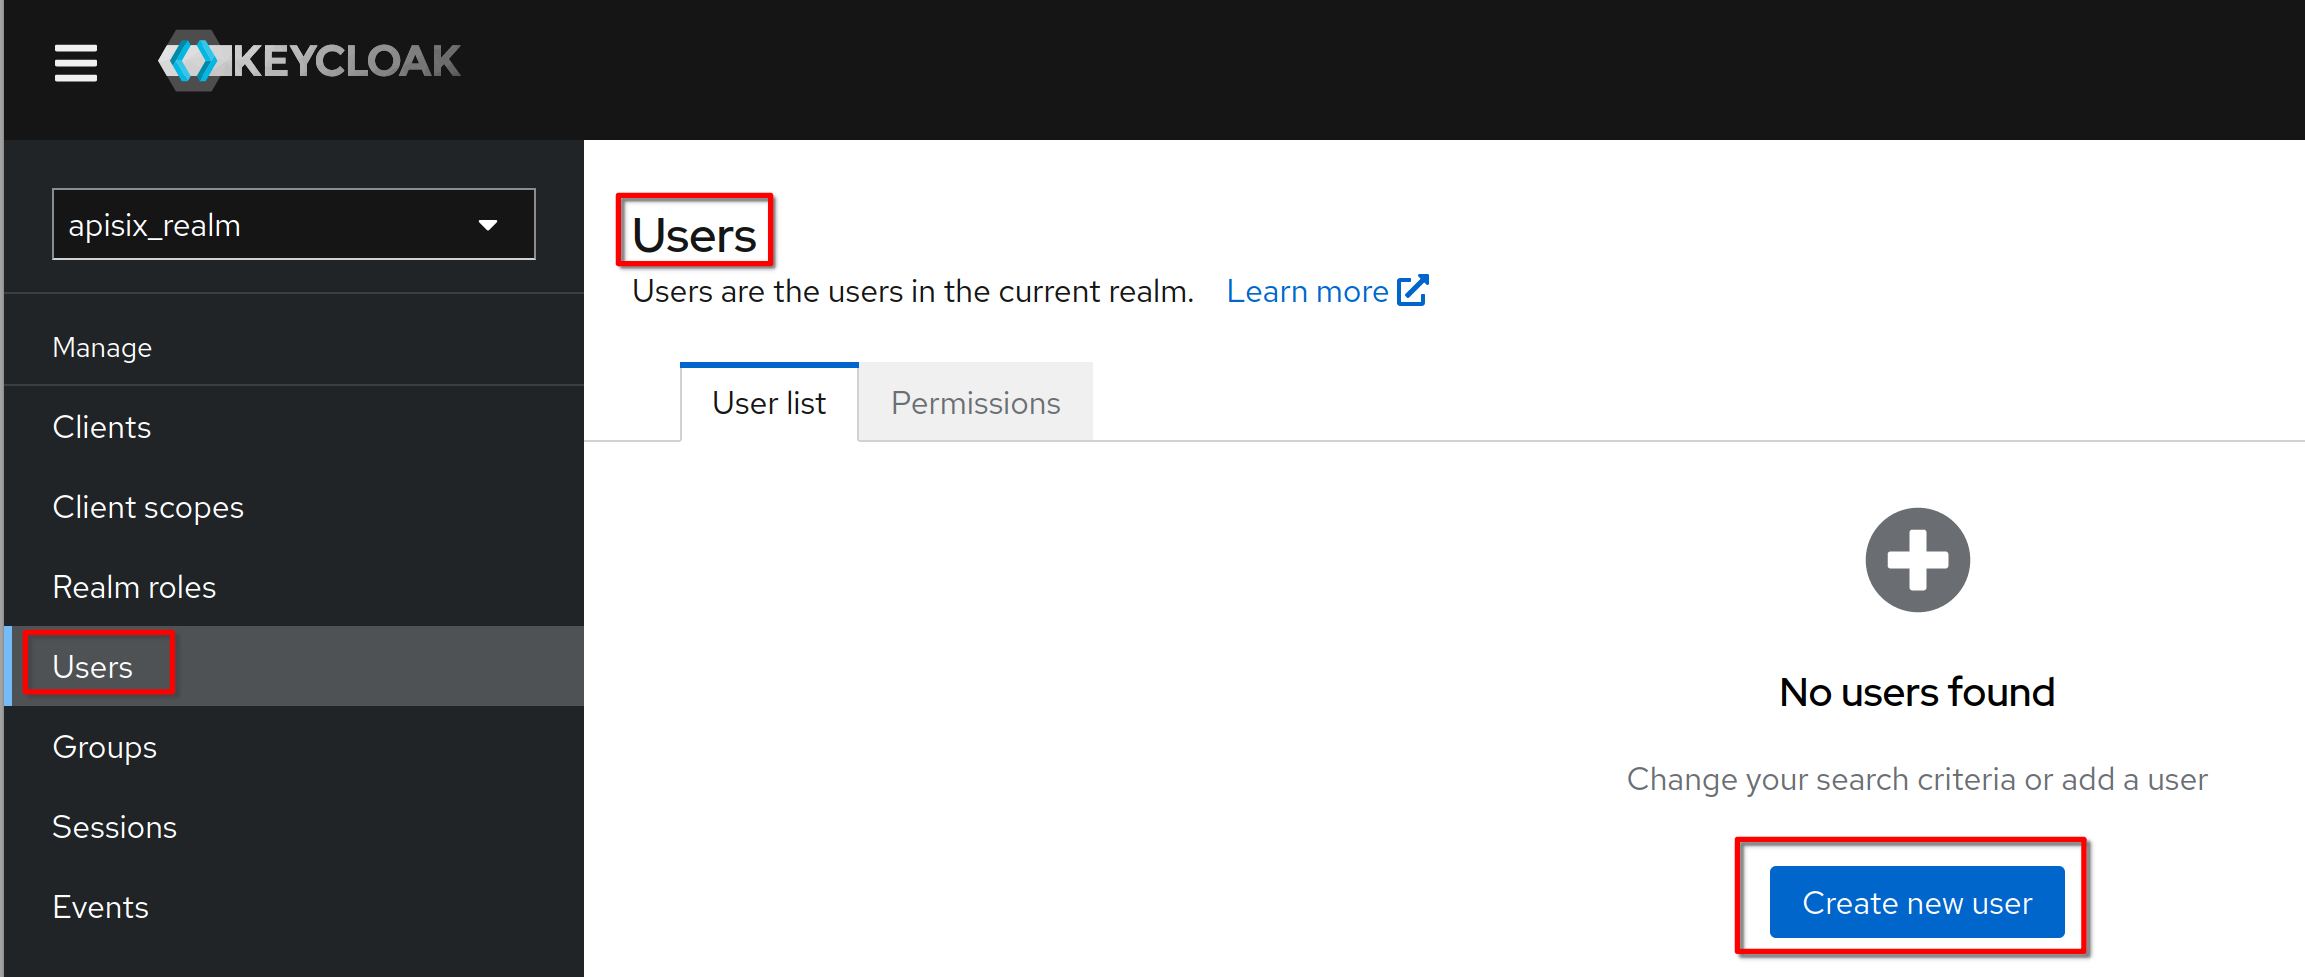
Create a new user
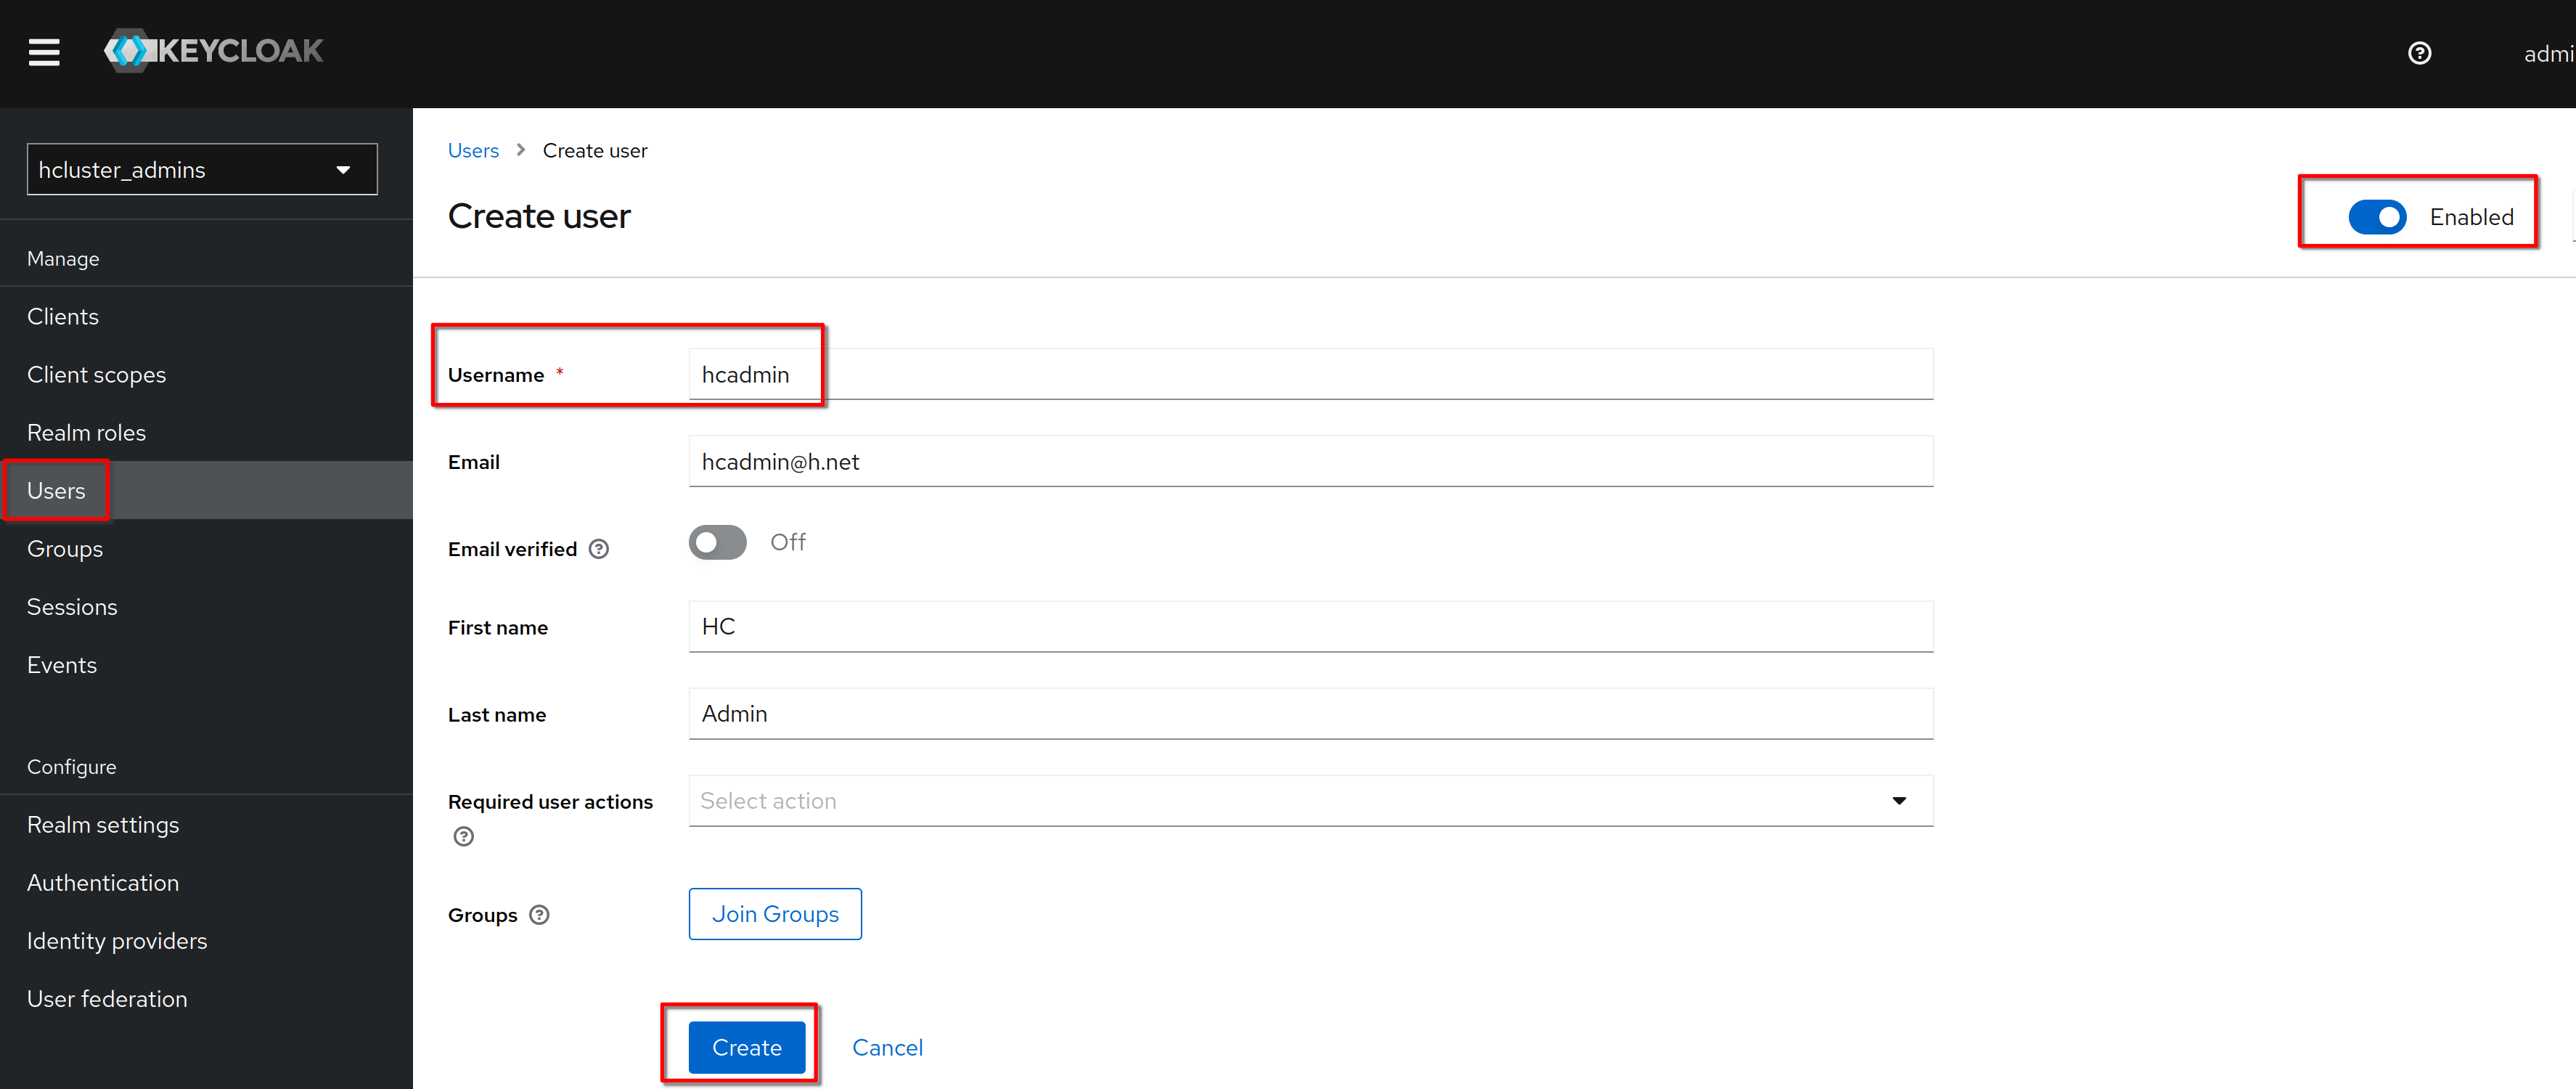
Set the username to “hcadmin” and click “Create”
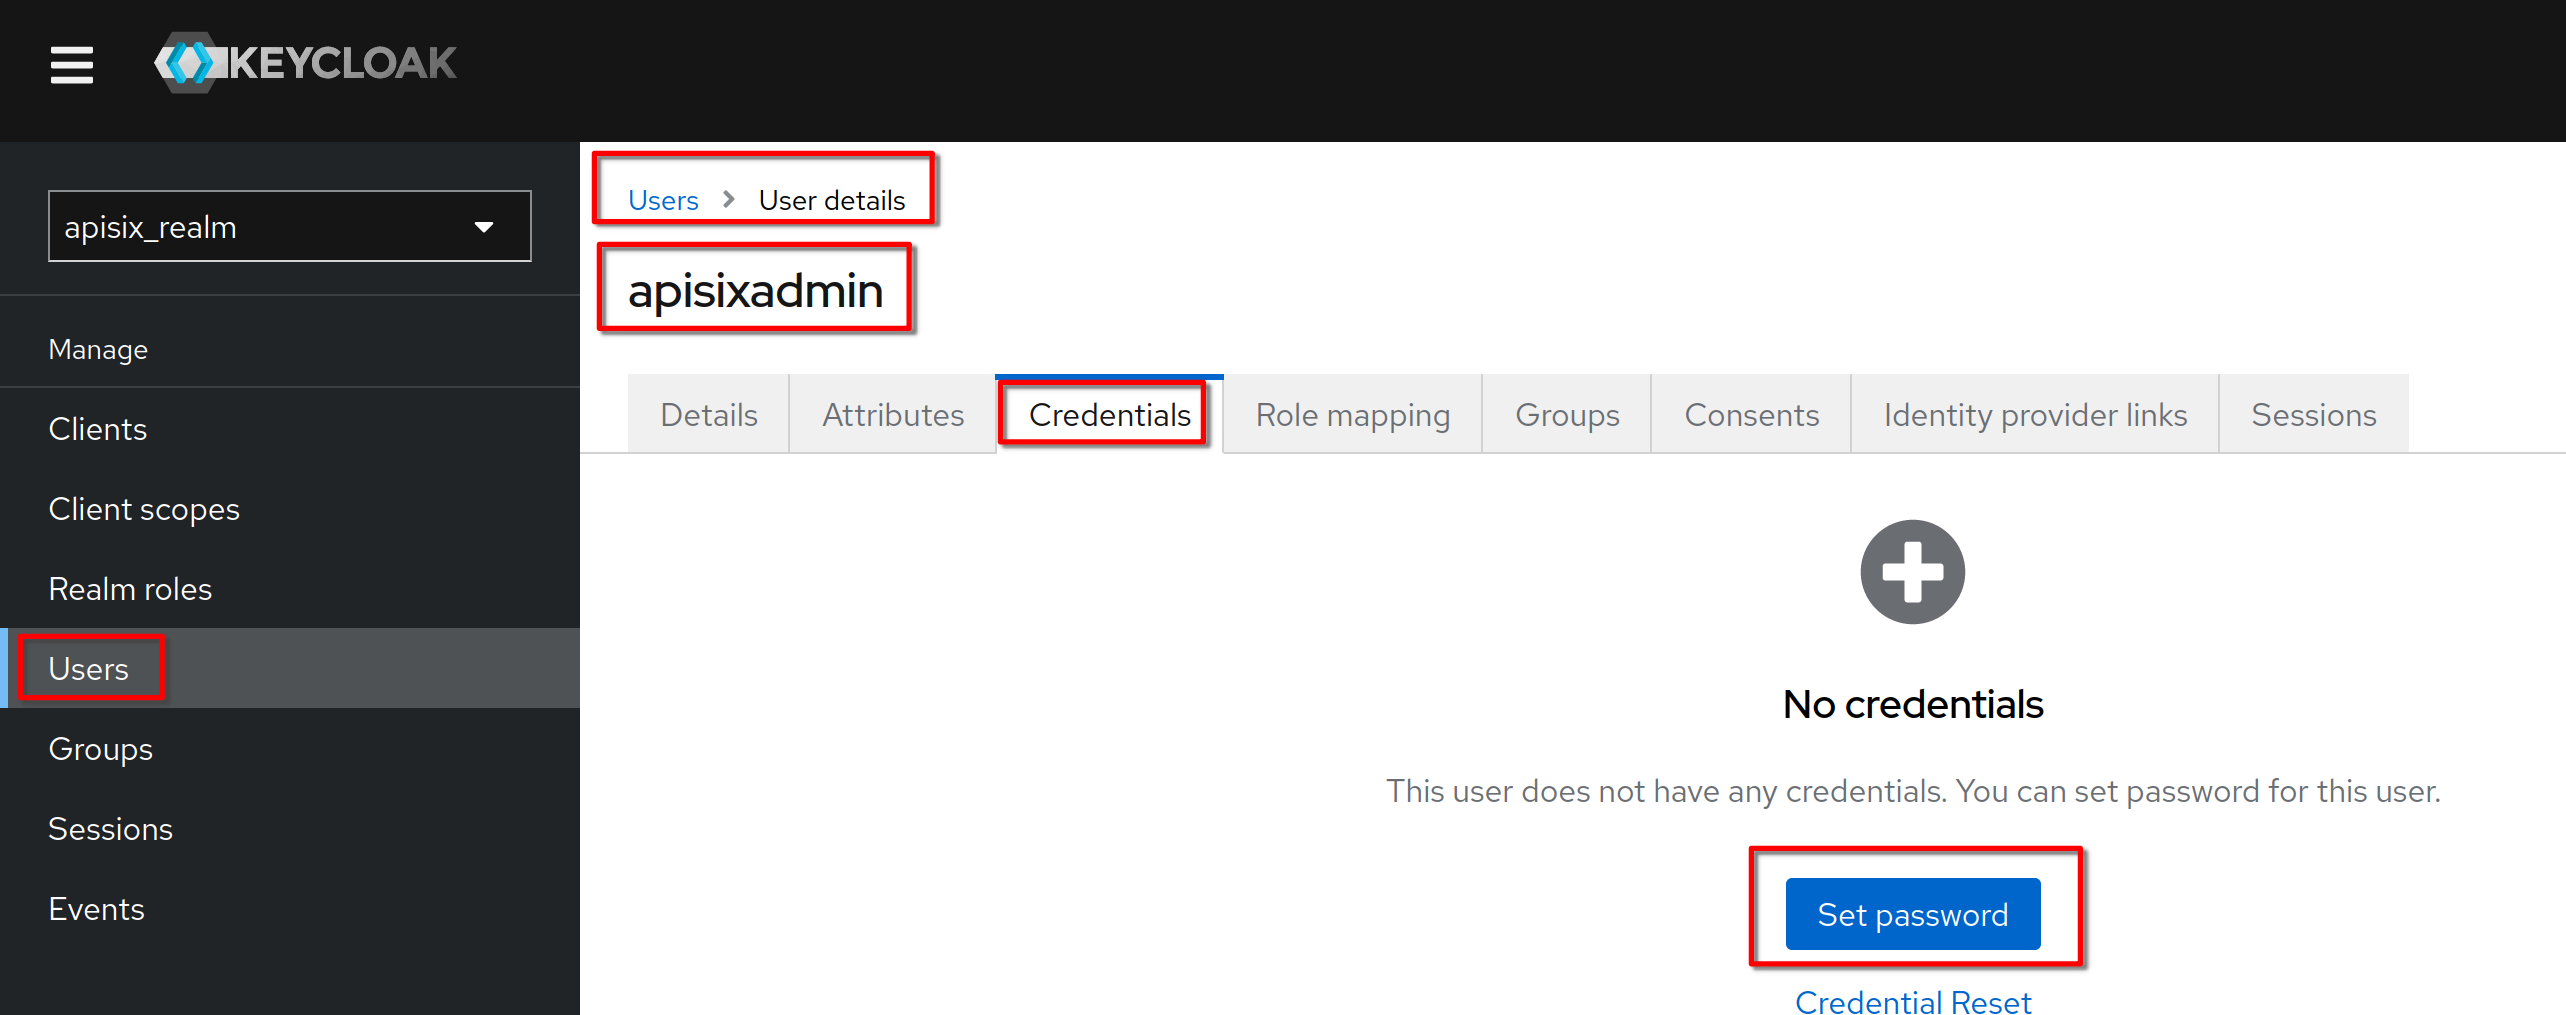
In the “Credentials” tab click “Set password” (same procedure for “Reset” password)
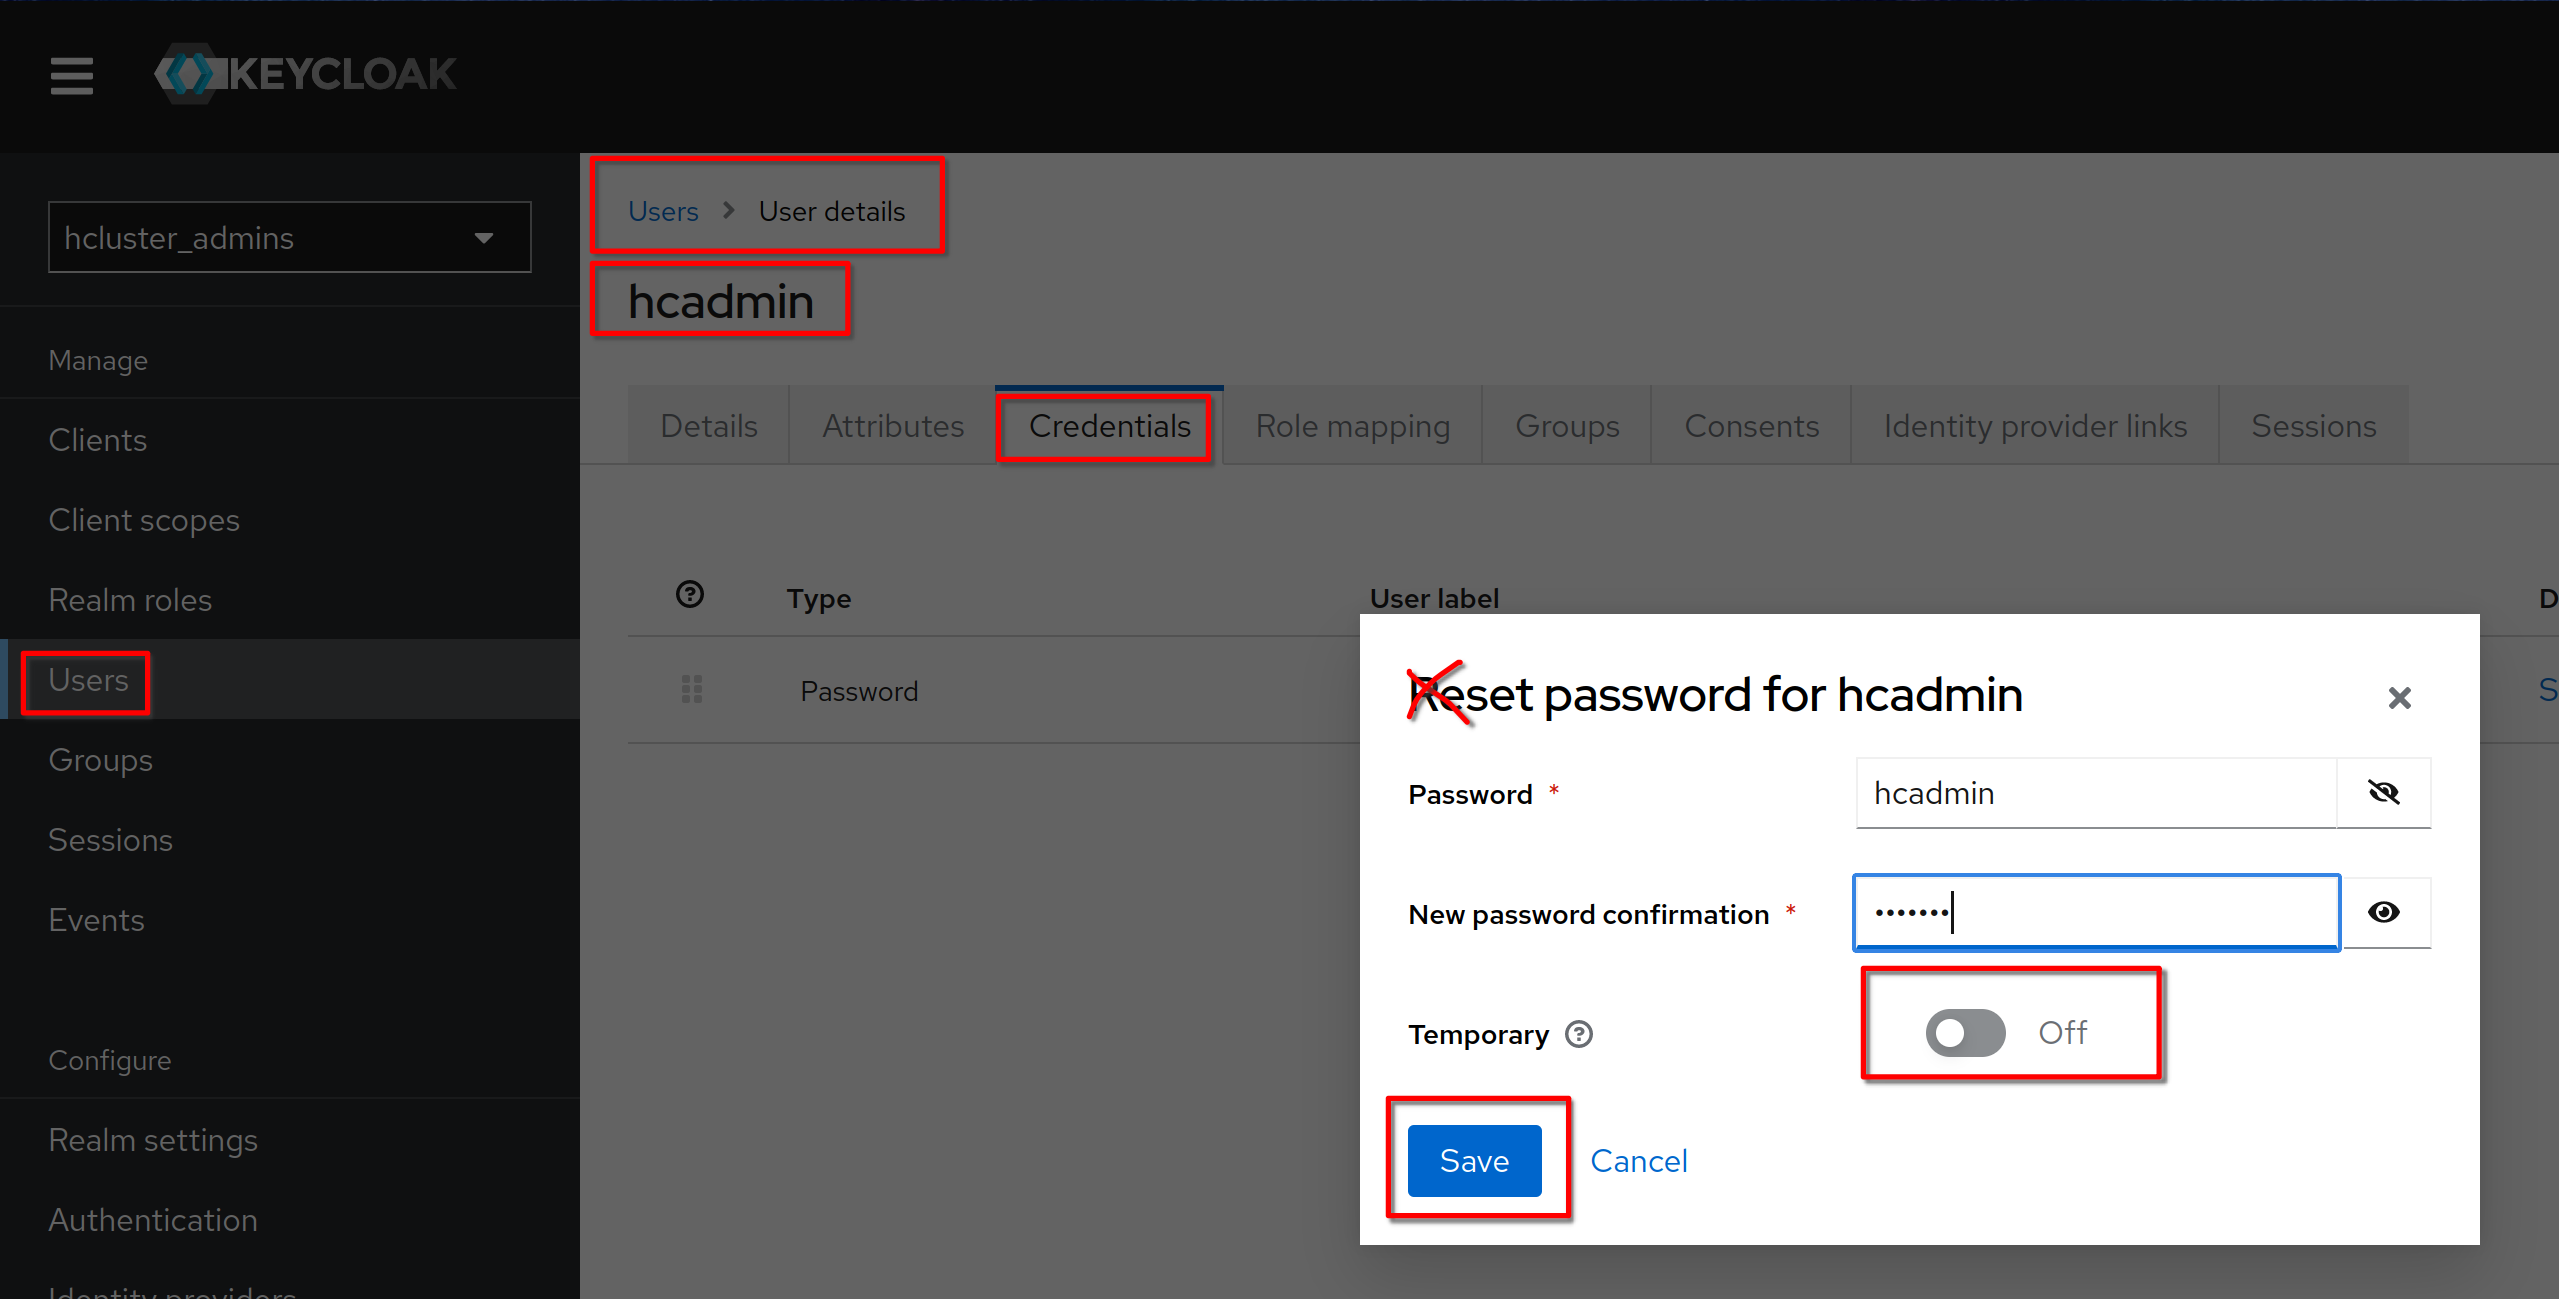
Set a permanent (Temporary set to Off) password to “hcadmin” (equal to the username)
Get Client ID and Secret
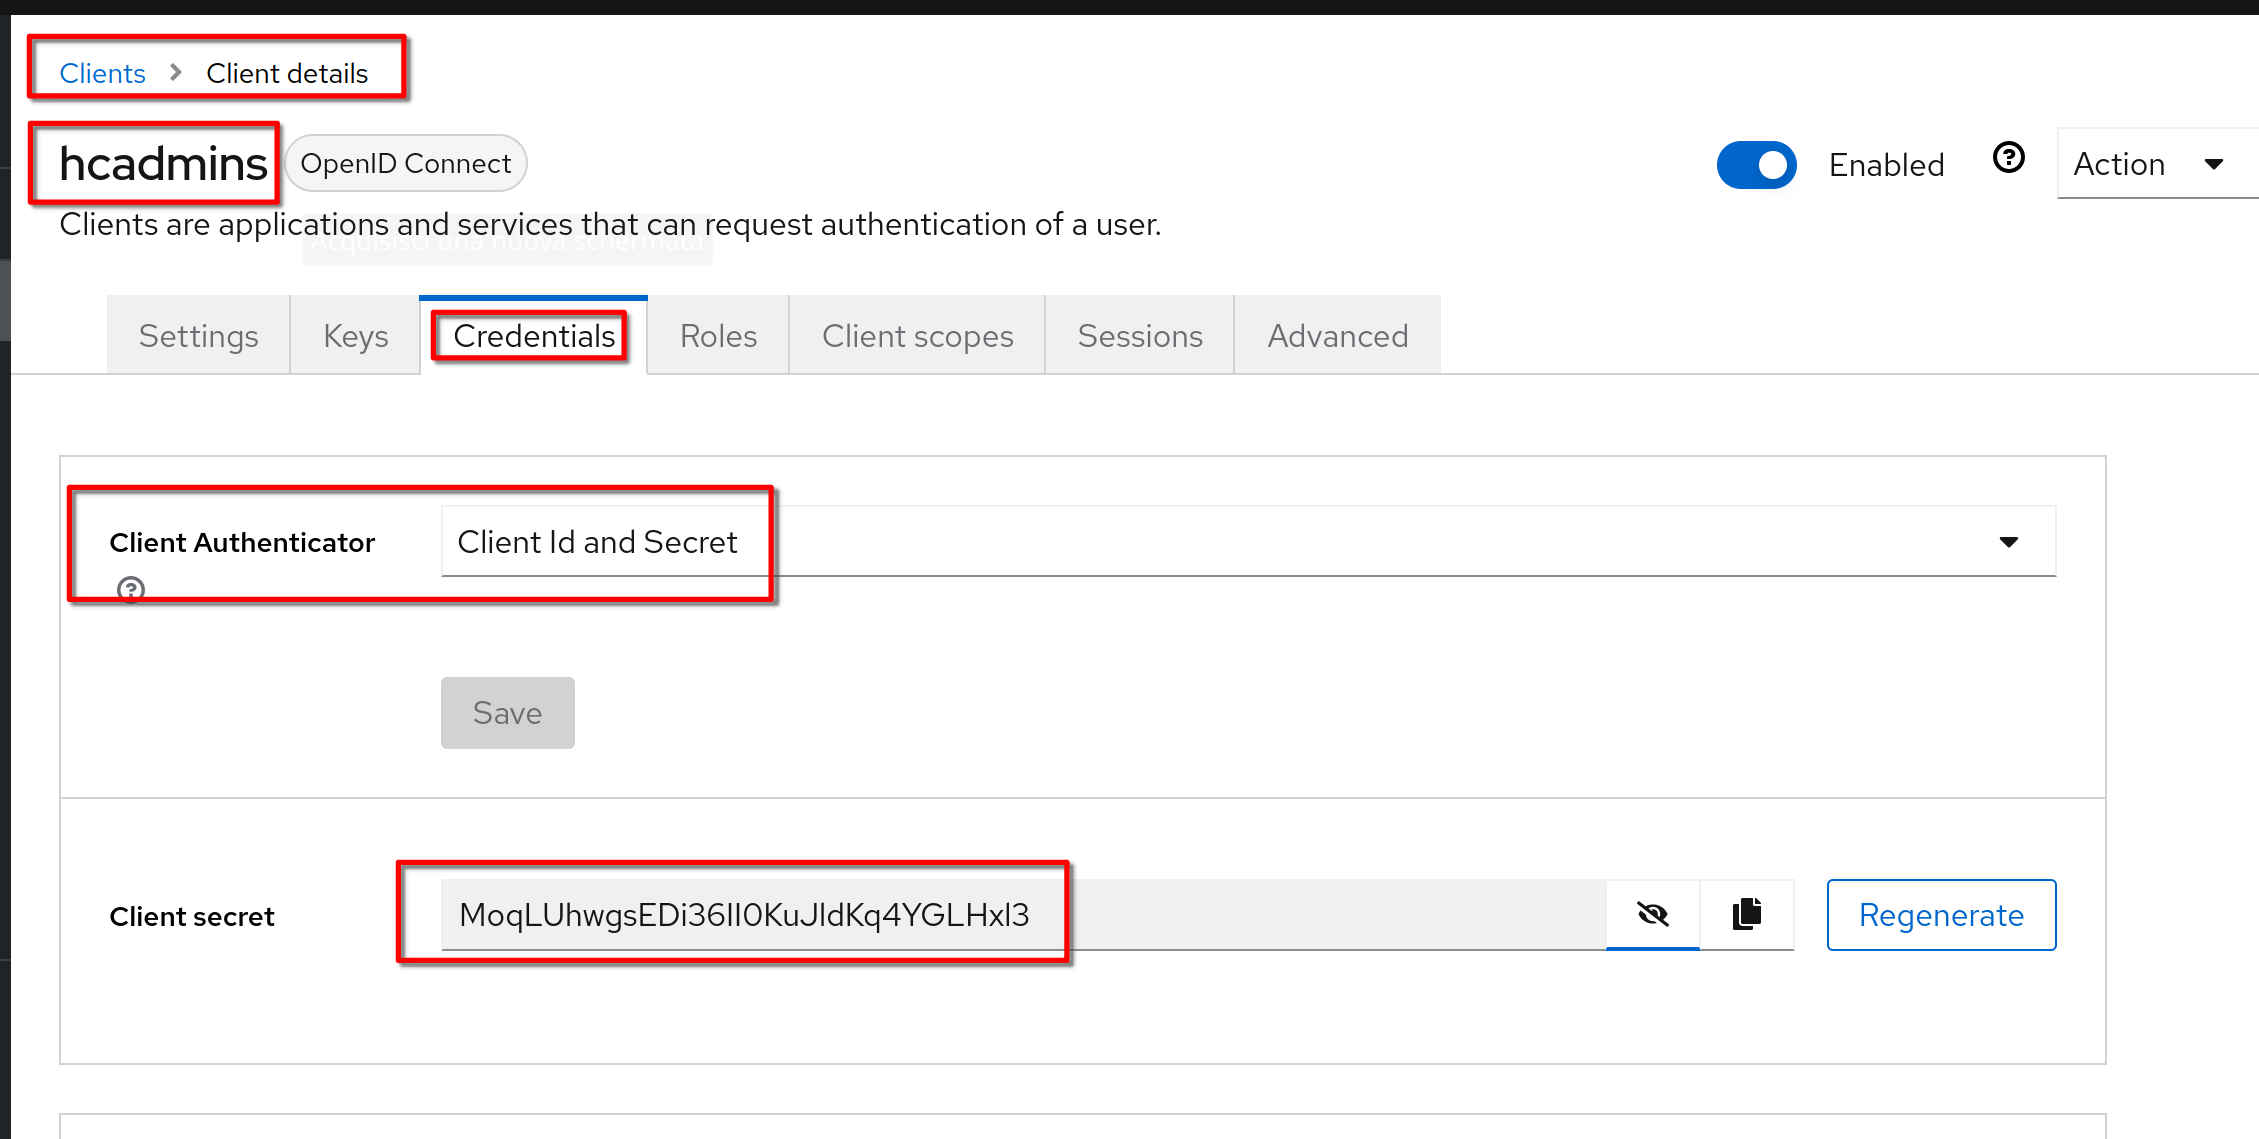
Select hcadmins client. Go to Credentials tab; show the Secret and copy the client id and secret to be used in the next steps
client ID: hcadmins
Secret: MoqLUhwgsEDi36II0KuJldKq4YGLHxl3
In the “Realm settings”, “General” tab click on the link “OpenID Endpoint Configuration”
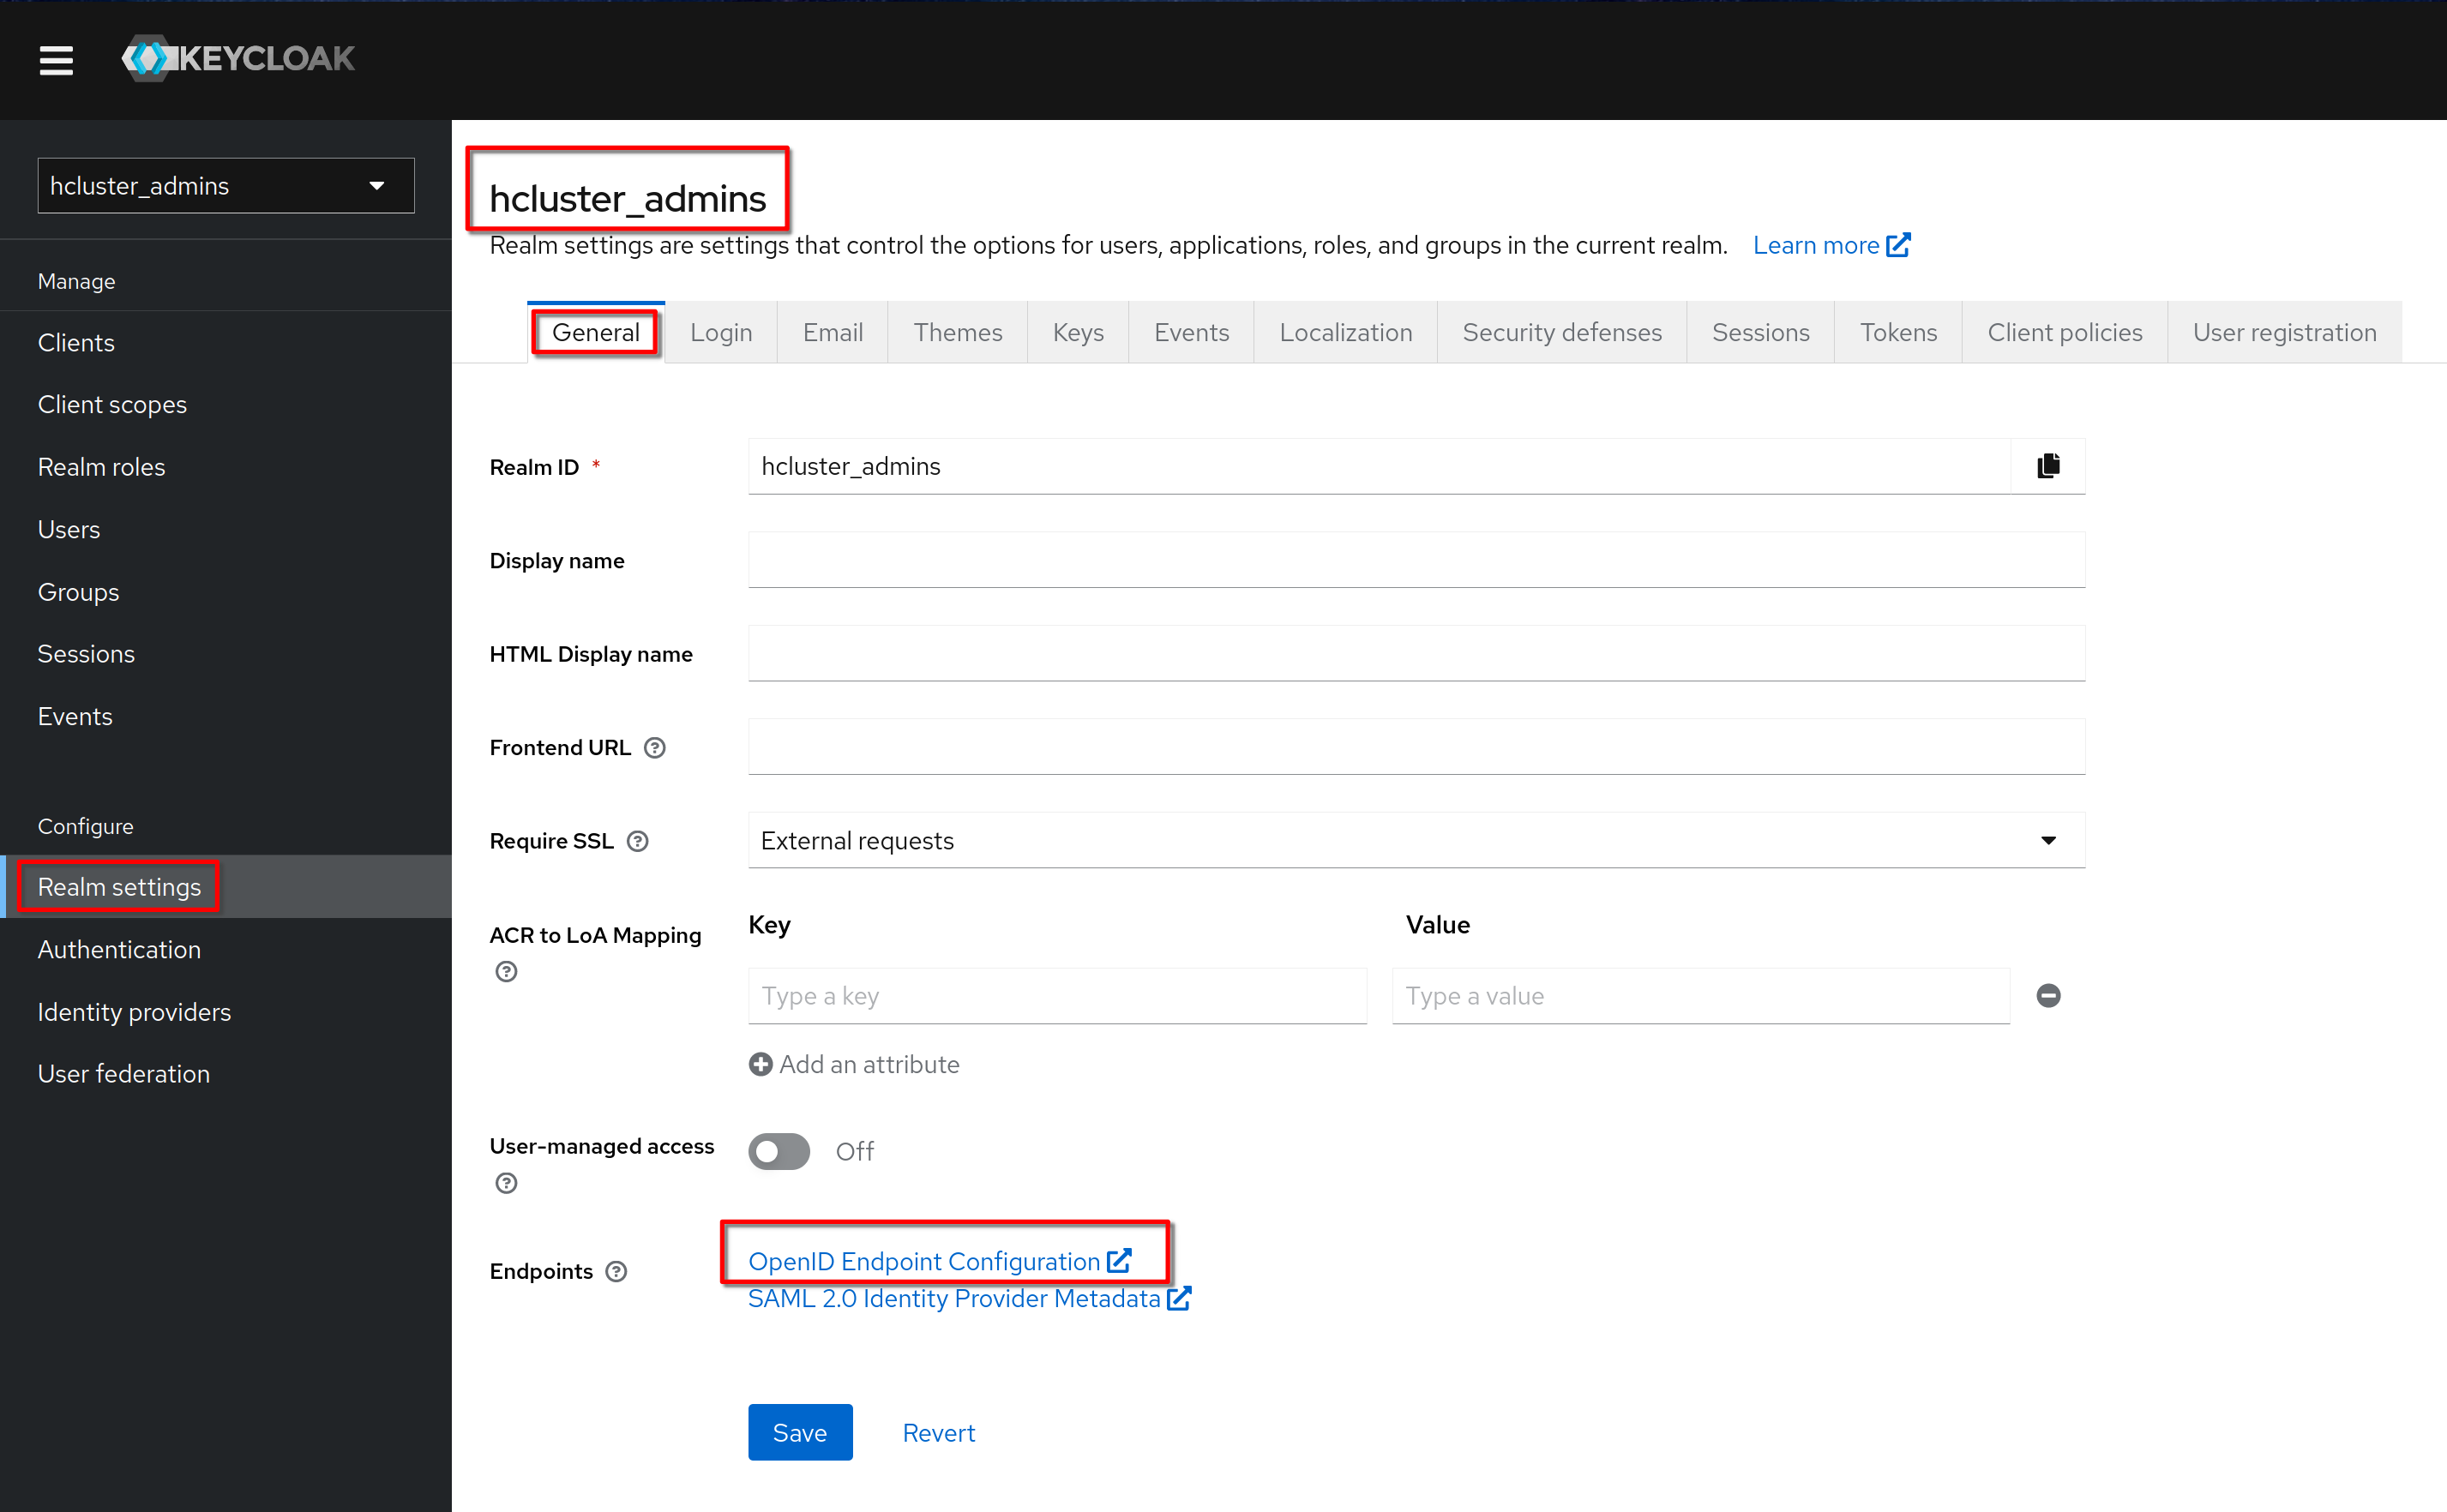
This is the shown page
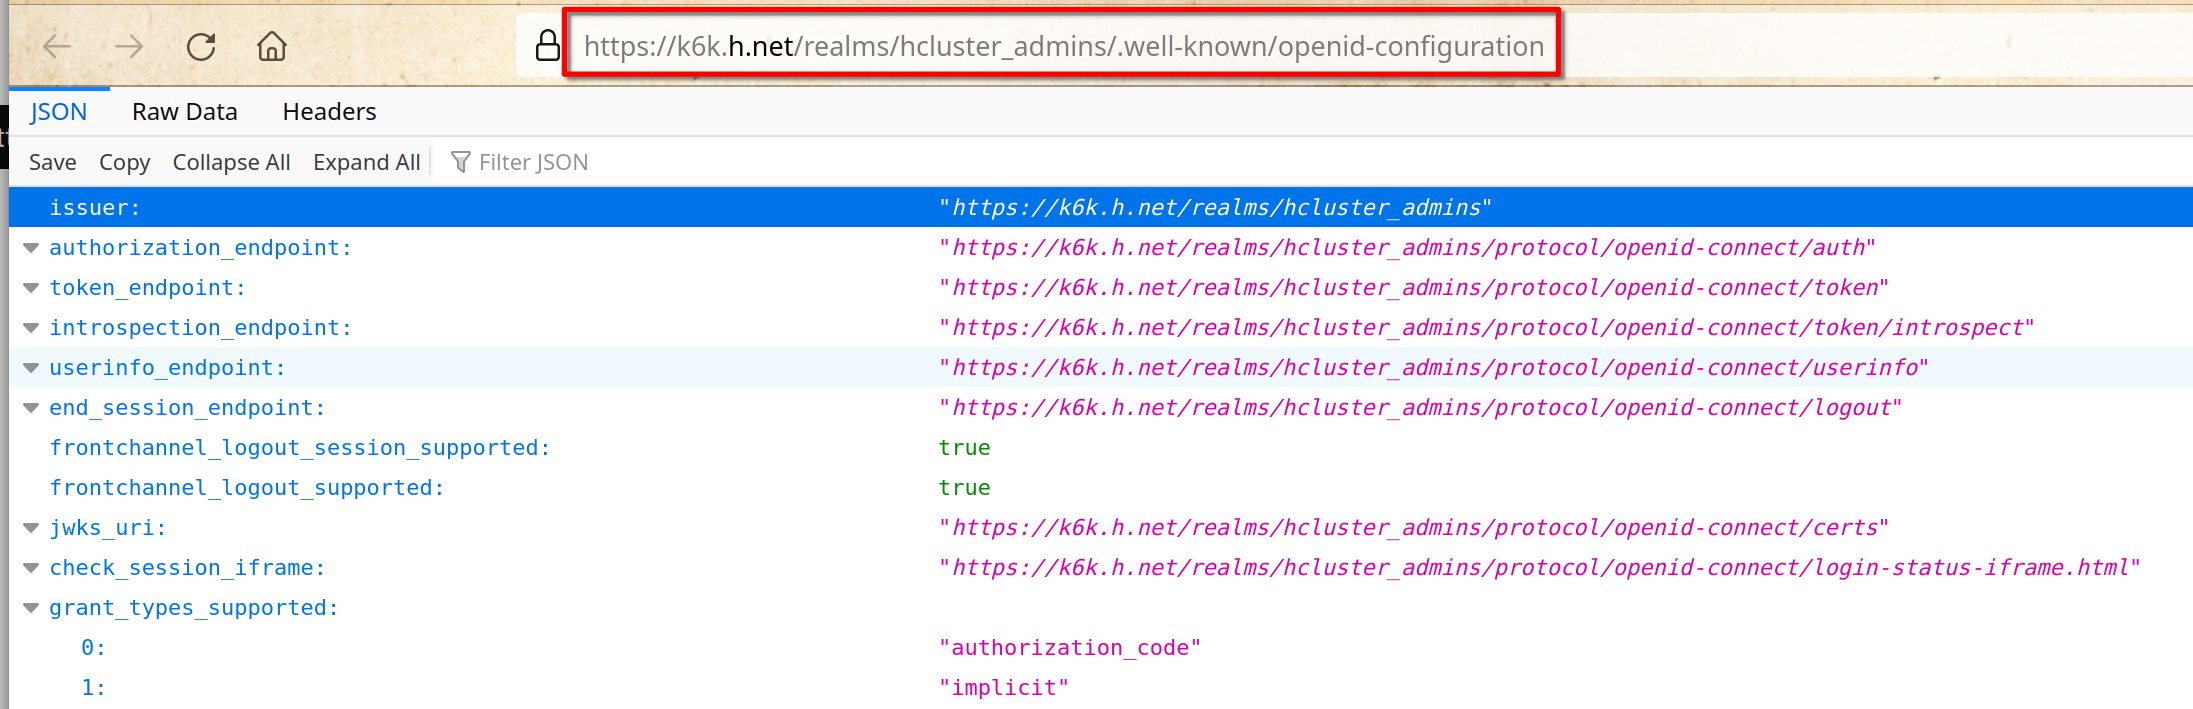
Copy the link
https://k6k.h.net/realms/hcluster_admins/.well-known/openid-configurationPrepare a json client definition using the previous copied information
{
    "client_id":"hcadmins",
    "client_secret":"MoqLUhwgsEDi36II0KuJldKq4YGLHxl3",
    "discovery":"https://k6k.h.net/realms/hcluster_admins/.well-known/openid-configuration",
    "scope":"openid profile",
    "bearer_only":false,
    "realm":"hcluster_admins",
    "introspection_endpoint_auth_method":"client_secret_post",
    "redirect_uri":"https://apisix.h.net/*",
    "access_token_in_authorization_header":true
}
OpenID-Connect for APISIX Dashboard
Work on any machine
Configure the apisix-dashboard route.
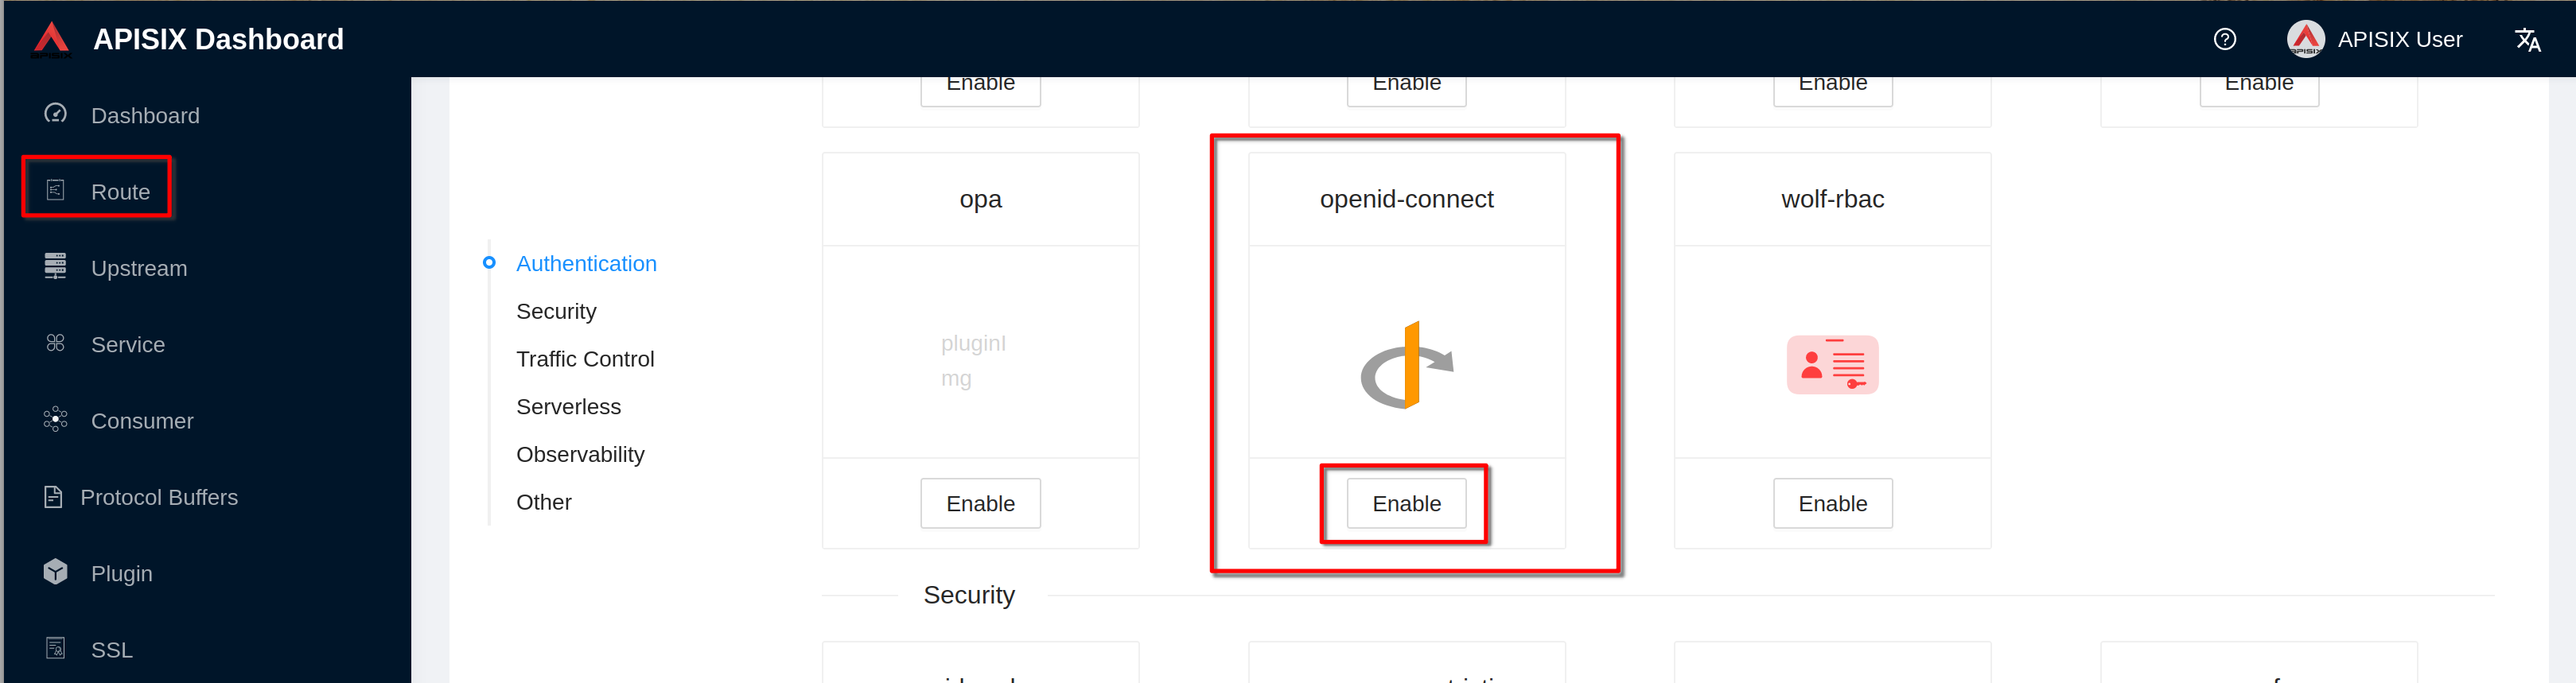
Go to “3 Plugin config”
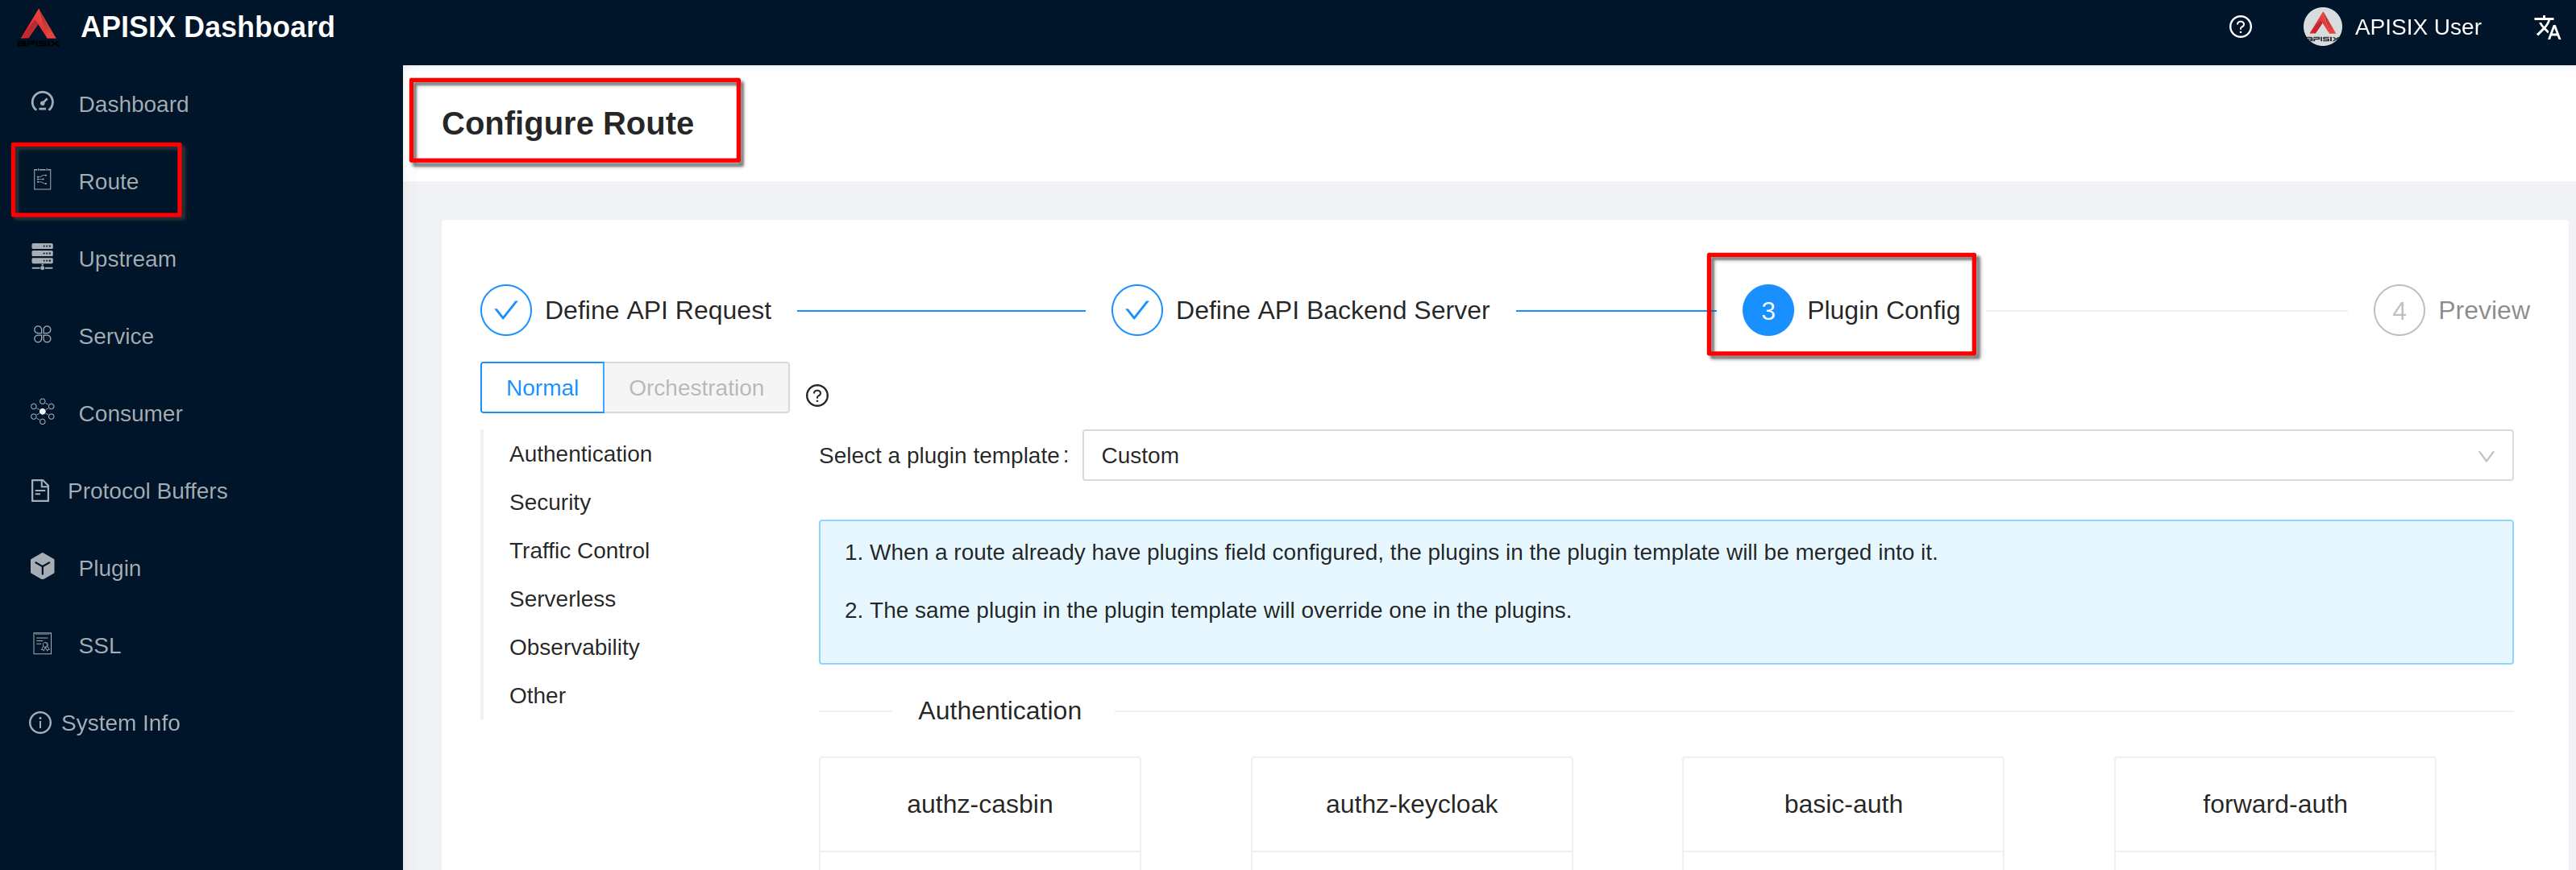
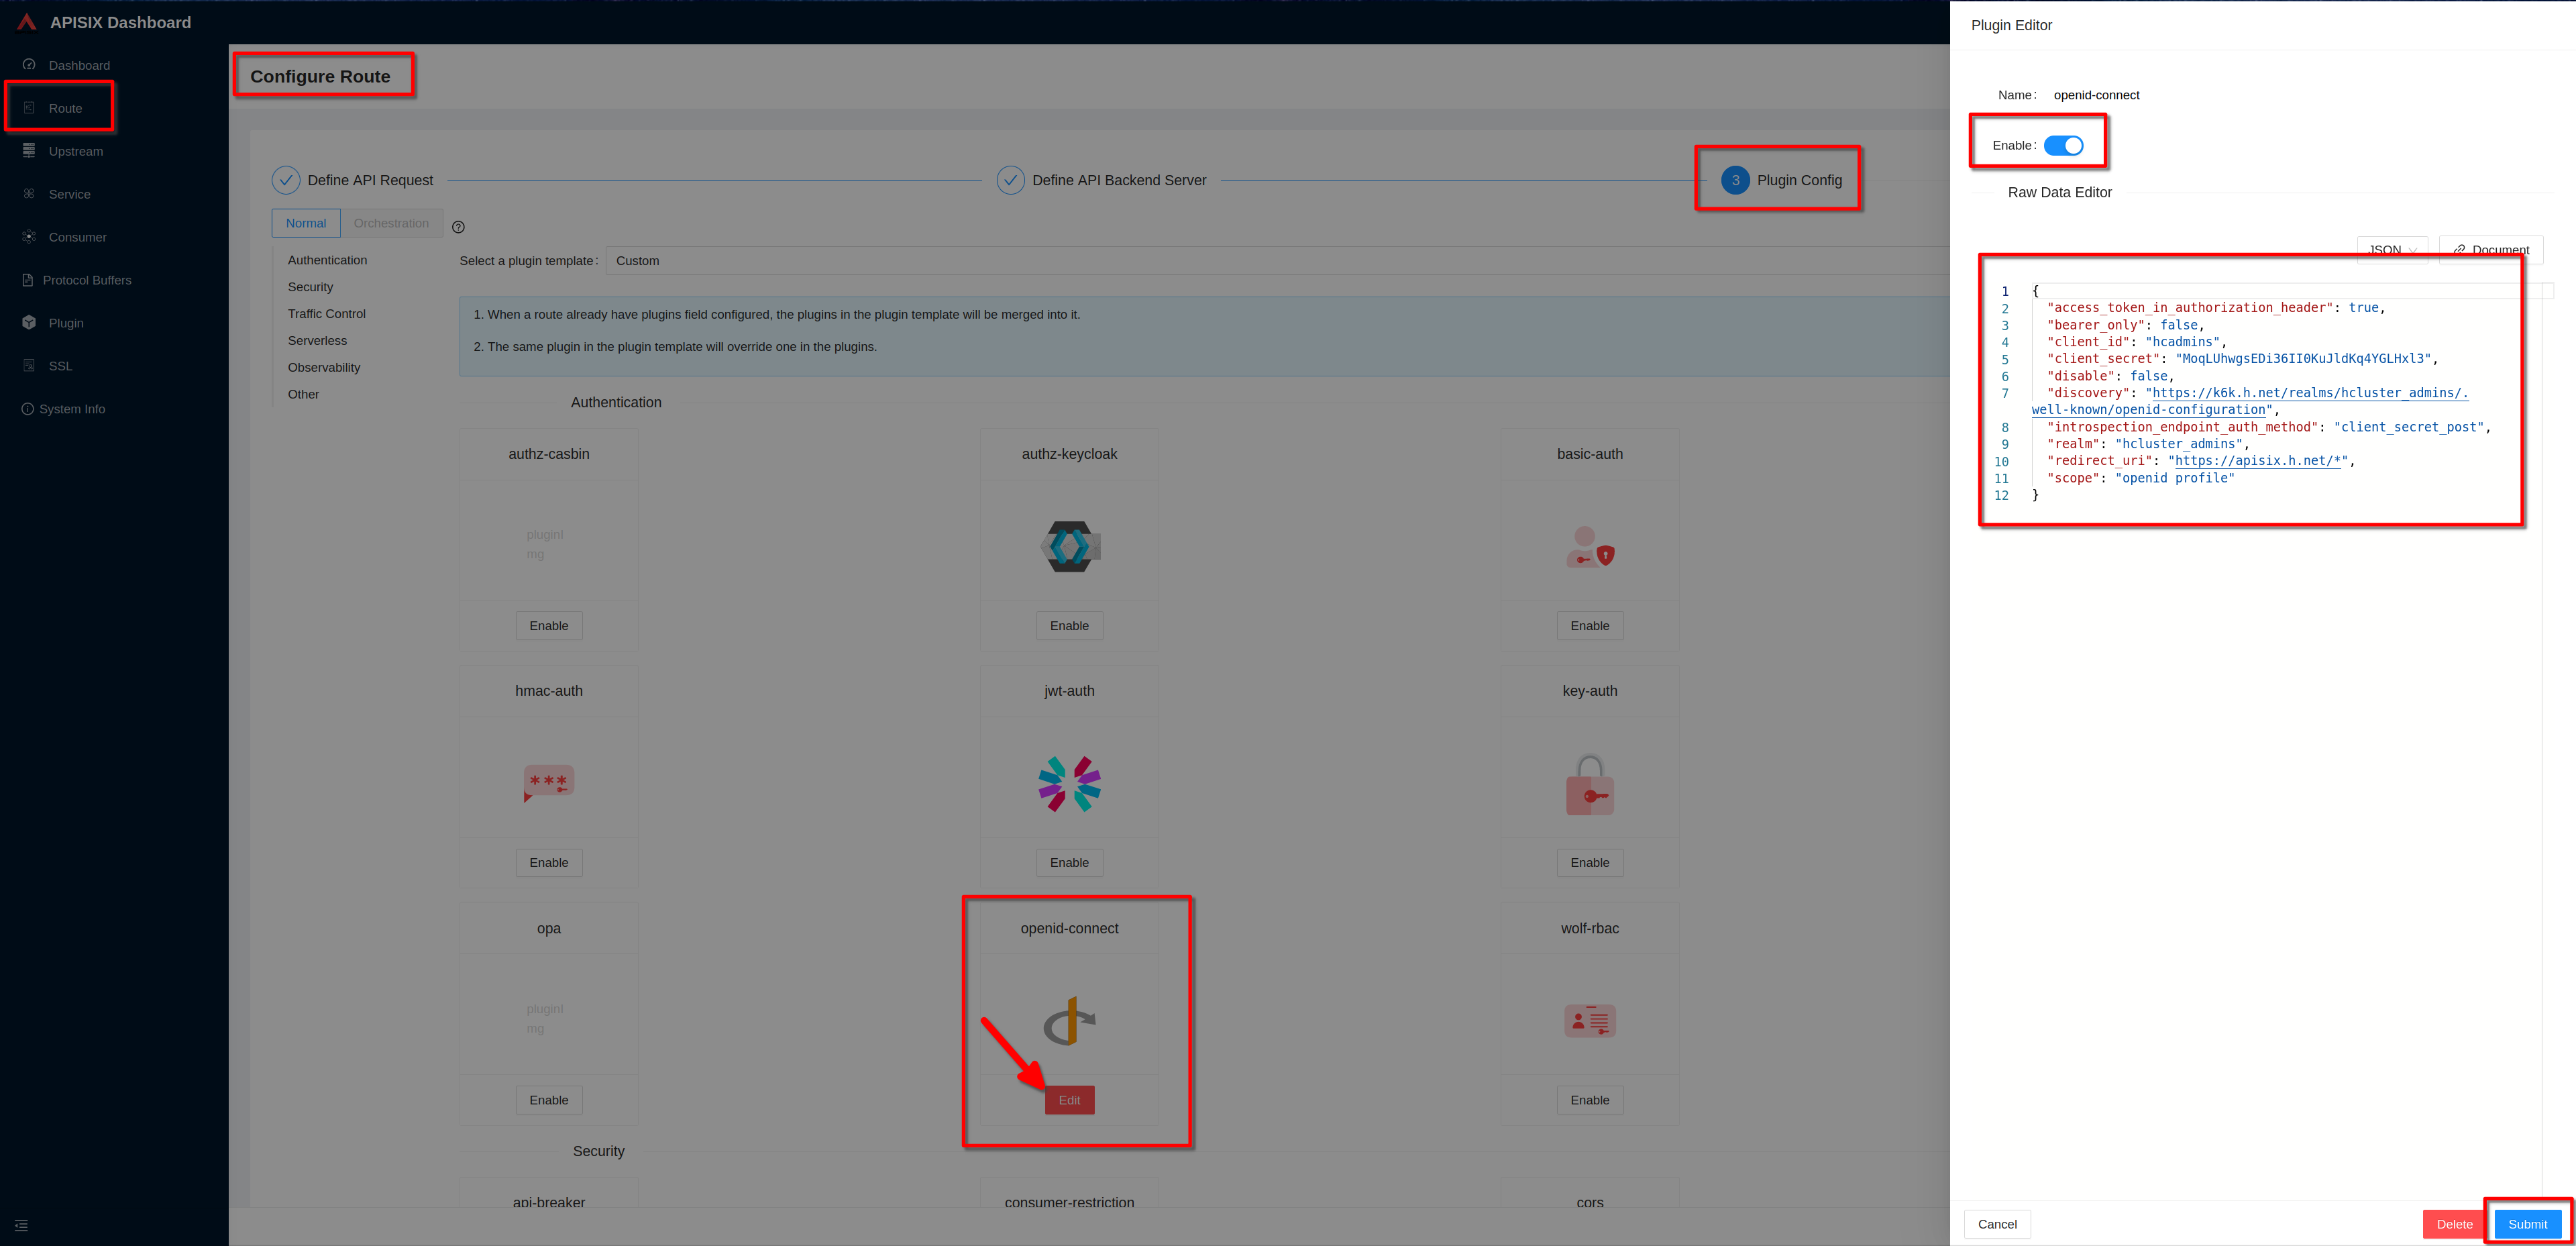
Click “Enable” on openid-connect plugin (if you have already defined the plugin you’ll see “Edit” instead of “Enable”)
Enable the plugin. Copy the previous defined json definition and click “Submit”
Clik “next” and then clik “Submit” to complete the route configuration
Then “view” the route to see the plugin configuration
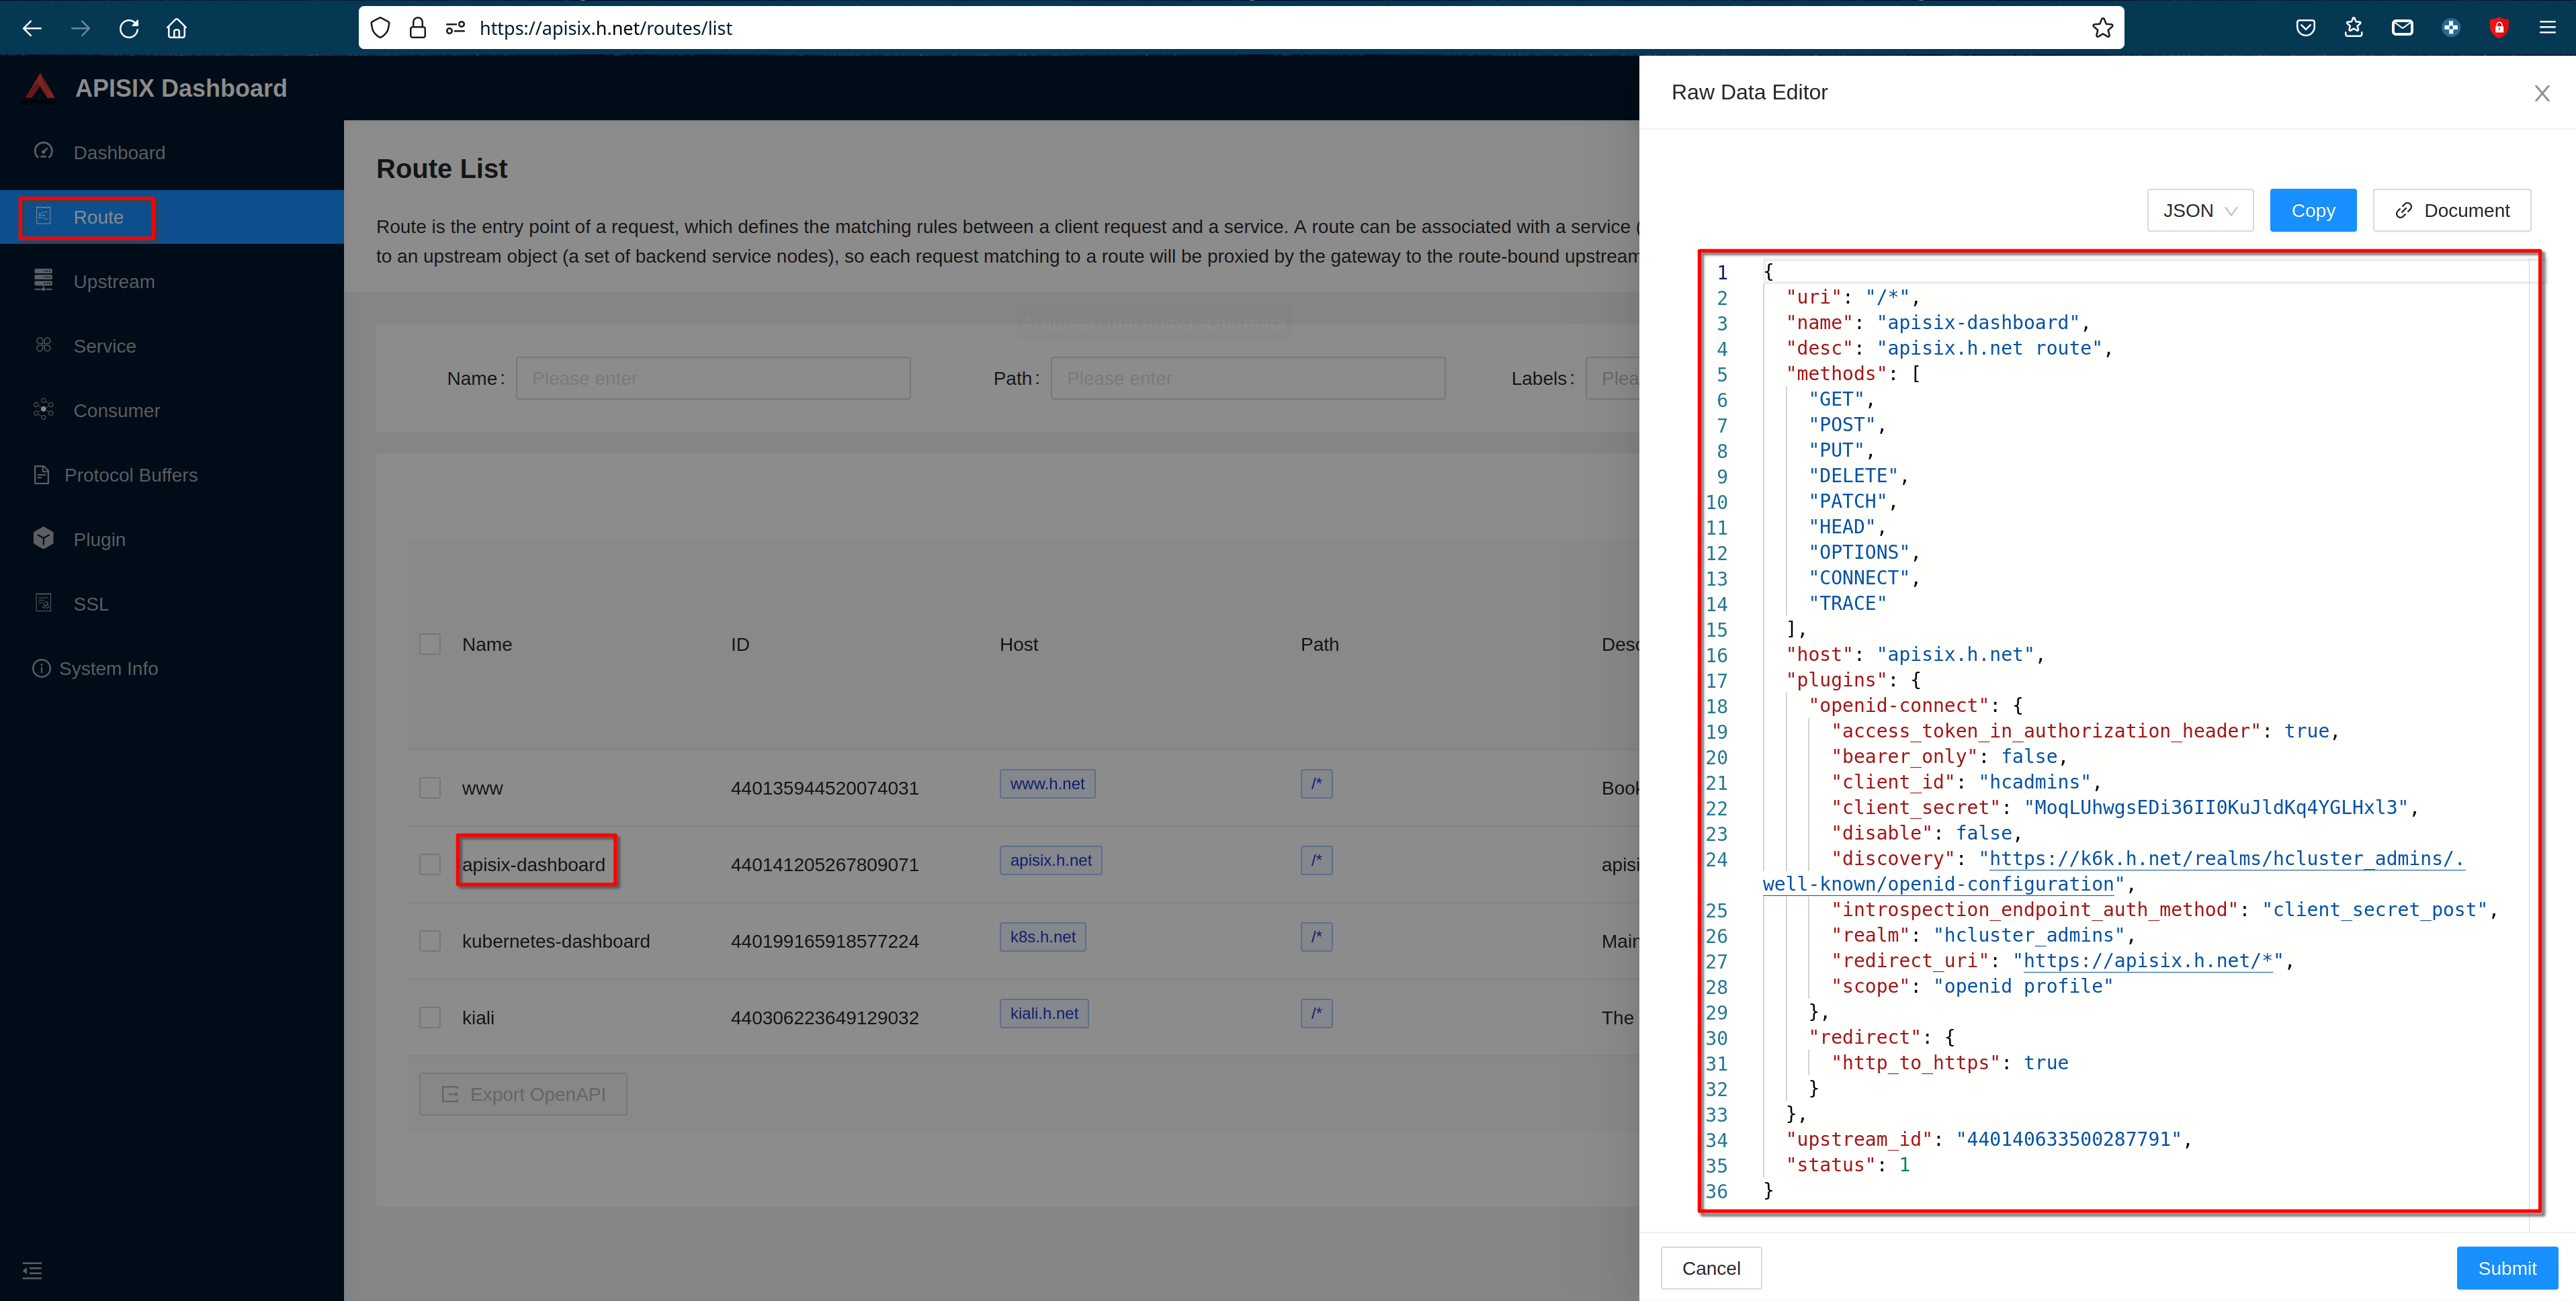
Accessing the Protected APISIX Dashboard Route
Work on any machine
Go to the URL
https://apisix.h.netYou will be redirected to the Keycloak login page for the “HCLUSTER_ADMINS” realm. Login with the previous defined user “hcadmin” / “hcadmin”
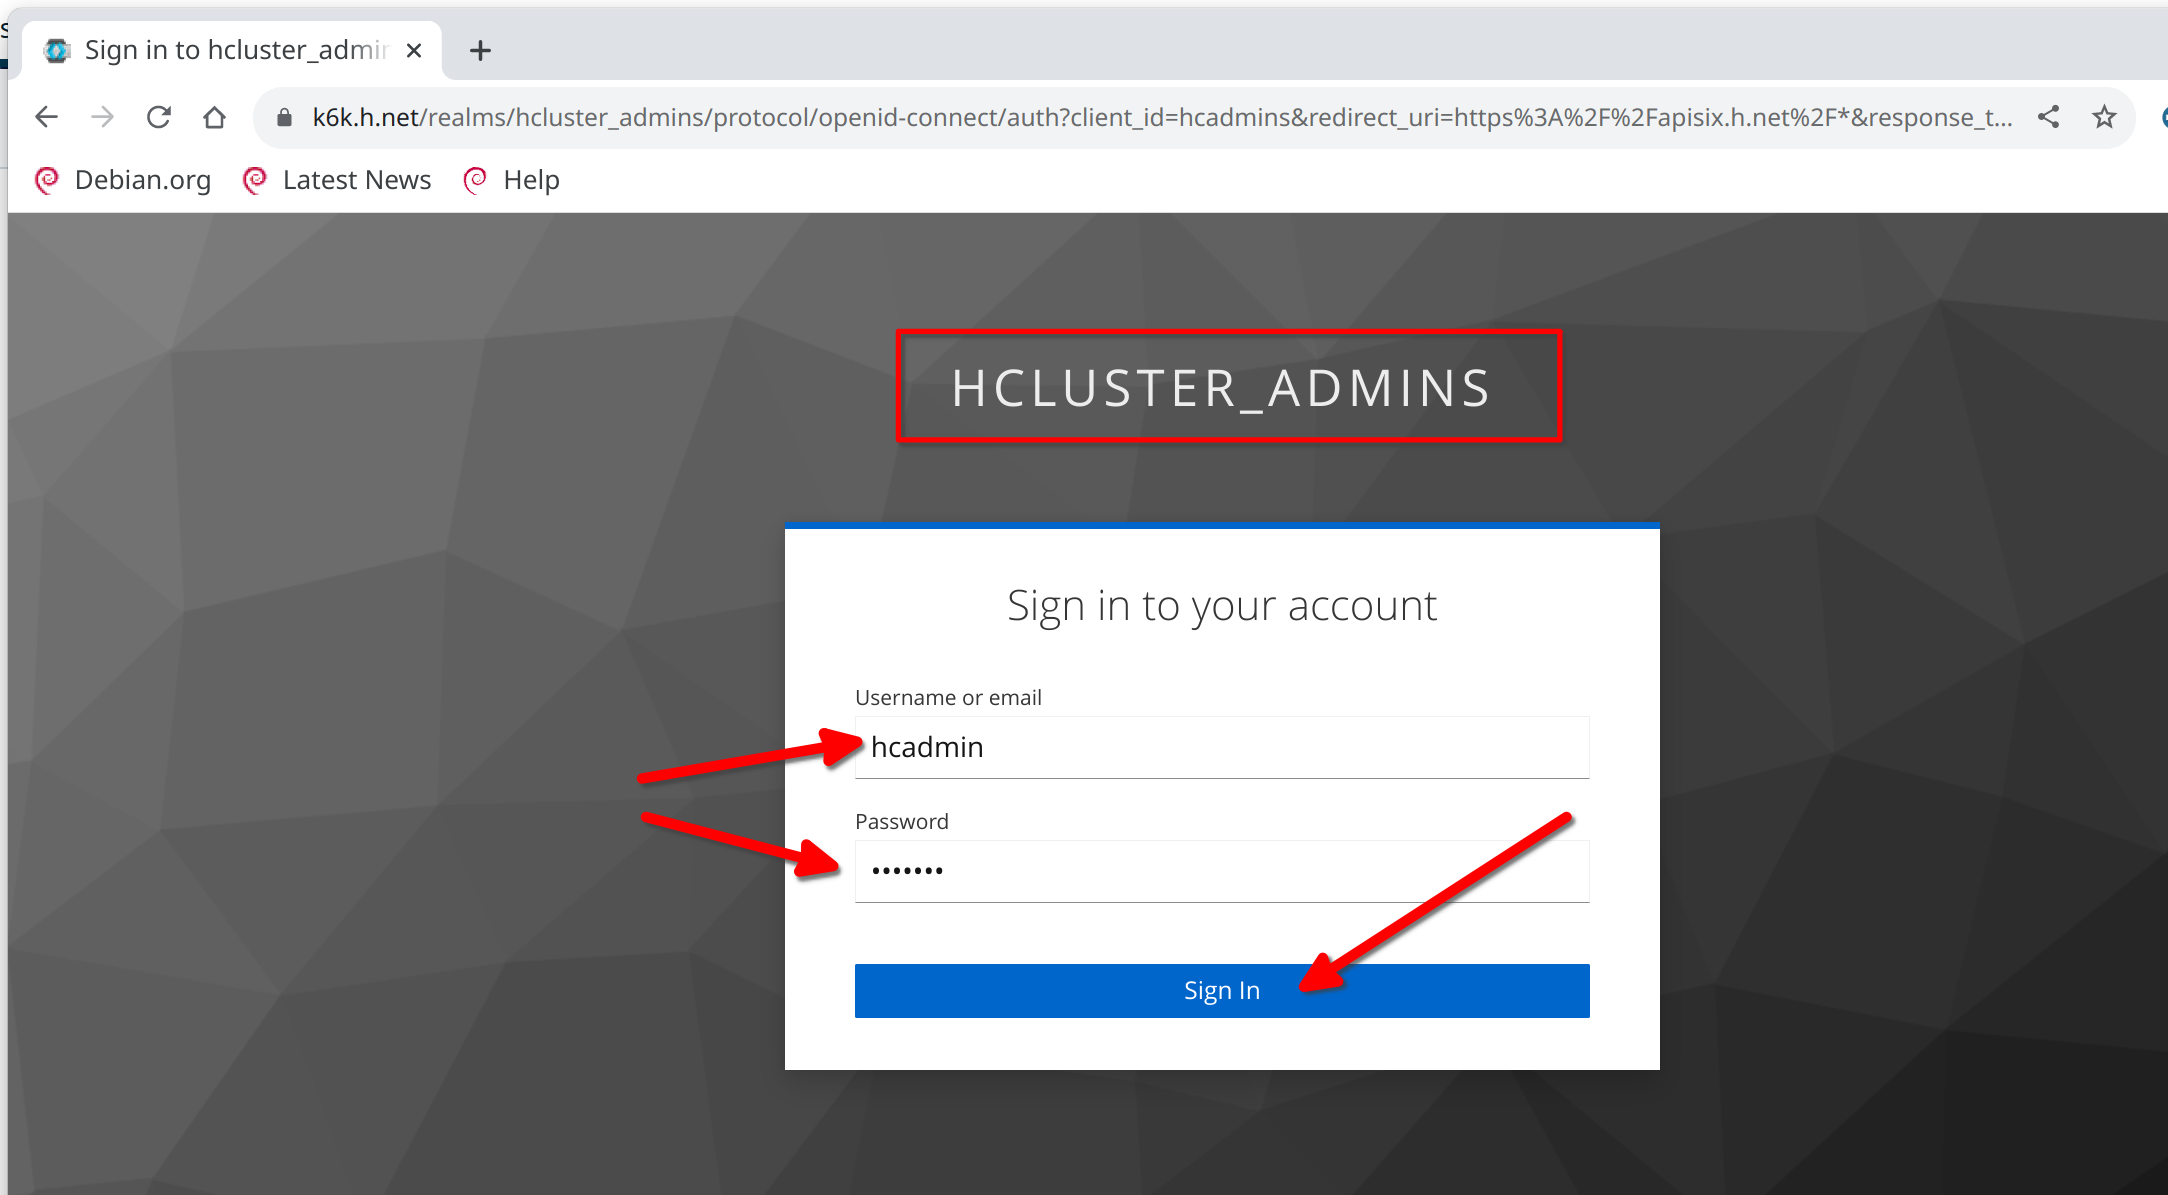
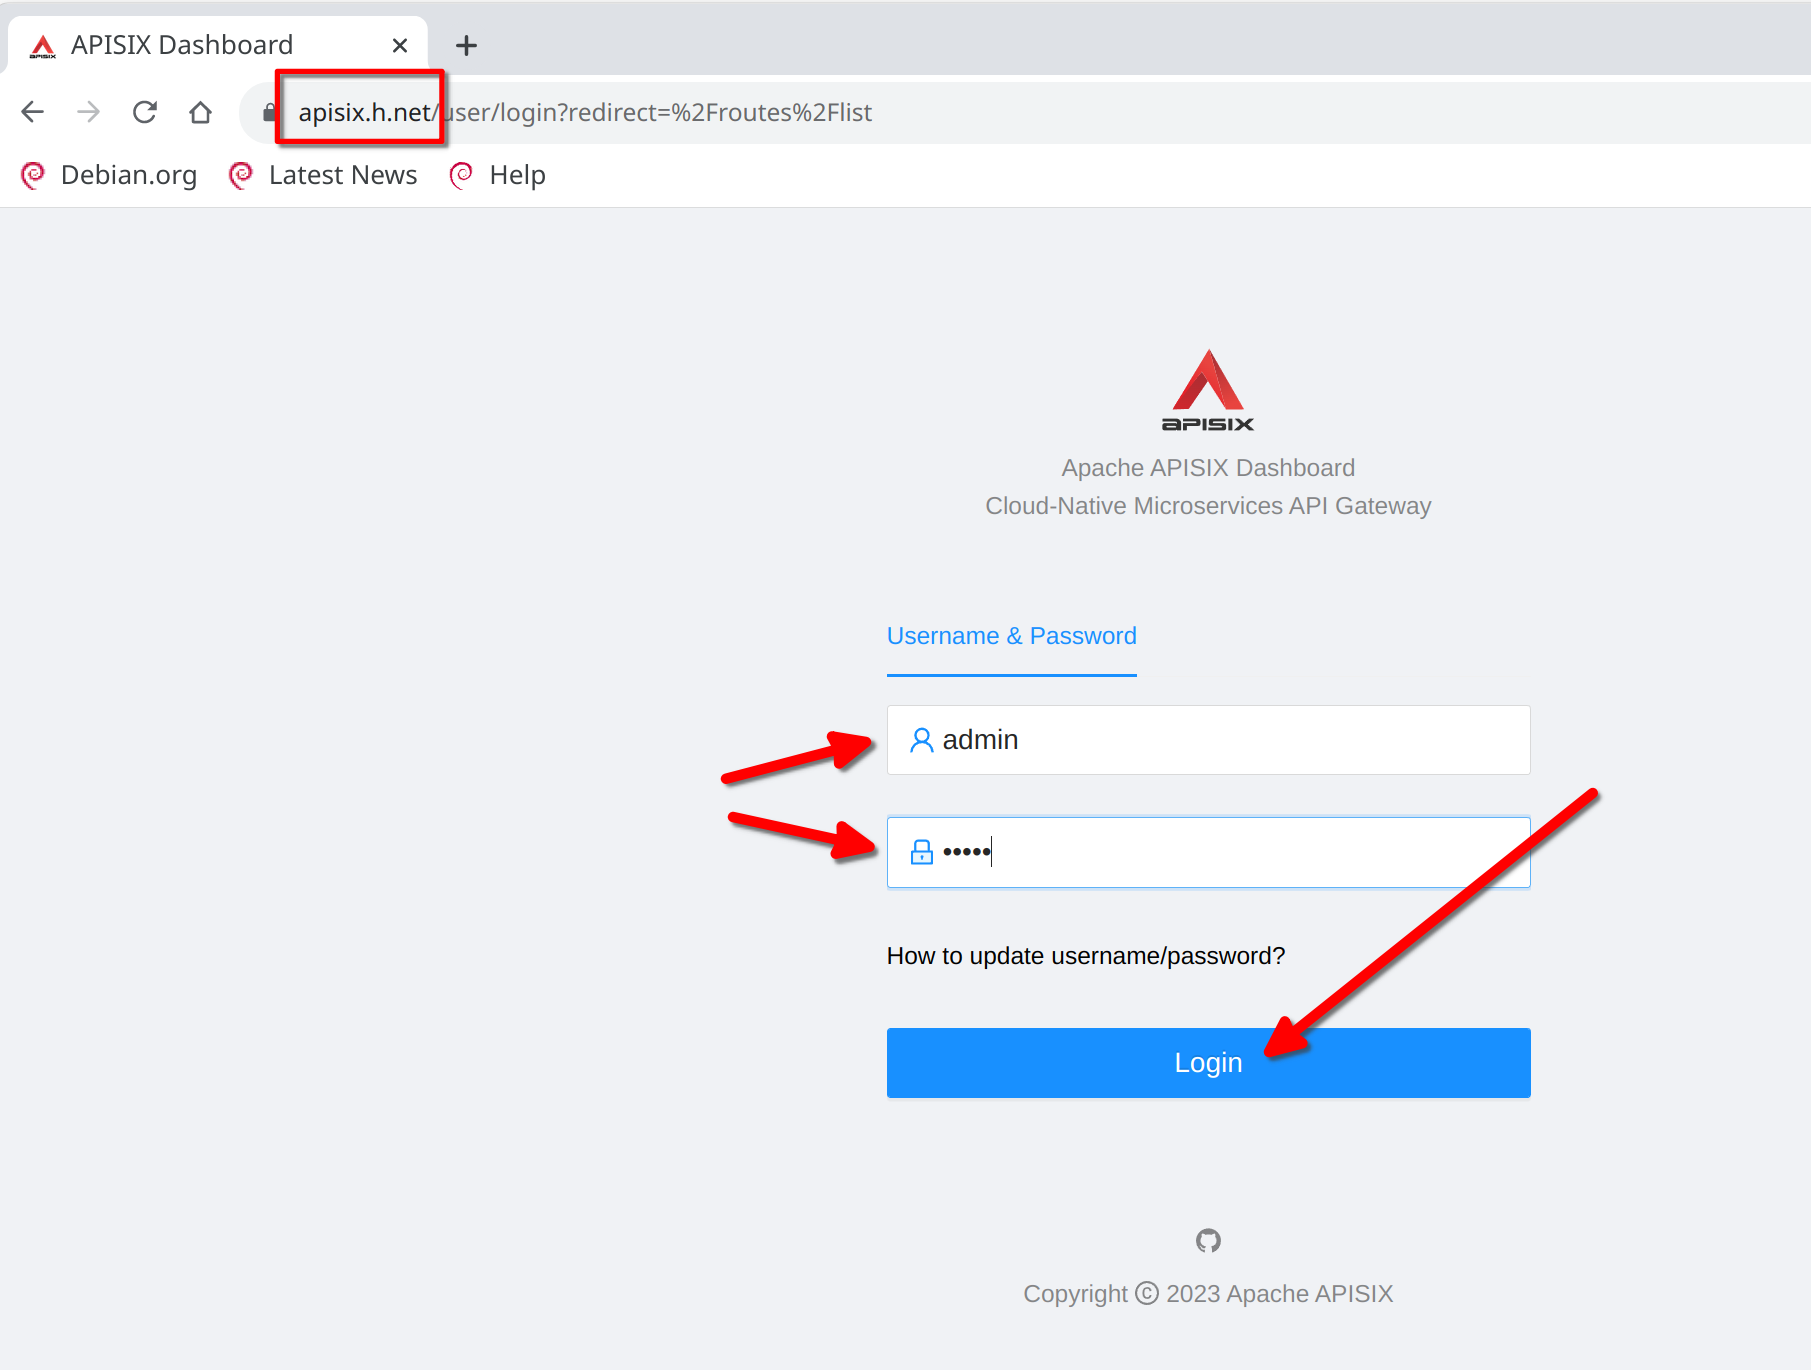
The apisix-dashboard login will be presented. Login with “admin” / “admin”
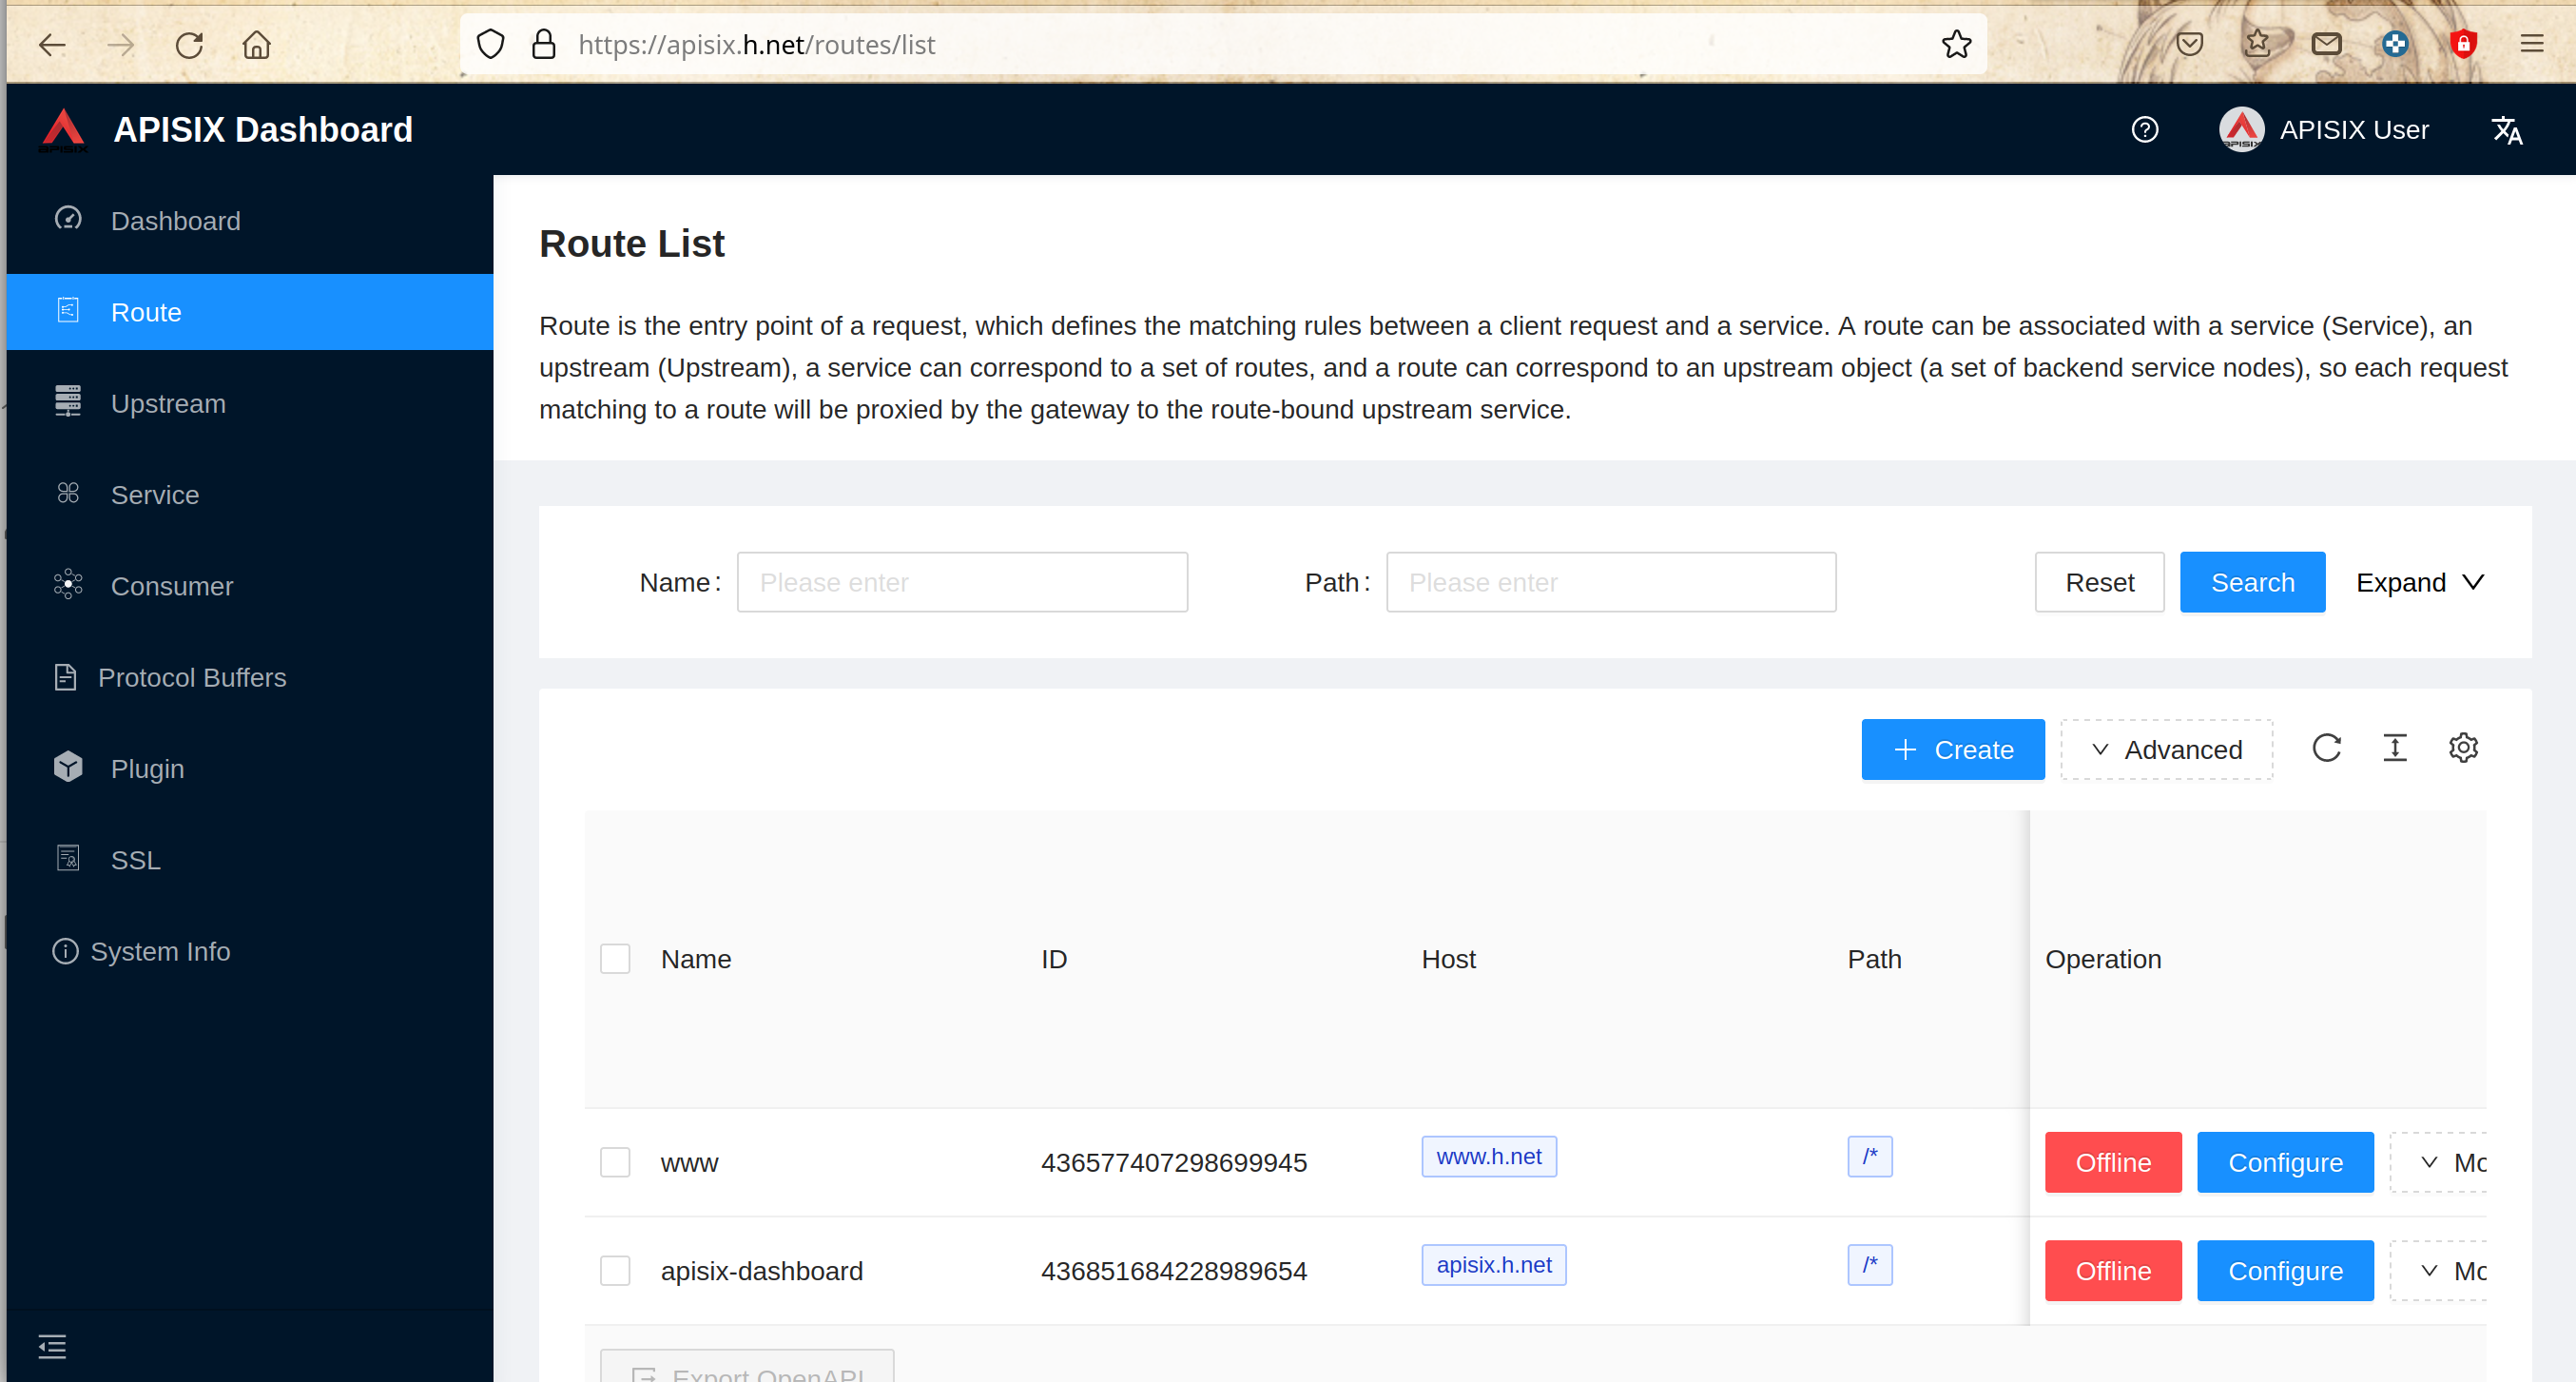
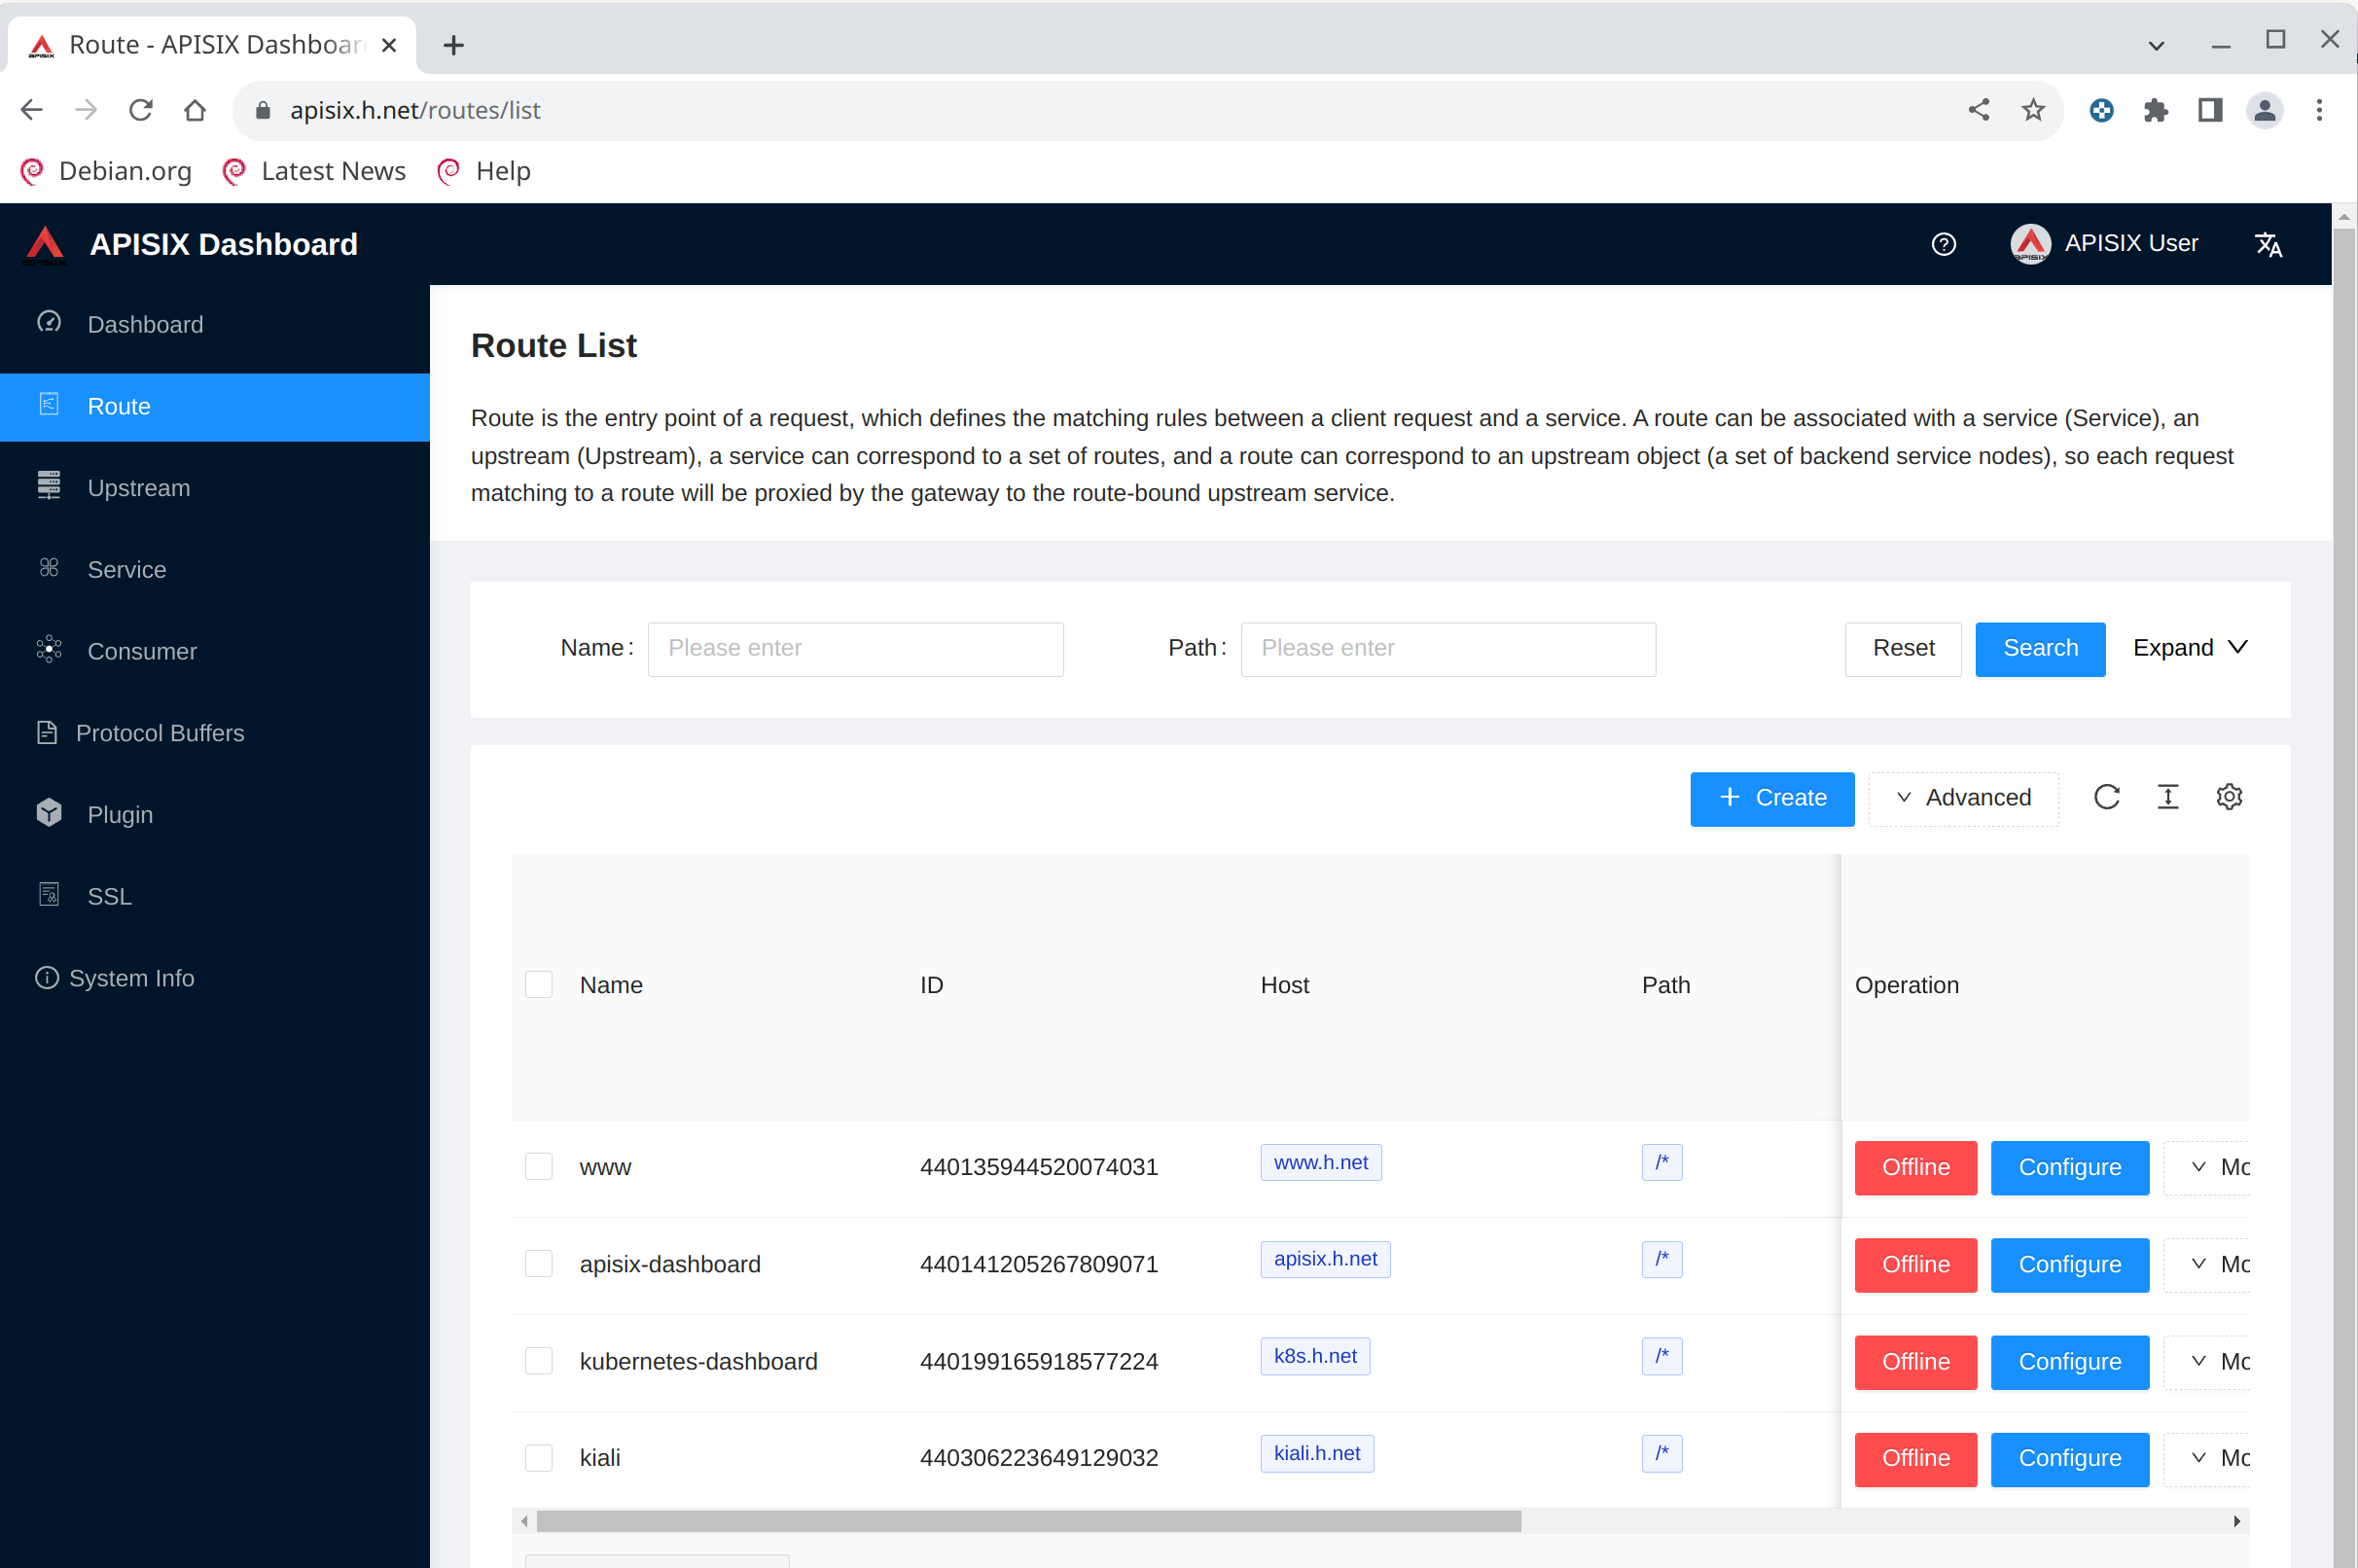
And now you can see the apisix dashboard
Recap
In this article were presented the intruction to:
- set up a Certification authority and create key and certificates for various sites
- set up a nginx server as reverse proxy and load balancer
- set up a Keycloak server accessible through a nginx reverse proxy
- set up Apisix in a kubernetes cluster with ingress-controller and apisix-dashboard
- set up the authentication framework in Keycloak to access the apisix-dashboard
- set up the nginx load balancer for apisix-dashboard inside kubernetes
- set up the apisix resources, including openid-connect plugin, to access the apisix-dashboard with authentication provided by the keycloak server
Note that this set up is only for educational purpose. Do not use in production.